Hello! Kept up on my "job jar" routine all month and it went well. Some of the tasks were quite lengthy and dirty to boot - cleaning windows and woodwork, getting rid of the greasy grime on top of the refrigerator, cleaning a part of the basement that really needed it, and so on.
Some tasks weren't as labor-intensive, like repairing torn pockets in a couple of my husband's pants and doing an easy fix on a chair. Other tasks were of an organizational nature, like decluttering holiday decorations and sorting through recipe clippings.
I was able to help out others by donating to a thrift store, making and sending a gift to an out-of-state friend who needed a boost, writing letters and doing a random act of kindness. That last one was fun to do!
Took time to listen to a relaxation CD, played with a craft kit, made a couple of holiday crafts, and more.
Some of the above tasks, like the chair fix, could have been done months or even years ago, but weren't. Guess they were easy to overlook. Well, overlook no more - the job jar has been a nice little motivational tool!
Thursday, February 28, 2013
Wednesday, February 27, 2013
Snow Business
Hello! We've gotten a serious amount of snow this month, as in probably around 70". I read somewhere that we might have set an all-time record here for snowfall amount in the month of February.
Most of the snow we get is lake effect, which tends to be fluffy and very light. But get enough of it at a time and it can end up being heavy to move around - especially at driveway aprons after the snowplows have come through. The stuff that gets kicked up by the plows is packed down, making it more difficult to get out of the driveway.
And occasionally, like today, we'll get a snowstorm that comes up from the south, which meant the heavy, wet stuff. And of course that meant that the snow that got plowed by the road crew was like concrete to move.
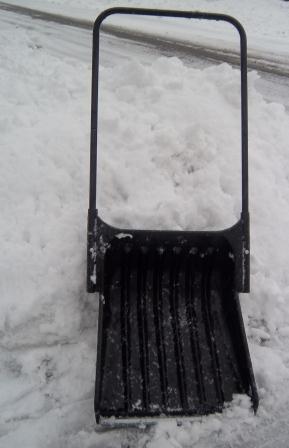
As chief snow shoveler in the family, I had gotten weary of shoveling out those heavy piles of snow at our driveway apron (though of course I am always grateful when the snowplows that come through; they do a great job around here!) So a couple of winters ago I bought this:
 It's Suncast's "Big Scoop" shovel, and I have found that it excels at blasting away the heavy stuff at the driveway apron, and with less strain on the shoulders and back. This morning, in the amount of time that it would have taken me to tackle our driveway apron with a conventional shovel, I was able to do our driveway and a neighbor's.
Thus, I'd say that this shovel is a worthwhile purchase for those who don't own snowblowers. Of course, it could be used for the whole driveway, not just the end, but I happen to live in a neighborhood of narrow lots. Consequently, the Big Scoop is too awkward to navigate on most of our driveway. That's okay; it's earned its keep for how I use it!
I bought the Big Scoop while visiting the other side of the state, so I don't know if it's available in this area. You can find more information on it HERE, though.
(I should add that this is an unsolicited testimonial from me.)
Most of the snow we get is lake effect, which tends to be fluffy and very light. But get enough of it at a time and it can end up being heavy to move around - especially at driveway aprons after the snowplows have come through. The stuff that gets kicked up by the plows is packed down, making it more difficult to get out of the driveway.
And occasionally, like today, we'll get a snowstorm that comes up from the south, which meant the heavy, wet stuff. And of course that meant that the snow that got plowed by the road crew was like concrete to move.
As chief snow shoveler in the family, I had gotten weary of shoveling out those heavy piles of snow at our driveway apron (though of course I am always grateful when the snowplows that come through; they do a great job around here!) So a couple of winters ago I bought this:
Thus, I'd say that this shovel is a worthwhile purchase for those who don't own snowblowers. Of course, it could be used for the whole driveway, not just the end, but I happen to live in a neighborhood of narrow lots. Consequently, the Big Scoop is too awkward to navigate on most of our driveway. That's okay; it's earned its keep for how I use it!
I bought the Big Scoop while visiting the other side of the state, so I don't know if it's available in this area. You can find more information on it HERE, though.
(I should add that this is an unsolicited testimonial from me.)
Sunday, February 24, 2013
Made It - Comfort Dolls Ready To Go!
Hello! Several weeks ago I had blogged about the Comfort Doll Project, as seen HERE. I had set the intention to make 10 dolls to send out for distribution, but got waylaid for awhile in finishing up.
Finally got all 10 done today, so here they are, ready to be shipped out tomorrow:
 I eventually settled on a doll body with a bit of simple patchwork, yo- yo and pompom "hat", felt heart with a vintage button and piece of twill tape stamped with the word "love", bead eyes and embroidered mouth. I worked through a few variations while making the dolls before deciding upon the final look.
I am pleased to report that virtually everything you see on the dolls came from thrift stores. Exceptions to secondhand purchases were the beads and embroidery floss, bought new for previous projects. And a few of the yo-yos came from a retail store that sells secondhand finds for use in arts and crafts projects (I made most of the yo-yos myself).
I had fun picking out the fabrics for each doll; it was a great way to use up some smaller pieces. And it's great to know that my dolls will go to women in domestic abuse shelters. I hope they like their dolls as much as I enjoyed making them - even if it took me awhile to finish!
Finally got all 10 done today, so here they are, ready to be shipped out tomorrow:

I am pleased to report that virtually everything you see on the dolls came from thrift stores. Exceptions to secondhand purchases were the beads and embroidery floss, bought new for previous projects. And a few of the yo-yos came from a retail store that sells secondhand finds for use in arts and crafts projects (I made most of the yo-yos myself).
I had fun picking out the fabrics for each doll; it was a great way to use up some smaller pieces. And it's great to know that my dolls will go to women in domestic abuse shelters. I hope they like their dolls as much as I enjoyed making them - even if it took me awhile to finish!
Saturday, February 23, 2013
Laura Ingalls Wilder and The Long Winter
Hello! After a slow start, winter has ramped up in the area. We've gotten almost 70" snow in the past month. And according to today's Holland Sentinel, another storm is on its way in the coming week.
Yes, it gets tiring shoveling snow, and it's no fun driving on icy roads, but then I remember Laura Ingalls Wilder and her book, The Long Winter, which describes the especially severe winter of 1880-1881 in Dakota Territory (now South Dakota).
If you've never read the book, you might be tempted to say that at least they didn't have to worry about power outages or getting cars stuck in the snow. They could just hitch up their horses to a sleigh to get around. True, but as Laura describes it, the blizzards were so severe and so frequent that people in the town of De Smet, where the book takes place, became too afraid to leave their houses for very long. Without the advantage of street lights and other forms of bright lighting, it was dangerous to even go just across the street during a blizzard!
(Also keep in mind that they endured sub-zero temperatures without the benefit of central heat).
People stored whatever foods they had harvested from their gardens, but they depended on the general stores in the town for foods they couldn't grow or didn't have enough of - sugar, flour and other grains, salt pork, tea, etc. They also needed coal for their stoves and kerosene for their lamps.
In turn, the stores had their goods brought in by the railroad. But a series of blizzards left the railroad line consistently blocked by snowdrifts, so the railroad company made the decision in early January to stop running the trains to the region until spring.
Thus, the rest of the book describes how Laura's family was forced to make do with ever-dwindling supplies. By this point in the book, most of their diet seemed to consist of a bread made from freshly-ground wheat kernels. Nowadays such a bread would be considered a wholesome, natural food, but we would not consider it a well-balanced diet if it made up the majority of our meals.
Laura sometimes comments that she feels "dull and stupid" as she tries to keep up on her schoolwork (the school in town had closed due to a lack of coal). When I first read the book as a kid, I assumed she felt so listless from a lack of stimulation - as in being stuck in the same building for months on end. However, as an adult I now realize that she was undoubtedly malnourished, and that was probably the reason for her listlessness.
But then, as now, winter eventually makes way to spring. When the train finally comes, with supplies and a delayed Christmas barrel full of gifts for Laura's family, a joyous celebration occurs. The very last chapter of the book, "Christmas In May" is such a treat to read, as Laura's family and some good friends feast on a lavish holiday dinner.
My perspective on the book has changed greatly since I was a kid. When I was younger, I thought that the book was incredibly boring - all the family seemed to do was keep track of the blizzards and grind wheat and twist hay into sticks (that's what they burned for fuel when they ran out of coal). But now, as an adult, I am in awe of their resourcefulness and creativity in getting through an incredibly difficult time.
And I realize that our current spell of winter snow is so tame by comparison. Any inconveniences we have due to snow and ice are minor when one considers what Laura's family endured during that long-ago winter.
If you and your children have never read The Long Winter, you owe it to yourselves to find a copy. You will marvel at what Laura's family went through - and will be grateful that our winters are no longer as challenging!
Monday, February 18, 2013
Get Carded - Valentine's Day
Hello! Better late than never, I'll show off the cards I made for my husband and daughter on Valentine's Day.
First up, my husband's Valentine:
 Materials used:
- white card stock
- page torn from a vintage science textbook
- wallpaper sample altered with rubber stamp and paint
- heart shape cut from serendipity paper (the "paper" began as a
vintage restaurant menu)
- vintage button
- "boy" and "fun" cut from 1960's school papers (my husband's)
Close-up detail:

Now on to our daughter's card:

For this card, I used:
- white card stock
- piece of art paper I'd painted
- page torn from vintage science textbook
- hearts cut from serendipity paper (base was a vintage prayer book)
- vintage button
- "dear" cut from 1960's school paper
A detail:

As you can see, I used some of the same elements for both cards (vintage science textbook, school papers); this made crafting easier after a couple of weeks of making Valentine cards and gifts for two dozen + others.
In fact, by the time Valentine's Day had rolled around, I had done enough crafting that my creative well felt rather dry, but I still had to make cards for the two most important people in my life. I feared I couldn't come up with good cards for them - but I think I managed!
First up, my husband's Valentine:

- white card stock
- page torn from a vintage science textbook
- wallpaper sample altered with rubber stamp and paint
- heart shape cut from serendipity paper (the "paper" began as a
vintage restaurant menu)
- vintage button
- "boy" and "fun" cut from 1960's school papers (my husband's)
Close-up detail:

Now on to our daughter's card:

For this card, I used:
- white card stock
- piece of art paper I'd painted
- page torn from vintage science textbook
- hearts cut from serendipity paper (base was a vintage prayer book)
- vintage button
- "dear" cut from 1960's school paper
A detail:

As you can see, I used some of the same elements for both cards (vintage science textbook, school papers); this made crafting easier after a couple of weeks of making Valentine cards and gifts for two dozen + others.
In fact, by the time Valentine's Day had rolled around, I had done enough crafting that my creative well felt rather dry, but I still had to make cards for the two most important people in my life. I feared I couldn't come up with good cards for them - but I think I managed!
Friday, February 15, 2013
Eats - Valentine's Day Dinner
Hello! What do people usually think of when they plan for a Valentine's Day dinner? Making reservations for a night out? Or preparing a special meal at home - something along the lines of steak or shrimp?
How about heart-shaped pizza? I first did this back in our married student housing days at Michigan State in the mid-1980's. A local pizzeria was advertising pizzas thus shaped; I took one look at the ad and said "I can do that at home!" And did so.
(Note: over the years I've seen other pizzerias do the same thing for Valentine's Day; this year I saw Papa Murphy's TV commercials for heart-shaped pizzas).
Almost 30 years and seven residences later, it's obviously a firmly-established tradition. But last night there was something new: our daughter had never been fond of pizza, but more recently has learned to like it enough to eat it on occasion. I asked her if she wanted her own heart-shaped pizza and she said sure.
Here's her pizza:
 Toppings: roasted red bell peppers, black olives and mushrooms
My husband's pizza:
 Toppings: mushrooms and roasted red bell peppers
And mine:
 Broccoli and red bell peppers. Normally I would have used pepperoni or ham instead of broccoli, but Lent has begun and so we don't eat meat on Fridays. Therefore, I made a pizza that would give me planned leftovers for today's lunch.
As you can see, the pizzas aren't exactly perfectly heart-shaped, but close enough. It's not that easy to shape pizza dough into hearts, and the hearts got distorted a bit as they rose further while baking.
I used to use some heart-shaped cake tins that I'd bought at a rummage sale. They were the perfect size, but led to soggy bottom crusts, and who wants that in a pizza? I use baking stones now. The parchment paper on the bottom of my husband's pizza and mine helped in transferring them from the pastry cloth (where the dough was rolled out and shaped) to a large baking stone. I used the pizza disk (the implement with holes in it) to place our daughter's pizza on a round baking stone.
As you can see, they all baked up nicely - and tasted as good as they looked!
How about heart-shaped pizza? I first did this back in our married student housing days at Michigan State in the mid-1980's. A local pizzeria was advertising pizzas thus shaped; I took one look at the ad and said "I can do that at home!" And did so.
(Note: over the years I've seen other pizzerias do the same thing for Valentine's Day; this year I saw Papa Murphy's TV commercials for heart-shaped pizzas).
Almost 30 years and seven residences later, it's obviously a firmly-established tradition. But last night there was something new: our daughter had never been fond of pizza, but more recently has learned to like it enough to eat it on occasion. I asked her if she wanted her own heart-shaped pizza and she said sure.
Here's her pizza:

My husband's pizza:

And mine:

As you can see, the pizzas aren't exactly perfectly heart-shaped, but close enough. It's not that easy to shape pizza dough into hearts, and the hearts got distorted a bit as they rose further while baking.
I used to use some heart-shaped cake tins that I'd bought at a rummage sale. They were the perfect size, but led to soggy bottom crusts, and who wants that in a pizza? I use baking stones now. The parchment paper on the bottom of my husband's pizza and mine helped in transferring them from the pastry cloth (where the dough was rolled out and shaped) to a large baking stone. I used the pizza disk (the implement with holes in it) to place our daughter's pizza on a round baking stone.
As you can see, they all baked up nicely - and tasted as good as they looked!
Wednesday, February 13, 2013
Thrifty Acres - All Dolled Up
Hello! The return trip from an errand yesterday took me right past a thrift store, so of course I stopped in. Pickings looked slim until I glanced at a display shelf near the checkout counter, where I saw this:
 This handmade doll was crafted in the primitive style: her muslin body has painted "shoes", painted hands and forearms, and painted head, neck, hair and face. The body is simply constructed, but the painted hair and face took patience and a steady hand. I'm not a great painter, so I gladly paid the $3.00 to take her home.
She is 17" tall, and I have a doll dress pattern that should work just fine for properly clothing her.
Near this doll was a basket that held several small handmade dolls, each priced at 50c. I selected this one:
 She also has a muslin body, with a face that appears to have been drawn on with marker. The front of her dress looks as if it had been cut from a vintage quilt, with the back of the dress cut from a piece of another fabric. I don't care for the lace trim on the bottom, but that is easily removed.
She's 10" tall, with a stuffed body about half that length. She's already found a place to hang out - the wall of our powder room.
Since this doll and her mates were all made the same way, I wondered if they'd been left over from a craft show. If so, I am sorry they didn't sell for their creator, although I benefited from the lack of sales.
(Note: I should add that in the doll section of the same thrift store were dolls similar to the primitive-style doll in the first photo. These were all dressed, but I didn't care for the dresses they had on. I think it'll be more fun to make a dress with fabric I like better.)
And so yet again, a thrift store surprised me with the unexpected: two styles of handmade dolls made it worth the stop!

She is 17" tall, and I have a doll dress pattern that should work just fine for properly clothing her.
Near this doll was a basket that held several small handmade dolls, each priced at 50c. I selected this one:

She's 10" tall, with a stuffed body about half that length. She's already found a place to hang out - the wall of our powder room.
Since this doll and her mates were all made the same way, I wondered if they'd been left over from a craft show. If so, I am sorry they didn't sell for their creator, although I benefited from the lack of sales.
(Note: I should add that in the doll section of the same thrift store were dolls similar to the primitive-style doll in the first photo. These were all dressed, but I didn't care for the dresses they had on. I think it'll be more fun to make a dress with fabric I like better.)
And so yet again, a thrift store surprised me with the unexpected: two styles of handmade dolls made it worth the stop!
Tuesday, February 12, 2013
Teaching Kindness
Hello! On Tuesdays the weekly edition of American Profile magazine comes with our local paper, and I enjoy reading it. There's at least one item of interest every week, whether it be new recipes, features on various facets of American history, articles about businesses that have stayed in the same families for several generations, and more.
Often there are stories about ordinary folks doing good. Case in point is the article in today's American Profile entitled "Teaching Kindness". The article discusses the Kindness Club at an elementary school in Minnesota, whose members make and distribute greeting cards to those in need. Since the club's beginning in 1995, kids have made more than 47,000 cards - this, from a total of only 316 total students in that time! That is a phenomenal number of cards from such a small group. (the town itself - Evansville, MN - has only 612 residents, according to the article).
Not only have the cards' recipients been grateful for the love and support shown by Kindness Club members, but the kids themselves have benefited. The school teacher who started the club and still runs it reported that former students will stop by to suggest someone who could use a greeting card, and a young woman in her 20's who had been a member of the original club now volunteers for the United Way. The club, she said, "...created an awareness of opportunities to give".
I think this club is such a wonderful thing! The kids are learning kindness and compassion - and who knows, since the cards are handmade, maybe they're also learning that there are alternatives to store-bought things. I don't know how many elementary schools (or other settings where children gather) have similar programs, but in my opinion, every child would benefit by belonging to a Kindness Club. Actually, we adults could use something like this too!
If you don't read American Profile, you can read the article on the Kindness Club HERE.
Saturday, February 9, 2013
Holidays - Simple Gift Wrap
Hello! One thing I enjoy doing is combining humble, inexpensively-purchased items to create attractively-wrapped gifts, such as what I had done earlier today:
 I wrapped a small gift in a square of red tissue paper (purchased at an estate sale), then added a "ribbon" of vintage cotton crochet thread (thrift store find). Lastly, I tucked in a heart shape made of serendipity paper (in this case, a page from an old prayer book, altered with acrylic paint, rubber-stamped designs and bits of a vintage matchbook. The prayer book was another thrift store find and the matchbook from a garage sale run by an antiques dealer).
True, serendipity paper can take a bit of time of make, but I've discovered that it goes pretty quickly when small pieces of paper are used as bases instead of the much bigger road atlas pages I'd been taught. And a little serendipity paper goes a long way, I've found. I like to make several small sheets at a time; then I have them on hand for adding interest to a project.
Or in this case, a small gift package. All told, this was very inexpensive gift wrapping, but I think it turned out nicely.
Friday, February 8, 2013
Made It - More Valentine's Day Crafting
Valentine's Day crafting continues. For the past several years, I've made a stack of greeting cards as part of the nationwide Valentines For Vets program. The cards have gone to a regional VA hospital to be distributed to patients there.
I always enjoy doing this, so I recently gathered up some craft supplies and got busy:
 Above, you see a portion of the decorative elements that will go on the card fronts.
A close-up:
 I altered a vintage trading card with paints and rubber stamping, then glued a stamped heart made from art paper to the trading card piece. I may add further embellishment after gluing the whole piece onto the card front.
Still haven't made any Valentine's Day cards for friends and family, but I made a substitute card for a friend I saw earlier today:
 The above "ensemble" was created with stencils from the Klutz Press kit Paper Fashions Fancy, which I'd gotten at a thrift store. The kit was minus the fancy papers and trims, but the stencils were intact, so I happily paid the 50c price. (brand new, complete, it would retail for $21.95!)
The various shapes, cut from art paper scraps, were glued onto a matboard piece from the creative reuse store Learning From Scratch.
Not a bad substitute for a greeting card, I think!
I always enjoy doing this, so I recently gathered up some craft supplies and got busy:

A close-up:

Still haven't made any Valentine's Day cards for friends and family, but I made a substitute card for a friend I saw earlier today:

The various shapes, cut from art paper scraps, were glued onto a matboard piece from the creative reuse store Learning From Scratch.
Not a bad substitute for a greeting card, I think!
Tuesday, February 5, 2013
Made It - Let The Valentine's Day Crafting Begin!
Hello! I'm behind on my Valentine's Day crafting, due in part to some home repair projects that took nearly a month to complete. But when I saw the following at the thrift store last week, I knew it'd be good for Valentine's Day projects:

This is 21" square, so I suppose it's a scarf. The label states that it is 100% cotton and was made in Japan. The flower design of the border does seem Japanese, I think.
Not sure of its age, but I'd guess 1960's or 1970's. I paid a quarter for it.
The cotton is thin and soft, so I wasn't sure how well it would sew up, but I had no trouble making this:
 This stuffed heart is about 4" high and 4" wide. It is simply trimmed with a piece of vintage rickrack, a piece of stamped twill tape and a vintage button.
I gave it to a friend I saw earlier today for, as I admitted, I may not get around to making her a Valentine's Day card this year. This handmade heart could take its place.
She was happy with her heart, and I was happy to make it for her!

This is 21" square, so I suppose it's a scarf. The label states that it is 100% cotton and was made in Japan. The flower design of the border does seem Japanese, I think.
Not sure of its age, but I'd guess 1960's or 1970's. I paid a quarter for it.
The cotton is thin and soft, so I wasn't sure how well it would sew up, but I had no trouble making this:

I gave it to a friend I saw earlier today for, as I admitted, I may not get around to making her a Valentine's Day card this year. This handmade heart could take its place.
She was happy with her heart, and I was happy to make it for her!
Saturday, February 2, 2013
Made It - Super Simple Scarf
Hello! We'd just returned from an out-of-town trip earlier today when my husband noticed that he'd forgotten his scarf somewhere. He'd be needing another scarf ASAP; did we run out to a store to buy one? No, I headed to my polar fleece stash to make another version of the scarf he'd left behind.
In a couple of minutes, my husband had a new scarf - and this included the time it took to go down to the basement and hunt around in the container that holds polar fleece pieces. Yes, it was that easy, thanks to these instructions:
Super Easy To Make Scarf
Purchase 1/4 yard polar fleece. Cut off both selvedges. Put scarf around neck and cut to the length you like. If desired, cut fringe on both ends - polar fleece does not ravel.
(Note: instructions are courtesy of Field's Fabrics in Holland, MI, though I don't know if this project originated with them. Field's has a rack of patterns/instructions free for the taking).
See what I mean by easy?
Subscribe to:
Posts (Atom)