Hello! With September drawing to a close, it's time for my monthly Job Jar update.
It appears that most of my tasks involved cleaning and decluttering this month - well, that's one way to get things done around here! I tackled the dirtiest room in the house - the basement - and also washed windows outside. Cleaned woodwork, the stove, decluttered the messiest closet in the house as well as the messiest cabinet. Also kept up on the filing and shredding of papers. Yes, there was some dirty, messy, sometimes tiring work, but it was a good feeling to complete the heavy-duty chores.
I made a treat to give to our daughter, worked with my camera manual, did some birdwatching in a county park I'd never been to before, and did yoga.
I carved a rubber stamp, made some holiday crafts, dug out a craft kit I hadn't used in a long time (and decided there was a reason I hadn't used it in a long time; it's on its way to a thrift store), and used stencils to create fall decorations and greeting card designs.
As has been the case in previous months, there was a good mix of work and play involved throughout this month. Keeps things interesting - and balanced too.
Monday, September 30, 2013
Sunday, September 29, 2013
Prepare To Be Amused!
Hello! If you came of age in the 1970's - or even if you didn't - you will likely be amused by the Plaid Stallions blog, which has the stated mission of "Reliving the 70s a catalog page at a time".
If you go to the blog's home page, you'll see a number of buttons on the right-hand side, each pertaining, of course, to a different subject - toys, holidays, flea market finds, and so on. There's a guaranteed trip down Memory Lane!
But my two favorite categories on this blog are entitled "Fashion Mockery" and "Awkward!" The fashions of the 1970's certainly deserve to be mocked, and what's more, Plaid Stallions shows off the most mind-numbingly, bizarre fashions ever! Just check out the posts in the Fashion Mockery section from Sept. 16th and 18th to see what I mean. My jaw dropped when I saw these entries.
According to the blog, "Awkward!" refers to awkward catalog poses, but features fashions worthy of mockery as well.
If you'd like to read Plaid Stallions, check it out HERE.
Wednesday, September 25, 2013
AAUW's Annual Used Book Sale Returns This Weekend
Hello! Perhaps you've seen the TV commercial in which a young woman perkily proclaims that a sale being run by an eyeglass chain is her favorite sale of the year.
Now, I've worn glasses for most of my life, but I would never get that excited about an eyeglass sale! The notice in the local paper today about the upcoming annual AAUW used book sale is more to my liking. And I know I'm not alone - in years past, a line formed outside before the doors opened, and it can be a mob scene the first hour or two of the sale!
Prices are generally very good and with donations of reading material dropped off for months in advance of the sale, there's something for everyone.
The details: the AAUW used book sale will be held at the Holland Civic Center. The sale opens this Friday, Sept. 27th, from 4-9, but for a $20 fee (non-refundable), shoppers can enter the sale at 3.
The sale continues on Saturday the 28th, from 9-4. And starting at 12:30 that day, shoppers can fill a bag for $5.00. One may think there'd be nothing good left that late in the sale, but that's not the case, at least not in my experience. I'm currently using a fitness book I grabbed a few years back during the fill-a-bag time, and a Christmas cookbook I bought at last year's bag sale yielded a special recipe I liked so much that making it will likely become an annual holiday tradition.
So, if you like to read and have some time to spare Friday evening or Saturday, go to the AAUW used book sale and see what you can find! Proceeds from the book sale go to local nonprofits and scholarships, so your purchase will help others as well.
Monday, September 23, 2013
Eats - Mackinac Fudge
Hello! You know what they say about all work and no play, so when I created my job jar system for this year, I made sure to include fun activities as well as chores.
Early this morning, I drew the job jar tag that read "make candy". Definitely fun!
Went through my recipes and eventually settled on one called Mackinac Fudge. It's named in honor of one of Michigan's most famous tourist destinations, Mackinac Island. Knowing that the island is known for its fudge (and rightfully so; I've had it), I thought this would be worth a try.
The recipe is basically a variation of those Fantasy Fudge-type recipes, the kind that use a marshmallow product and chocolate chips. This particular recipe calls for large marshmallows and two ounces of unsweetened chocolate along with milk chocolate chips and semi-sweet chocolate chips. That addition of unsweetened chocolate intrigued me, as I don't think I'd ever seen that ingredient used in this type of fudge before. Usually chocolate chips (or the other flavored baking chips) and other forms of sweetened chocolate are indicated.
I followed the recipe to the letter with one big exception: it calls for one full cup of butter (two sticks), but I decided to try it using half that amount. A number of years ago, I had made a similar, even richer, fudge recipe. It also had a cup of butter in it, and I used that amount. But I thought the finished product was, well, too buttery. So I decided to use less butter this time and see how the fudge turned out.
 I'd say it turned out well! That's about three pounds of fudge right there! Shortly after this picture was taken, I gave some of it to our neighbors, and will mail some to an out-of-town relative too. This fudge turned out rather firm (perhaps because of using less butter?), so I think it'll mail pretty well.
As for the taste? I can't say if it actually tastes much like Mackinac Island fudge, since I always buy the maple-nut fudge when I'm there. My batch has a somewhat mild chocolate taste, but I liked the added depth of flavor that the unsweetened chocolate gave. And as for the missing butter, this fudge is plenty rich without it! But next time I might go for a compromise and try 1 1/2 sticks.
This was easy to prepare and very good. I don't make fudge very often, but this recipe was worth trying. If you'd like to try it yourself, here's the RECIPE.
Early this morning, I drew the job jar tag that read "make candy". Definitely fun!
Went through my recipes and eventually settled on one called Mackinac Fudge. It's named in honor of one of Michigan's most famous tourist destinations, Mackinac Island. Knowing that the island is known for its fudge (and rightfully so; I've had it), I thought this would be worth a try.
The recipe is basically a variation of those Fantasy Fudge-type recipes, the kind that use a marshmallow product and chocolate chips. This particular recipe calls for large marshmallows and two ounces of unsweetened chocolate along with milk chocolate chips and semi-sweet chocolate chips. That addition of unsweetened chocolate intrigued me, as I don't think I'd ever seen that ingredient used in this type of fudge before. Usually chocolate chips (or the other flavored baking chips) and other forms of sweetened chocolate are indicated.
I followed the recipe to the letter with one big exception: it calls for one full cup of butter (two sticks), but I decided to try it using half that amount. A number of years ago, I had made a similar, even richer, fudge recipe. It also had a cup of butter in it, and I used that amount. But I thought the finished product was, well, too buttery. So I decided to use less butter this time and see how the fudge turned out.

As for the taste? I can't say if it actually tastes much like Mackinac Island fudge, since I always buy the maple-nut fudge when I'm there. My batch has a somewhat mild chocolate taste, but I liked the added depth of flavor that the unsweetened chocolate gave. And as for the missing butter, this fudge is plenty rich without it! But next time I might go for a compromise and try 1 1/2 sticks.
This was easy to prepare and very good. I don't make fudge very often, but this recipe was worth trying. If you'd like to try it yourself, here's the RECIPE.
Sunday, September 22, 2013
Made It: Fall Leaves
Hello! When our daughter was younger, I used many a stencil set to do arts and crafts with her.
Well, she's now grown up and the years of doing arts and crafts together are past. I still like using stencils, though. But instead of buying them at the kids' crafts section of toy stores, I now cruise thrift store aisles.
I've found a variety of stencils this way, from a great set meant to be used in scrapbooking to vintage sets like this:
 In this case, "Contemporary" meant the 1950's. There's a variety of stencils in the package, ranging from Biblical figures, of course, to holiday and seasonal shapes. And with today being the first day of fall, I pulled out the two leaf stencils to make some simple decorations.
I thought I came up with a good idea for the paper to use for the leaves: a page from my 1967 The World Book Atlas, another thrift store find. (I have an affection for vintage World Book products, since my parents had their encyclopedia set when I was growing up, and I pored over it often then).
Why did I choose an atlas page? Well, if a given country/state/province has a variation in topography, then the colors on its page vary from greens to yellows to oranges - in short, similar in feel to the coloring of the changing leaves this time of year.
I used the page from France and here's what my leaves look like:
 Above, an assortment of leaves, with the middle one singled out to be used on my fall weathergram.
Close-up of some of the leaves:
 If I'd picked the page that shows western Canada, I would have brighter yellows and oranges due to the higher elevations being depicted. I still like my French leaves though.
Like I said, this was a simple craft - but sometimes simple is good!
I'll assemble the fall weathergram later on today. If you'd like to make your own to usher in the season, look HERE.
Well, she's now grown up and the years of doing arts and crafts together are past. I still like using stencils, though. But instead of buying them at the kids' crafts section of toy stores, I now cruise thrift store aisles.
I've found a variety of stencils this way, from a great set meant to be used in scrapbooking to vintage sets like this:

I thought I came up with a good idea for the paper to use for the leaves: a page from my 1967 The World Book Atlas, another thrift store find. (I have an affection for vintage World Book products, since my parents had their encyclopedia set when I was growing up, and I pored over it often then).
Why did I choose an atlas page? Well, if a given country/state/province has a variation in topography, then the colors on its page vary from greens to yellows to oranges - in short, similar in feel to the coloring of the changing leaves this time of year.
I used the page from France and here's what my leaves look like:

Close-up of some of the leaves:

Like I said, this was a simple craft - but sometimes simple is good!
I'll assemble the fall weathergram later on today. If you'd like to make your own to usher in the season, look HERE.
Friday, September 20, 2013
Made It - Solid Bath Sugar Scrub
Hello! The friend who recently gave me some cake flour in advance of her overseas move also gave me a large quantity of melt-and-pour soap bases. I've dabbled in this form of soap-making in the past, and now it looks like I'll be dabbling a lot more!
I decided to search brambleberry.com for ideas, as this company sells the soap bases that were now in my possession. There, I came across a link to teachsoap.com, and this site had a recipe entitled Solid Bath Sugar Scrub. It sounded very easy and I had everything on hand. Within minutes I had a nice little supply of solid bath sugar scrubs ready to use. Here are a few:
 The instructions called for making the batch in three different colors, red, white and blue. I made 1/3 of the recipe and used no colorant. I added orange essential oil. Among the suggested skin-softening oils listed in the recipe, I used olive oil.
I also didn't have a suitable soap mold; the cubes are supposed to be single-use per portion and the few soap molds I have on hand were too big for this purpose. I did, however, have an old ice cube tray and that worked fine.
Maybe it's me, but I didn't use all of one scrub in one shower. I did feel my skin was softer after use, though, so I was glad I tried this recipe.
I also decided to put one of the cubes in a small unbreakable jar and leave it at my kitchen sink. Between cooking, cleaning, yardwork, caring for our cat, and yes, even crafting, I wash my hands a lot! And because of this, they can get very dry, especially in the winter. But now I can use this scrub to smooth and moisturize my hands at the same time. (Since there isn't a lot of soap in the recipe, I still wash my hands first with my liquid hand soap, then use the scrub.)
A few years back, I was given a jar of commercially-produced hand scrub. It was nice, but left so much oily residue on my hands that I had to remove the excess oil with a cloth. Not so with this recipe - no icky residue, just a nice softness.
If you happen to have some melt-and-pour soap base lying around and want to try making your own solid bath sugar cubes, you can find the recipe HERE. I found it well worth the minimal time and effort that it took to make these, and you may as well.
I decided to search brambleberry.com for ideas, as this company sells the soap bases that were now in my possession. There, I came across a link to teachsoap.com, and this site had a recipe entitled Solid Bath Sugar Scrub. It sounded very easy and I had everything on hand. Within minutes I had a nice little supply of solid bath sugar scrubs ready to use. Here are a few:

I also didn't have a suitable soap mold; the cubes are supposed to be single-use per portion and the few soap molds I have on hand were too big for this purpose. I did, however, have an old ice cube tray and that worked fine.
Maybe it's me, but I didn't use all of one scrub in one shower. I did feel my skin was softer after use, though, so I was glad I tried this recipe.
I also decided to put one of the cubes in a small unbreakable jar and leave it at my kitchen sink. Between cooking, cleaning, yardwork, caring for our cat, and yes, even crafting, I wash my hands a lot! And because of this, they can get very dry, especially in the winter. But now I can use this scrub to smooth and moisturize my hands at the same time. (Since there isn't a lot of soap in the recipe, I still wash my hands first with my liquid hand soap, then use the scrub.)
A few years back, I was given a jar of commercially-produced hand scrub. It was nice, but left so much oily residue on my hands that I had to remove the excess oil with a cloth. Not so with this recipe - no icky residue, just a nice softness.
If you happen to have some melt-and-pour soap base lying around and want to try making your own solid bath sugar cubes, you can find the recipe HERE. I found it well worth the minimal time and effort that it took to make these, and you may as well.
Wednesday, September 18, 2013
Thrifty Acres - Ode To Summer
Yes, I know the first day of fall is fast approaching, and I know pumpkins, apples and other cool-weather crops are showing up at the local farmer's market, but it feels more like summer today. It's pleasantly warm and sunny outside, I had a BLT for lunch - made with locally-grown lettuce and my home-grown tomato - and I made coffee ice cream for my husband to have for dessert after dinner tonight.
And my ode to summer continues with this:
 This delightful (to me, anyway) cookbook was published in 1961 and is loaded with terrific illustrations, photos, information and recipes.
Never had given it any thought before, but I learned in this cookbook that gas grills hadn't been invented yet - wood, charcoal and coal reigned. "Bottled and canned fuels are for use in camp stoves only" Betty Crocker explains.
Nevertheless, there are two full pages of grills, one of which I hadn't heard of before:

"Vertical grills are forging ahead fast in popularity" the cookbook informs us, but not only were they unfamiliar to me, an Internet search turned up nothing that looked like this.
Here's how one looked like in action:
 Those are some yummy shish kabobs there!
Also unfamiliar to me is this grill:
 I couldn't figure out what kind of grill this was, only that I'd never seen one like it before. That's foil-wrapped submarine sandwiches cooking over the coals.
This illustrations highlights that outdoor cooking is for everyone:
 From left to right, you've got a young man cooking burgers on a small, basic grill, an established Man of Suburbia grilling steak on a larger grill, and a member of the Upper Class basting his rotisserie poultry on the behemoth grill of the era. Like I said, something for everyone!
Now on to the food! One of the many themed menus from this cookbook:
 In previous posts about vintage cookbooks, I've discussed the making of rather formal food for informal settings, and this cookbook is no exception. I admit, I'm not a camper, so I don't know if anyone still fixes meals like this when they camp. However, I do like the dessert advice Betty Crocker offers: "...be sure to explore "Cake Sale" signs outside of churches. I never miss one if I can help it...you have the double reward of aiding a good cause and finding a superb homemade dessert without trouble." Indeed!
 I suppose that the inclusion of grilled pork chops is what makes this breakfast "Midwest". Pork is very popular in Indiana, Illinois and Iowa, and I've had excellent pork ribs and tenderloin sandwiches in those three states. But for breakfast, I'd just as soon have bacon or sausage for my pig meat. This menu is in the section entitled "Breakfast Cookouts".
 The above menu is clearly for the gourmand; perhaps it's meant for the rotisserie-poultry gent I showed off earlier in this post. But with the exception of watermelon pickles (have never had them, so I don't know what they taste like), I'd like this menu too - even though I'm no gourmand.
 This picnic menu sounds great, and it looks great too:
 I don't know what the colored sandwich wrapping was made of, but I like it! 16 different sandwich filling suggestions were given.
Perhaps you'd rather eat outdoors without having to pack up your car. So, have a Terrace Barbeque:


 Looks like a glorious spread, doesn't it? The first photo shows off Whole Barbequed Turkey, Stuffed Acorn Squash, and a Tossed Salad with Cauliflowerets.
The middle photo includes fresh fruit (arranged in a container shaped like a giant shell!), Chocolate Butter-Mallow Cake and coffee. The mugs have names of the attendees on them.
The last photo shows Poppy Seed Rolls being warmed up on the grill.
Hmm...grilled turkey, acorn squash, cauliflower and hot coffee - sounds like a menu more for fall than for summer, doesn't it? And here I was, trying to hold onto the illusion of summer for a little while longer yet!
But never fear, outdoor cooking can be done in the fall as well:
 Even though I mourn the end of summer, I love this illustration of a man flipping pancakes over a campfire, with a pot of coffee brewing next to his skillet.
My copy of Betty Crocker's Outdoor Cook Book was rather beat up, so it was a very inexpensive thrift store find. But if you like vintage cookbooks of the same era, I think you'll be pleased if you come across a copy of this publication for yourself!
And my ode to summer continues with this:

Never had given it any thought before, but I learned in this cookbook that gas grills hadn't been invented yet - wood, charcoal and coal reigned. "Bottled and canned fuels are for use in camp stoves only" Betty Crocker explains.
Nevertheless, there are two full pages of grills, one of which I hadn't heard of before:

"Vertical grills are forging ahead fast in popularity" the cookbook informs us, but not only were they unfamiliar to me, an Internet search turned up nothing that looked like this.
Here's how one looked like in action:

Also unfamiliar to me is this grill:

This illustrations highlights that outdoor cooking is for everyone:

Now on to the food! One of the many themed menus from this cookbook:


Perhaps you'd rather eat outdoors without having to pack up your car. So, have a Terrace Barbeque:


The middle photo includes fresh fruit (arranged in a container shaped like a giant shell!), Chocolate Butter-Mallow Cake and coffee. The mugs have names of the attendees on them.
The last photo shows Poppy Seed Rolls being warmed up on the grill.
Hmm...grilled turkey, acorn squash, cauliflower and hot coffee - sounds like a menu more for fall than for summer, doesn't it? And here I was, trying to hold onto the illusion of summer for a little while longer yet!
But never fear, outdoor cooking can be done in the fall as well:

My copy of Betty Crocker's Outdoor Cook Book was rather beat up, so it was a very inexpensive thrift store find. But if you like vintage cookbooks of the same era, I think you'll be pleased if you come across a copy of this publication for yourself!
Sunday, September 15, 2013
Eats - Tomato Concentrate
Hello! I admit, I get a little tomato-crazy during the growing season - not only do I grow cherry tomatoes(for salads and snacking) and beefsteak types (for sandwiches), I also buy Romas and canning tomatoes to cook into various concoctions.
On Monday I showed what I'd made with some Romas I'd bought, and today I'll discuss what I did with some canning tomatoes.
At some time or another I'd picked up an old Mother Earth News magazine (old, as in November/December 1975)and took note of the recipe for tomato concentrate. Seven recipes using the concentrate were also included. It didn't look too hard, so shortly after lunch I began making this recipe. It was a bit chilly and overcast today, so this was a good indoor task.
 This is at the beginning - tomatoes, onions and celery and a bit of parsley (plus a small muslin bag of bay leaves and whole cloves) will be brought to a boil and cooked until tender.
See those large chunks of celery? Those big pieces turned out to be a big mistake! The recipe didn't say anything about how to cut up the celery, so I left it in those large chunks. Well, some time later the tomatoes and onions were tender, but most of the celery still was about as hard as when I'd started. I eventually fished it out of the pot and cut it up into much smaller pieces. This did the trick, so take it from me, if you want to try this recipe, cut up your celery smaller than what you see above!
 Here, the vegetables are finally all tender, and the mixture has reduced quite a bit in volume.
At this point, according to the recipe, the mixture is to be put through a food mill - for one thing, the tomato skins had been left on. I have a powerful blender (a Vitamix), so I just pureed the mixture as is. (of course, I took that muslin bag of seasonings out first!) Not only is this easier, but the resulting concentrate has more fiber and nutrients in it as well.
One last cooking step: a paste of flour, butter and salt is made, stirred into the pot, and then the concentrate is brought to a boil. Here is the end result:
 It is, indeed, quite thick - I got a bit of a workout stirring it at this stage. But since it is so thick, it had to be stirred constantly to avoid sticking. This step didn't take very long, however.
The recipe calls for canning the finished product, but as I said in a recent post, I'm not a canner, so I will freeze my concentrate. The recipes using the concentrate all call for a pint of it, so I'll freeze mine in this amount.
This recipe is still available on the Mother Earth News website, so you can find it here.
On Monday I showed what I'd made with some Romas I'd bought, and today I'll discuss what I did with some canning tomatoes.
At some time or another I'd picked up an old Mother Earth News magazine (old, as in November/December 1975)and took note of the recipe for tomato concentrate. Seven recipes using the concentrate were also included. It didn't look too hard, so shortly after lunch I began making this recipe. It was a bit chilly and overcast today, so this was a good indoor task.

See those large chunks of celery? Those big pieces turned out to be a big mistake! The recipe didn't say anything about how to cut up the celery, so I left it in those large chunks. Well, some time later the tomatoes and onions were tender, but most of the celery still was about as hard as when I'd started. I eventually fished it out of the pot and cut it up into much smaller pieces. This did the trick, so take it from me, if you want to try this recipe, cut up your celery smaller than what you see above!

At this point, according to the recipe, the mixture is to be put through a food mill - for one thing, the tomato skins had been left on. I have a powerful blender (a Vitamix), so I just pureed the mixture as is. (of course, I took that muslin bag of seasonings out first!) Not only is this easier, but the resulting concentrate has more fiber and nutrients in it as well.
One last cooking step: a paste of flour, butter and salt is made, stirred into the pot, and then the concentrate is brought to a boil. Here is the end result:

The recipe calls for canning the finished product, but as I said in a recent post, I'm not a canner, so I will freeze my concentrate. The recipes using the concentrate all call for a pint of it, so I'll freeze mine in this amount.
This recipe is still available on the Mother Earth News website, so you can find it here.
Friday, September 13, 2013
Thrifty Acres: Let's Bake A Cake!
Hello! A friend is moving overseas and thus has to get rid of just about everything in her pantry. Knowing I like to cook, she asked me if I wanted a box of Softasilk cake flour.
I said sure, but later wondered how I'll use it. I don't actually have many recipes that specifically call for this ingredient; all-purpose flour is the norm.
As luck would have it, I found this in a thrift store the next day:
 This is from 1957. Over on eBay, one seller is currently asking $25.00 for it! That seems like a lot of money for a slim cookbook - it's only 31 pages in length. But that seller was extolling the pristine condition; for one thing, no writing in his copy.
That is not true for my volume - if you notice the faint marks on the cake in the photo above (right below the top row of strawberries), those are the words "Good Book" that someone had written. And I'll show some more handwritten comments in a bit.
But is it a "Good Book"? Well, I haven't looked over all the recipes yet, but the photos sure look good:
 Not shown in the photo is the caption "Here's a cake so downright rich that you just couldn't make it from a mix! You have to start this beauty with Softasilk Cake Flour. And when you bake it you'll have the confidence that the special blend of special flours in Softasilk will make your cake turn out high, light, tender, and wonderful!"
And if that prose wasn't glowing enough, the copywriter added "A soft...soft...Softasilk Cake says such nice things about you!"
Well, how about that - I thought that a well-made cake says I am a good baker - now I'm wondering what else it says about me?
Oh, by the way, the above cake is a Pink Marble Cake (Bonnie Butter Cake with a portion of the batter tinted pink and cut into the plain batter), frosted with White Mountain Frosting tinted pink.
Next up:
 This drum cake is a Real Red Devil's Food Cake, frosted with White Mountain Frosting and decorated with peppermint sticks and maraschino cherries. Love the marching band figures in the foreground!
Also love this trio:
 These chocolatey goodies would be favorites indeed in my family! Alas, like most of the other photos in the cookbook, there's no caption telling me what recipes were used for the batters and frostings. I had to hunt for the recipe that matched the first photo I showed. (the Drum Cake was an exception; its photo was smaller, so there was room for its instructions next to the photo).
Is one of the cakes above Black Midnight Cake? Are those Brownies in the back? Is that Minute Fudge Frosting on top of them? Beats me!
I had promised to show another handwritten comment in this cookbook, and here it is:
 In case you can't read the writing on the side, it says "Real Good. moist" and "Edna" below those words. I am going to try out this recipe to see if this baker's opinion was on target - plus I love the name "Dinette Cake" anyway! Sounds quaint, doesn't it?
Whoever owned this cookbook had also written next to a couple other recipes - for instance, "Edna" is mentioned again next to Black Midnight Cake, which was credited as being "Good".
Now, that eBay seller obviously thought an unwritten-in copy of this cookbook greatly increased its value. But as for me - well, I think the commentary adds to the charm of my copy - and, I paid FAR less than $25.00 for it!
I said sure, but later wondered how I'll use it. I don't actually have many recipes that specifically call for this ingredient; all-purpose flour is the norm.
As luck would have it, I found this in a thrift store the next day:

That is not true for my volume - if you notice the faint marks on the cake in the photo above (right below the top row of strawberries), those are the words "Good Book" that someone had written. And I'll show some more handwritten comments in a bit.
But is it a "Good Book"? Well, I haven't looked over all the recipes yet, but the photos sure look good:

And if that prose wasn't glowing enough, the copywriter added "A soft...soft...Softasilk Cake says such nice things about you!"
Well, how about that - I thought that a well-made cake says I am a good baker - now I'm wondering what else it says about me?
Oh, by the way, the above cake is a Pink Marble Cake (Bonnie Butter Cake with a portion of the batter tinted pink and cut into the plain batter), frosted with White Mountain Frosting tinted pink.
Next up:

Also love this trio:

Is one of the cakes above Black Midnight Cake? Are those Brownies in the back? Is that Minute Fudge Frosting on top of them? Beats me!
I had promised to show another handwritten comment in this cookbook, and here it is:

Whoever owned this cookbook had also written next to a couple other recipes - for instance, "Edna" is mentioned again next to Black Midnight Cake, which was credited as being "Good".
Now, that eBay seller obviously thought an unwritten-in copy of this cookbook greatly increased its value. But as for me - well, I think the commentary adds to the charm of my copy - and, I paid FAR less than $25.00 for it!
Monday, September 9, 2013
Eats - Roasted Roma Tomatoes
Hello! At this time of year, our local farmer's market has vendors selling large amounts of tomatoes at very reasonable prices. Undoubtedly many people buy tomatoes in quantity for canning. I don't do canning, but still bought a nice supply of Roma tomatoes recently to use in various recipes. What isn't eaten right away is stored in the freezer.
Last night I made a batch of roasted roma tomatoes. This is a recipe I clipped from a newspaper in Philadelphia while living there in the 1990's. The newspaper credited the recipe to a Frank Audino, who at that time was running an Italian restaurant called Aglio. Audino commented that it's a very versatile recipe: the tomatoes can be served as an appetizer (which is what he did at Aglio), heated up to toss with pasta, or processed to make a sauce.
I have done both the heat-up-and-serve-with-pasta and turn-into-sauce routes. For freezer storage, I think the tomatoes hold up better when pureed into sauce first.
Here is the recipe:
Roasted Roma Tomatoes (adapted from Frank Audino's Roast Tomato Recipe)
Roma Tomatoes
Sea Salt
Pepper
Garlic (can use any form of garlic - fresh or dried).
Dried herbs of your choice (the recipe calls for thyme, but I use basil)
Olive Oil
Hot Peppers (optional; I use red pepper flakes)
Preheat oven to 400 degrees. Cut Roma tomatoes in half and place them, cut side up, on a baking sheet deep enough to hold the juices inside. (Line sheet with aluminum foil for easier clean-up.) Top with sea salt, pepper, garlic, dried herbs, and optional hot peppers. Drizzle olive oil on top. Place in oven and roast for 30 minutes. Let cool and store in refrigerator.
As you can see, this is easy to do. Use the above seasonings as guidelines; put on what you like.
I did make one change to the recipe. The skins are left on the tomatoes, but I don't care for the texture of cooked tomato skins. So I just wait until the tomatoes have cooled down after cooking and peel the skins off. They slip off easily, and so this step takes only about 2-3 minutes for the whole recipe. But if the cooked skins don't bother you, go ahead and leave them on.
Also - although the recipe doesn't say anything about the seeds, I do remove as many as I can from each half. This is also a quick step, but again, optional.
A couple pictures of the process:
 The Roma tomato halves seasoned and ready to go into the oven.
 This is a portion of the finished product - cooled and peeled, the tomatoes are now ready to use.
Just out of curiosity, I looked up Aglio online to see if it's still in business, and learned it is not. However, I came across one woman's fond remembrance of the restaurant - and she said she especially enjoyed these tomatoes!
Last night I made a batch of roasted roma tomatoes. This is a recipe I clipped from a newspaper in Philadelphia while living there in the 1990's. The newspaper credited the recipe to a Frank Audino, who at that time was running an Italian restaurant called Aglio. Audino commented that it's a very versatile recipe: the tomatoes can be served as an appetizer (which is what he did at Aglio), heated up to toss with pasta, or processed to make a sauce.
I have done both the heat-up-and-serve-with-pasta and turn-into-sauce routes. For freezer storage, I think the tomatoes hold up better when pureed into sauce first.
Here is the recipe:
Roasted Roma Tomatoes (adapted from Frank Audino's Roast Tomato Recipe)
Roma Tomatoes
Sea Salt
Pepper
Garlic (can use any form of garlic - fresh or dried).
Dried herbs of your choice (the recipe calls for thyme, but I use basil)
Olive Oil
Hot Peppers (optional; I use red pepper flakes)
Preheat oven to 400 degrees. Cut Roma tomatoes in half and place them, cut side up, on a baking sheet deep enough to hold the juices inside. (Line sheet with aluminum foil for easier clean-up.) Top with sea salt, pepper, garlic, dried herbs, and optional hot peppers. Drizzle olive oil on top. Place in oven and roast for 30 minutes. Let cool and store in refrigerator.
As you can see, this is easy to do. Use the above seasonings as guidelines; put on what you like.
I did make one change to the recipe. The skins are left on the tomatoes, but I don't care for the texture of cooked tomato skins. So I just wait until the tomatoes have cooled down after cooking and peel the skins off. They slip off easily, and so this step takes only about 2-3 minutes for the whole recipe. But if the cooked skins don't bother you, go ahead and leave them on.
Also - although the recipe doesn't say anything about the seeds, I do remove as many as I can from each half. This is also a quick step, but again, optional.
A couple pictures of the process:


Just out of curiosity, I looked up Aglio online to see if it's still in business, and learned it is not. However, I came across one woman's fond remembrance of the restaurant - and she said she especially enjoyed these tomatoes!
Sunday, September 8, 2013
Civil War Muster
Hello! Our local museum sponsored its 5th annual Civil War Muster this weekend at Van Raalte Farm, a local park. This was the first time I have attended this event. I was more interested in seeing the reenactment of people living in the 1860's than the reenactment of a battle itself, so I went early in the day. There were just a few other visitors besides myself then, so I could take pictures without any sign of 21st C people (I mean, people who look modern vs. those who look mid-19th C).
 Weapons dropped off as soldiers arrive at the outdoor church service.
 Campfire coffee.
 Row of tents at the Confederate camp.
 Join the cause!
 Nicely-dressed woman at the civilian camp.
 Some comforts of home at the civilian camp - note the rocking chair in the background and cupboards to the left.
 I don't know how comfortable the sleeping quarters were, but this looks comfy-cozy to me!

Airing out undergarments.
 Cookstove with coffeepot on top.

Hoopskirts!
I must admit, I didn't really know much about the nature of civilian camps during the Civil War, but the sorts of people who inhabited such camps is explained well here.
 Watching over the horses at the Cavalry camp.
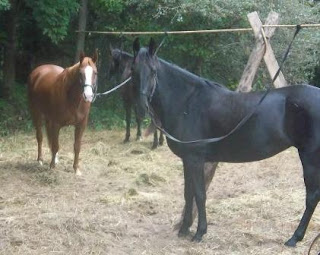 I was warned to stay away from the horses who were behind these two; they might kick me if I got too close, I was told. These two seemed to like posing for the camera, though!
 Tent at the Union camp.
 Another call to action!
 No tent for the hardy fellow who slept here.
As to why so few reenactors were in the camps while I was there: I think they were all at that outdoor church service.
After touring the camps, I walked over to a field where an reenactment of the Battle of Gettysburg was to take place in the afternoon:

 Cannons at the ready.
 As I was leaving the event, this regiment was lining up, getting ready to perform a military drill. And in front of the Van Raalte farmhouse, Generals Robert E. Lee and J.E.B. Stuart were speaking. Lincoln was going to speak two hours later - but by then I was back in the 21st C., finishing up laundry and putting away groceries.
Still, it was fun to step back in the past for a short while!


Airing out undergarments.


I must admit, I didn't really know much about the nature of civilian camps during the Civil War, but the sorts of people who inhabited such camps is explained well here.


As to why so few reenactors were in the camps while I was there: I think they were all at that outdoor church service.
After touring the camps, I walked over to a field where an reenactment of the Battle of Gettysburg was to take place in the afternoon:


Still, it was fun to step back in the past for a short while!
Friday, September 6, 2013
Things You Can Always Find At A Thrift Store #5: Fantastic Plastic
Hello! In my previous post in this series, I discussed glassware I'd purchased at thrift stores. Today I'll discuss its synthetic cousin, plastic. Although glass may seem nicer, plastic ware does have its uses, especially when you have a tendency to break glass as I do! And it's just as plentiful in thrift stores as glass is.
I needed a serving tray with sections for serving crudites with dip, and this came to my rescue:
 At 18"l x 13"w, this is a sizable tray. It'd be rather heavy if made of glass, but since it's plastic, it's quite light. It's a good size for large casual gatherings; most recently it saw service at our daughter's open house. I paid 50c for it. I don't need a large tray like this very often, so why pay much for one?
 I paid a dime for this basic, 9" diameter plate. Now, why am I bothering to show you this plate? Because of its intended purpose. There are times when I volunteer to bring a dozen or so cookies, and this sort of plate is sturdier than paper plates. And since it was so inexpensive, it doesn't matter if it's left behind somewhere. But thus far it's been returned to me.
For potlucks, open houses and other large gatherings, it's nice to have enough large serving utensils to go around. But why head to a big box store to buy them when you can find perfectly good ones at a thrift store?
 I paid a quarter apiece for what you see in the above photo. Between a ladle, a slotted spoon and two serving spoons, I'm prepared!
A colander seems like another basic item - until you buy some nice fresh berries and want them to drain after washing them off. I had one large colander and one small, but needed an in-between size. And that is what I found:
 I paid 25c for this colander; it's 9"w and about 4 3/4"h. I like the spring-like green color.
I'm just showing off some kitchen items today, but of course thrift store plastic is common in other categories as well. I've bought storage tubs and other handy organizational items, all at very reasonable prices.
A word of warning, though: sometimes thrift store plastics come cracked, misshapen, badly stained, or with other signs of damage. Unless such issues don't bother you, examine the item carefully for signs of misuse. There's enough plastic in good shape to turn your back on the beaten-up stuff.
And it's the stuff in good shape and at low prices that makes me say it's "fantastic plastic!"
I needed a serving tray with sections for serving crudites with dip, and this came to my rescue:


For potlucks, open houses and other large gatherings, it's nice to have enough large serving utensils to go around. But why head to a big box store to buy them when you can find perfectly good ones at a thrift store?

A colander seems like another basic item - until you buy some nice fresh berries and want them to drain after washing them off. I had one large colander and one small, but needed an in-between size. And that is what I found:

I'm just showing off some kitchen items today, but of course thrift store plastic is common in other categories as well. I've bought storage tubs and other handy organizational items, all at very reasonable prices.
A word of warning, though: sometimes thrift store plastics come cracked, misshapen, badly stained, or with other signs of damage. Unless such issues don't bother you, examine the item carefully for signs of misuse. There's enough plastic in good shape to turn your back on the beaten-up stuff.
And it's the stuff in good shape and at low prices that makes me say it's "fantastic plastic!"
Subscribe to:
Posts (Atom)