Hello! Impulse buying can be the downfall of any shopper, and the thrift store shopper is no exception. In fact, it can be even harder to resist a thrift store item because of the low price. It can all too easy to justify a purchase when you're paying a fraction of the original retail price.
Impulse buying can lead to frivolous purchases, and I can be guilty of this, as seen here:
The Easy Chef Chocolate Bar Maker. The kit was priced a little higher than I would have preferred, but it was complete and in fact, looked like it had never been used. So I guess the thrift store pricing folks took that into consideration. I still paid far less than what the Amazon listing showed.
So what does this complete kit contain? Two sizes of chocolate bar molds (two each of each size), plus inserts to make "pockets" for adding fillings to the larger bars or fancy designs to the tops of the smaller bars.
There's also a plastic squeeze thingy for melting/squeezing out chocolate; this tool also has a nozzle for decorating the bars with chocolate drizzles.
The kit includes four candy bar wrapper-like bags and matching sticker labels; just the thing for four small gifts.
The molds don't look like much; the "large" ones measure about 3 1/4"l x 1 1/4"w x 1 1/4"d. The "fun" size molds are the same width and depth, but are about an inch shorter in length.
This kit was on the "kids' crafts" shelf at the arts and crafts section of the thrift store, so I suppose the chocolate bar maker is marketed toward kids. However, among the filling suggestions are three "entertaining" candy bars that call for more sophisticated ingredients, so see, you don't have to be a kid to want to use it.
And I did want to use it, even though I didn't have to have it, of course. But the "recipes" listed in the instruction booklet made me want to try my own combinations.
And that's what I did today:
Left, the "sharing" bar (the three sections are meant to be cut off and shared) and right, the "swirl top" bar. (The molds used to shape the bars are behind them, of course). They look rather professional if I say so myself!
For my first "recipe", I soaked about a tablespoon of dried cherries in a small amount of chocolate liqueur, and used about the same amount of chopped toasted pecans.
I didn't bother using the plastic thingy for melting the chocolate. I figured a glass custard cup would be easier to clean, so that's what I used instead.
Of course, a chocolate bar is really only as good as the chocolate used to make it. Well, I melted some semi-sweet chocolate chips - not fantastic quality, but good enough for this project. I used 1 7/8 ounce chocolate chips per bar. (with the add-ins, the total weight of each bar is 2 1/8 ounce.)
Here's a section of the "sharing" bar cut away:
The dark red of the dried cherry is hard to see in there, but I could definitely taste it. This "sharing section" made for a nice little post-yardwork treat.
Not bad for an impulse buy! It'll be fun to make other types of candy bars too.
Hello! Gardening season is finally here, so it's time to haul the yard work tools out.
And with yard work on my mind, I paid 50c for a vintage weeding tool at a thrift store last week. Here's what I got:
I wasn't familiar with this brand, Village Blacksmith, so I looked it up online and learned it was a company from Watertown, WI. It was in business from the early 1900's until the 1960's.
My online search showed similar tools to the one above, but the handles looked different. This puzzled me until I looked closer at my purchase - and discovered that it's not the original handle! The photos I viewed showed a flat handle, either made of plastic or wood. I'm guessing older versions featured wood handles, while newer models had plastic ones.
My handle is wood, and was likely formed from a sawed-off handle of another tool. Once I realized this, I smiled, for this is what I meant by "double the thriftiness". Someone thought enough of this weeder to fashion a "new" handle for it, thereby extending its life further.
And whoever did the fix-it job did it well. I tried my vintage weeder out this past weekend and it worked like a champ:
The vintage weeder faced off against our OXO weeder on the right.
I'd gotten the latter weeder several years ago for my husband as a gift during his mad gardening days.
I'm now the mad gardener of the family, and so was dismayed when the tines of that OXO tool became warped during normal usage a couple of years ago. It still does the job, just not quite as well. I like the design of the Village Blacksmith weeder better. It's more solid overall, so it's easier to dig into the soil to remove whatever it is I'm trying to remove.
In the above photo, I've removed some of what must be hundreds of scilla. They have pretty blue flowers, are among the first blooms of the spring, and remind me of the scilla in the yard of my family's house when I was a kid.
But we never had anywhere near the scilla then that I do now in my present yard. In years past, I'd just pull them out, which removed the leaves but didn't stop their spread. These plants grow via bulbs, so to reduce their numbers, I had no choice but dig the bulbs out. Before I started weeding over the weekend, the above patch of ground was a solid mass of scilla.
This took quite some time, and I'm still not done, but at least I can now see where my perennials are coming up. And it's almost fun to do such weeding with my Village Blacksmith tool.
I'm glad that a previous owner crafted a new handle for it, and I'm glad it was a inexpensive thrift store purchase.
Yep, double the thriftiness!
Hello! I'd written about my Chocolate Chocolate cookbook here.
I've made a few cookie recipes from the cookbook since that post, for parties and for out-of-town trips. Out-of-town trips? Yeah, my husband has been known to hunt down places where cookies and other goodies are sold when traveling; he's gotta have his desserts (and yet he's one of those people who never gains weight!)So I figure by making a treat before an excursion, at least we're saving some money.
He had an out-of-state conference to attend recently, so I dutifully made Soft Chocolate Chunk Cookies from Chocolate Chocolate for him to pack along. Author Lisa Yockelson's directions are a bit fussy, as you'll see, but the results were worth it.
First, the recipe:
Soft Chocolate Chunk Cookies (adapted from Chocolate Chocolate)
3 cups all-purpose flour
1/4 teaspoon baking soda
1/8 teaspoon cream of tartar
3/4 teaspoon salt
2 sticks plus 5 tablespoons unsalted butter, softened
1 cup sugar
1 cup firmly packed light brown sugar
2 large eggs
2 tablespoons vanilla
13 ounces bittersweet chocolate, chopped into chunks (see note below)
Sift the flour, baking soda, cream of tartar into bowl or onto sheet of waxed paper.
Cream the butter in the bowl of a freestanding mixer on moderately low speed for three minutes. Add the sugar and beat for two minutes. Add the light brown sugar and beat for two minutes longer. Blend in the eggs, one at a time, beating until incorporated. Blend in vanilla. On low speed, blend in sifted ingredients in three additions, beating until the flour particles are absorbed. Scrape down the sides of the mixing bowl frequently to keep the dough even-textured. Blend in the chocolate chunks.
Cover the bowl of dough and refrigerate for one hour.
Preheat oven to 325. Line cookie sheets with parchment paper.
Place heaping two-tablespoon-size mounds of dough on the prepared cooking sheets, spacing the mounds about three inches apart. Keep the mounds high and plump.
Bake cookies for about 16 minutes, or until set and light golden on top. Let the cookies stand on the cookie sheets for two minutes, then transfer then to cooling racks. Store in airtight tin. Yield: about three dozen.
Notes: the recipe calls for chopped bittersweet chocolate, but feel free to use other sizes/types of chocolates. If you have chocolate chips on hand, that's fine, I'm sure. I had a partially-open bag of semi-sweet chocolate chips stashed in the refrigerator, so that's what I added. But as that bag didn't have 13 ounces of chocolate chips in it, I made up the difference by cutting up some leftover Easter candy: Hershey's foil-wrapped Special Dark eggs. So, my batch had both chips and chunks! I'm guessing author Yockelson would approve, as she has at least one cookie recipe in the cookbook that calls for both chips and chunks in the dough.
As you can see, the recipe is easy to make, but the fussiness comes in the number of steps in the mixing. In general, chocolate chip cookies don't have so many separate mixing steps - for example, the butter and sugars are usually creamed together. But since this was the first time I was using this recipe, I decided to follow the directions as written.
Yockelson has breathless descriptions of her recipes and this one is no exception: "These soft and chewy cookies are buttery and mellow, with just a hint of caramel and chunks of bittersweet interspersed within the creamy, vanilla-centered dough".
I added: "Smooth, rich, buttery". And these words, and the author's, really are true. These cookies may have those extra mixing steps, but as I'd said, the results were worth it. I don't think you'd get a better cookie of its type at a fancy bakery!
I have one photo, of the last cookie from the batch:
Yockelson suggests that these cookies be eaten within two days of baking, but the above cookie was already nine days old. 10 seconds in the microwave and it tasted as if it'd just come out of the oven.
If you make this recipe, I hope you enjoy them as much as we did!
Hello! I've never studied French, but that didn't stop me from buying this at the Ann Arbor PTO thrift store several weeks ago:
At fifty cents each, several back issues of Marie Claire Idees magazine, published in France. I'd heard of the English-language Marie Claire published in this country and while I've never read it, I suspect it's not much like this Idees (ideas) version.
So, what's Marie Claire Idees like? A lot like Martha Stewart Living, only heavier on the DIY and less on interior decorating and gardening. There are features on new products, and columns on health and beauty, fashion, and travel as well, but it's primarily the DIY content that drew me in. The projects look wonderful (if quite laborious in many cases) and the photography is pure eye candy.
Since summer is on the horizon, I'll show off an issue devoted to that season. My issue is from June 2009.
Above, flowers are embroidered with silk ribbon on linen, with wheat pieces ringing the finished work. Maybe a bit fussy to make, but doesn't it look pretty?
By the way, if you've done a number of crafts, the photos are good enough to usually tell what supplies and techniques were used. But just to be clear, I used Google translator too.
An article called A la Lettre! needed no translation, since the projects shown were along these lines:
Above, a kitchen table top has "1 kg de pommes coupees en quartiers" painted onto it. "A little over two pounds of apples, cut into quarters" is what we'd see if this was an American recipe being immortalized. I know that the apple tart is a time-honored French dessert, so I'm guessing that's what the painted words refer to.
It's too hot to bake in June, you say - you'd rather be at the beach? Marie Claire Idees has you covered:
Well, if your beach includes a close-by outdoor shower(that would be handy, especially for washing salt water off), then paint the alphabet on a large canvas to create a privacy screen for that shower. The magazine suggests that this decorated canvas could be hung up at home as well. Indeed, it would look great displayed in a cottage!
Another article features cerises - cherries to us. Many charming projects, like this:
A serving tray featuring cherry-shaped mosaics - cute. The cherry-lover could also applique that fruit design onto a tablecloth or crochet look-alikes on a girl's dress.
The cherry-themed projects all have a sort of country charm to them, but then that article is followed by several pages devoted to rather fanciful party decorations featuring large gold circles. Some of the largest decorations are seen here:
Unfortunately, there are no directions given for decking out a tree with various sizes of gold circles, but this would be enchanting for a garden party. According to the article, we are encouraged to also use gold circles to decorate a tablecloth, chairs, or punch bowls. Martha Stewart herself could have done no better!
But admittedly, the food "sculpture" article was more my speed:
"Radis souris" - radish mice. Whole cloves are used for eyes, the root end of the radish forms the "muzzle", thin slices of radish create the ears, and a bit of the radish top in stuck in the back for a tail. Marie Claire comments that kids tend to not like radishes due to their spicy taste, but these radish mice will make them smile. That may be true, but of course this bit of food sculpturing doesn't lessen that spiciness!
For summer get-togethers, a lemon half mimics a boat; cute "sail" made from floral and gingham fabrics. Since the sail is labeled with a name, I presume this "petit navire" (small ship) was designed to mark places at a table.
Martha Stewart might very well have placed this simple project in the "Good Things" section of her magazine. But to be honest, I found looking through Marie Claire Idees much more fun!
This particular issue is the newest one in my thrift store lot. I don't know if the magazine has changed much since then, or if it's still as fanciful as shown here. Radish mice? Giant gold circle garlands dangling from trees? A line from a recipe painted onto a table? These are only a fraction of the creative pursuits in the magazine.
In a parsimonious mood, I left some of the Marie Claire Idees behind at the thrift store. I'm now sorry that I did - this June 2009 issue was a lot of fun to look at, even if some things might have got lost in Google translation.
Hello! As a kid in the 1960's and '70's, I remember reading my parents' Better Homes and Gardens magazine, which they subscribed to faithfully for years. (I was never sure why they got it, since they rarely seemed to use any of the project ideas or recipes therein).
I found the recipes boring, and had no use for advice on how to improve a home's curb appeal or how to add on a spacious master suite. But I always enjoyed the fanciful craft projects, so as a young woman in 1980's married student housing, I continued to buy some of the BH and G craft books and magazines.
For awhile, these publications had a number of similar craft projects that consisted of a. either send away for a kit of fabric designs to decorate, stuff and sew or b. follow the instructions in a magazine or book for enlarging the small-scale versions of the designs.
Well, a. I was too cheap to send away for the kits and b. the designs happened to be quite detailed, so the copy-the-grids method BH and G offered for enlarging them would have taken a lot of time to do well. I suppose copiers were available in public libraries, but I guess it didn't occur to me to seek one out. Jobs and other projects loomed instead.
But when a portion of one of these kits showed up at a thrift store recently, I recognized its provenance immediately and pounced on it:
A set of ten Old Fashioned Dolls, stamped on fabric and ready to decorate, stuff and sew together. It was produced in 1976:
Here's what the complete kit was about:
http://www.ebay.co.uk/itm/Better-Homes-and-Gardens-Crafts-Old-Fashioned-Dolls-to-Stitch-and-Stuff-Kit-/272031248575
The kit came with the printed fabric panel like the one I have, plus fiberfill stuffing and embroidery floss. My thrift store find just came with the panel - plus one embroidery needle. That's okay, since I have plenty of fiberfill and embroidery floss already.
I decided to start with one of the smaller-size designs, just to see how the process would go:
This young miss has a basket of apples.
My fabric panel came with the original instructions too, although I remembered the directions pretty well since, as I'd said, BH and G had several sets of these designs over time. And among the several suggestions for decorating the designs, one had stuck out in my mind: coloring in the different sections in crayon!
Had never decorated fabric with crayons, so thought that would be interesting to try. The directions stated to color in the areas, place paper towels over the finished design, then iron (without steam) to cause any excess crayon to be absorbed onto the paper towels.
So here was my apple girl design, all colored in:
It was kind of fun coloring in the design; kind of like using a coloring book, but more of a novelty since I was working on fabric. The colors are a bit muted due to some of the crayon being "ironed away", but I thought the overall look turned out well. I took the panel to show to a friend whom I met for dinner, and the waitress voiced her approval when she saw my coloring job. "Oh, that's pretty" she commented.
The next step was to add embroidered highlights. The instructions suggested adding just a few details, so that's what I did, using embroidery floss on the apple stems, basket, shoelaces, hairstyle, hat, apron and sleeves.
Lastly, I sewed together the front and back, stuffing the figure before sewing an opening closed:
Ta da, the finished "old fashioned doll". It's about 5 1/4" high.
Now, what to do with it? BH and G had several suggestions: Christmas ornament, gift package tie-on, sachet (add potpourri to the stuffing), applique fronts and backs to pillows, aprons, etc, or use the entire set to construct a mobile.
"You'll be able to think of dozens of other uses for your "Stitch and Stuff" dolls. Best of all, they make charming gifts for almost any occasion, suitable for friends and relatives of all ages." Or so BH and G opined near the end of the instructions.
Their ideas are all good, I'm sure, but as for me, I was just happy to find this panel so I could finally craft the vintage Better Homes and Gardens way!
Hello! The beginning of this year brought with it a number of goal-oriented challenges from online sources. I signed up for the free Hoops for Hope challenge by Canyon Hoops of Portland, OR since I own one of their fitness hoops (discussed here.)
The series began on Jan. 8th with a FAQ and then the actual hoop fitness challenges, along with accompanying instructional videos, began on Jan. 11th. Certified fitness trainer Leigh Little did an excellent job on the videos, and was available online to answer questions as well. She encouraged comments after participants had completed each workout in the challenge.
And challenging they were indeed, at least for me. I'd only ever used my fitness hoop for waist hooping, but suddenly I was being asked to spin the hoop in various ways around various body parts. Some routines I mastered all right, while others resulted in much dropping of my hoop and even a broken knick knack when the hoop flew off my arm instead of staying on it.
But I stuck with it and dutifully commented after I'd completed the instructions for each routine. I think there was a total of 10 routines as part of Hoops for Hope.
What I didn't know was that at the end of the challenge, each of my comments counted toward an entry for a giveaway from Canyon Hoops. And on Feb. 28th, I learned that I was the 2nd runner-up winner! Woo-hoo!
In case you're wondering why I'm just getting around to talking about my prize winnings, well, I just received the second of my two prizes a few days ago.
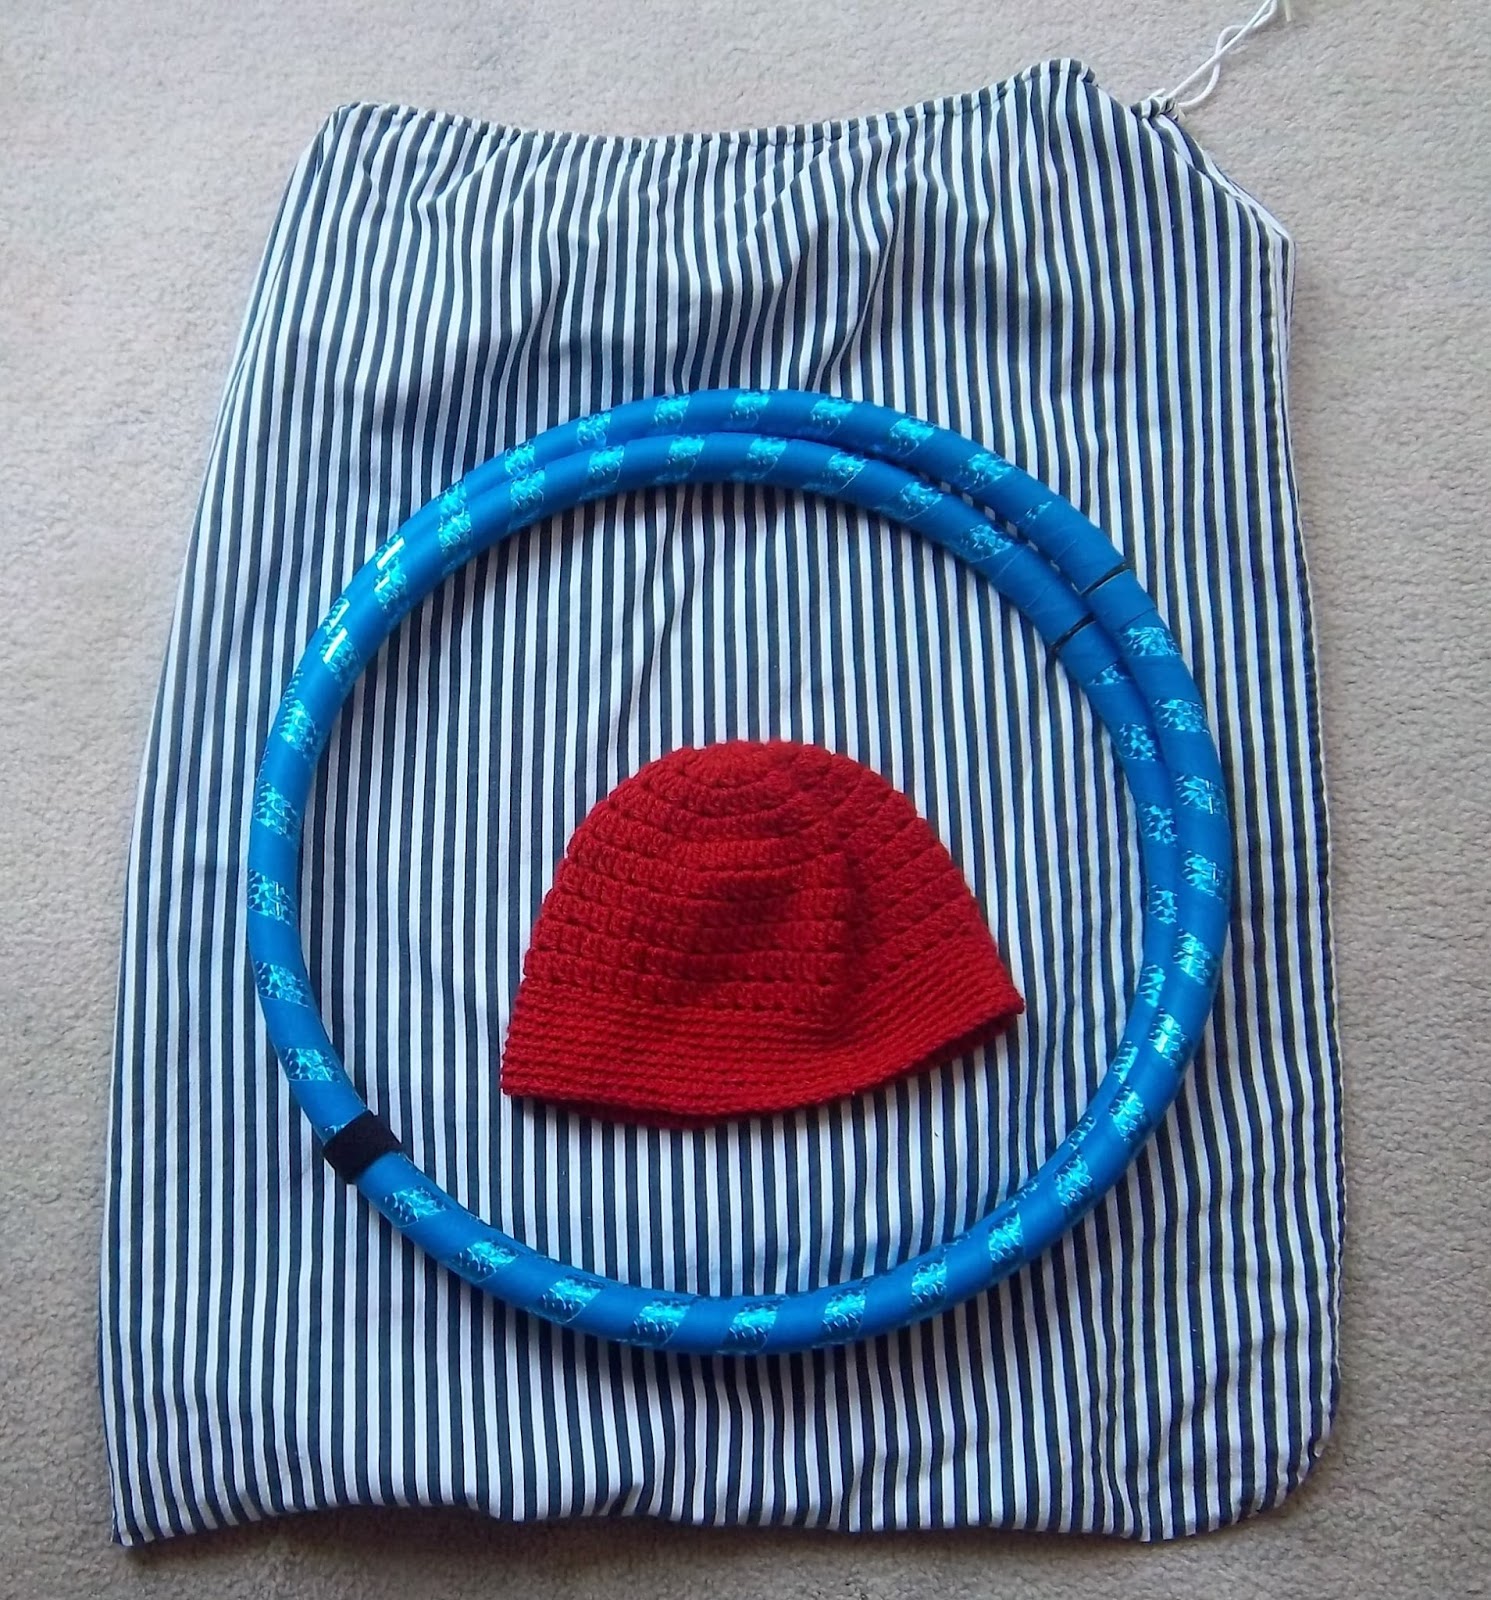
But without further ado, I will now show off what I won:
Above, Canyon Hoop's Infinity Collapsible Weighted Exercise Travel Hula Hoop and Xpressive Crochet's Best Hooping Hat Ever. What great prizes!
(Note: the blue and white striped bag was NOT part of the prize - it's something I bought at a thrift store for a buck so my travel hoop would stay clean while on the road.)
I enjoy using the fitness hoop I already own, but at 38" diameter, it's a bit cumbersome to take along on trips. I'd been considering ordering one of the travel hoops but was too cheap to do so. I was truly thrilled to win one!
I could select the hoop size/color I wanted, so requested the 38" diameter in glitter blue/blue.
Obviously, the hoop is shown folded above. Unfolding it is very easy: first, remove the velcro tape fastener (the black strip you see on the bottom left of the hoop, then unfold so the hoop looks like this:
From this infinity-ish shape, the hoop is then opened up and shaped to get this:
Voila! The hoop is now at its full diameter. Folding the hoop back into its travel size (about half the full diamater) is basically the same as unfolding, only reversed, of course.
The only bad part of this hoop was having to wait for it! A delay meant that it still hadn't arrived when we left for vacation on March 17th. In fact, it showed up at our house the day after we departed. That was disappointing, but we ended going out of town for Easter weekend later in the month, so I just took it along then. It worked great!
Now on to the other great prize:
Leigh Little, the woman responsible for the hoop challenge's fitness videos, raved about a hat made by April Billingsley of Xpressive Crochet. Obviously Ms. Little couldn't resist including one as a prize. As with the hoop, I could choose the color, so picked red to match the color of my two cold-weather coats.
This hat is soft and cozy, and the crocheting is loose enough that my hair isn't a matted-down mess afterward! Ms. Billingsley is obviously a very talented crocheter, and you can see more of her handiwork at her Etsy shop here.
And if you'd like to learn more about Canyon Hoops, then go to the website here.
The Hoop for Hope Challenge can be found on Canyon Hoop's blog, starting here. When you get near the bottom of this post, you'll see the link for the first Hoop for Hope challenge. Click on that to begin following the rest of the routines - if you have a hoop and are motivated to do so!
Who knows, you might have better luck than me and won't break anything around the house. But I feel pretty lucky anyway, thanks to winning a great hoop and a great hat!