Hello! Recently returned from vacation to parts east: New York, Pennsylvania, Ohio and Indiana. It was rather a whirlwind tour, but I still managed to make time for some secondhand shopping. I'd much rather get my souvenirs this way than go to some overpriced tourist-trap place. It's cheaper and more fun besides!
I lucked out while visiting a thrift store in Ithaca, NY. I happened to be browsing through the wares when a man stopped by with a bagful of stuff that had belonged to his late wife. The volunteer graciously took the bag and looked through it while standing next to me after the man had departed.
Among other things, out came a small pile of quilt blocks and embroidered linens. By sight and by musty odor, it was obvious these fabrics had been sitting around for decades. I wouldn't have been surprised if the man had said the embroidered linens had originally belonged to his mother-in-law.
I expressed my approval of these elderly fabrics to the volunteer, and then she went off to show them to the store manager. She came back with the pile and gave them to me for free, explaining that the manager had told her to throw them out. I guess he objected to the musty odor.
Needless to say, I was pleased with my freebies, so I'll show them off here. I haven't washed or ironed these pieces yet, which will undoubtedly improve their appearances. They're all in pretty good shape other than a few stains. The embroidery on the linens is intact, as is the seaming on the quilt blocks.
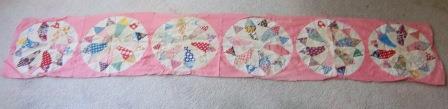
First up, a row of six quilt blocks:
This measures nearly 2 yards long and is a foot wide. With those dimensions, this could become a table runner or even a wall hanging. I'd add a backing fabric first.
Close-up of one of the blocks:
...and a close-up of some of the fabrics in the block:
Can you tell that I love vintage fabrics?
Another quilt block, and another close-up as well:
I'm not a quilter, so to me, the curved edges of a heart shape would be tricky to piece. Whoever made this block didn't seem to have trouble.
The last quilt block of the bunch:
The muslin has some staining, but I thought the house shape quite charming.
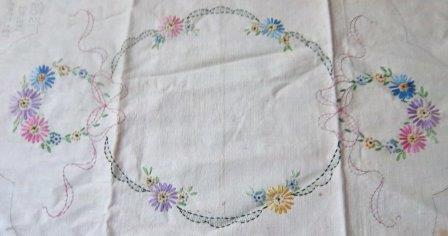
Now on to the embroidered linens, which didn't photograph as well.
Linen that measures 42" by 17".
Of the two main motifs, one has most of its embroidery completed.
Above, what the unfinished motif looks like. I found it interesting that the blue and red colors were stamped or painted onto the fabric, apparently to be accented with embroidery. The colored straight lines seen on the fabric are colored threads woven into it.
Another half-embroidered linen:
This piece measures 42" by 14".
Its close-up:
Pretty stitching in pinks, green and brown.
There are two three-piece buffet sets. I don't know anything about embroidered buffet sets, so I'll have to look them up. I only know their intended purpose because each set is labeled as such.
Buffet set #1. Not a three-piece set anymore, as one of the smaller sections had been cut away.
Close-ups:
Nicely-done embroidery.
Buffet set #2, with no sections missing:
A close-up:
Nice job here too! It's not unusual to encounter vintage linens with part of the embroidery missing due to age, but not the case with this work.
I don't know what I'll do with any of my freebies, but I hated the thought of such handiwork being tossed out as if they were pieces of junk mail!
I thought this was a good vacation vintage haul, but in my next post I'll show off what I picked up two days later in Williamsport, PA.
Hello! Little by little, I'm adding landscaping to our yard. I've been hampered by too much shade, sandy soil, and bugs and critters with appetites. But I still enjoy the process of improving the appearance of our property.
A few years back, while clearing out some overrun vinca (planted by a previous owner), I came across several paving stones. Obviously meant to delineate that part of the backyard, they'd become completely covered up by that vinca. Since I was taking out that ground cover to put some perennials in, I set the paving stones aside to reuse somewhere else in the yard. And there they sat.
Then this summer I had a brainstorm: I'd use them to make a short pathway near one side of the house. When we'd moved in, this strip of land had been a no-man's land between the side of the deck and the neighbor's wooden fence. All that was growing there was yet more vinca.
Over time I've pulled out the vinca and replaced it with mints, lemon balm and wildflowers. I left the area closest to the deck unplanted for a path, of course, which meant that it had an annoying tendency to attract weeds to that part of the strip.
Don't why it hadn't occurred to me before - I guess my brain works kind of slow at times - but it suddenly hit me that those once-buried paving stones would make a perfect path there. It would add interest to that part of the yard and would cut down on weeding too.
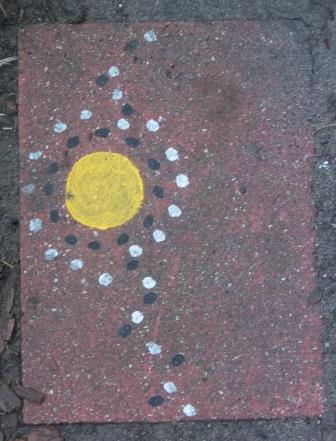
As I'd mentioned in this post, I'm not much of a painter, but I'm capable enough to tackle simple designs, so I hauled the paving stones (eight in all)to the proposed path area and put them in place. Then came the painting fun!
Using the same paints I'd discussed in the above link, I got to work with a circle design. I used a stencil for the largest circle and dotted on the smaller circles freehand.
Here's how my efforts turned out:
Above, one end of the path, flanked by milkweed (not planted by me; it comes up on its own), with mint, lemon balm and wildflowers beyond.
Close up #1: looking down at one end of the path from the deck
Close-up #2 shows a close-up of my design: I'd painted the large circle first, then added the white dots. It seemed like something was still missing, so I painted the black dots. In retrospect, they look a little too much like watermelon seeds to me, but it's okay.
I varied the placement of the large circles on the paving stones, but placed the smaller dots so that they "connected" from one paving stone to the next.
Had to hurry the design toward the end, though, as a storm was moving in. These paints need up to 72 hours of curing time before being exposed to the elements; I hadn't been expecting a sudden rain to move in. So I quickly finished up the painting, then covered my new pathway with a tarp.
I am quite pleased with how my painted paving stone path turned out. A more skilled painter would have come up with something far nicer, I'm sure, but I'm satisfied. Since the paving stones were a "found" material and I already had the paints and paintbrush on hand, all my new path cost me was a little time and effort.
Anything to improve the appearance of our yard - and the paving stones have, indeed, cut down on the weeds in that part of the yard. That's a win-win!
Hello! I know that designer purses are a "must have" for some women, but not for me. I'm fine with a handbag that looks decent and is functional - not too big, not too small, straps not too long or short, and enough pockets to hold all those things a purse typically holds.
It can be hard sometimes to find just the right purse, so I tend to hang on to the one in current use as long as I can. But of course eventually the time comes when a purse gets too shabby to be seen in public. Then I have to go buy a new one.
Such was the case recently, so I dutifully checked the sale prices at local department stores and then set out on the shopping trip. But rather than head straight toward those stores, I decided to try my luck first at a close-by thrift store.
And luck was indeed with me:
The brand is Liz Claiborne, and the purse appeared to be in like-new condition: not a single scratch or mark on it. It met my all requirements for size, pockets, etc. And the price? One dollar. Score!
According to online research, this purse might have come from JC Penney's, which happened to be one of the department stores I was going to visit. According to the sales flyer I had consulted, similar purses at Penney's were around the forty dollar range, with the possibility of lower prices for clearance items.
But even on clearance, I wouldn't have paid a mere dollar for a purse at Penney's. Since I did so at the thrift store, I'm now all set until this one begins to show its age.
Hello! We have a rather decrepit garage, which will be fixed up some day. But until that day comes, I hang decorative items on it to dress it up a bit.
As seen in this post, I had once crafted a garland to hang up along one side of the garage. However, time and my laziness in leaving it up all year round weren't kind to the garland, so I took it down. Time to make another one.
Earlier this spring I purchased three yards of sisal for a craft project, but the project didn't turn out well and was abandoned. That sisal length was inexpensive, but I didn't want it go to waste.
I realized I could use it to make another garland, and I had just the fabrics set aside for that would work: a pile of scraps left over from an ongoing quilt project.
No sewing was involved - all I did was cut narrow strips of the fabric scraps and tied them tightly onto the sisal. Since I placed the knotted strips close enough to completely cover the sisal, it took some time to finish this project. I worked on it off and on over several weeks.
It was a bit tedious, but it was fun to use a variety of fabric scraps, some of which were too narrow to work well in sewing projects. Quite a colorful collection though:
Had to stand back a ways to get the entire length of the garland, but here's a close-up of some of the fabrics that were used:
All in all, not a bad way to make use of some fabric scraps and a length of sisal first intended for another project. Anything to help our decrepit garage until we get around to improving its appearance!
Hello! Nine times out of ten I'll get up before my husband does. This isn't a problem except for when I want to whip up a smoothie for breakfast. Our Vitamix blender is powerful but loud. He says it doesn't wake him up, but I still feel bad about using such a noisy appliance while he's in bed.
Then recently I came across a recipe for Make-Ahead Oatmeal Smoothies, courtesy of Monica Matheny's The Yummy Life blog. Not only can these smoothies be made the night before, Matheny says, but they can be frozen as well.
Well, that sounded pretty good to me. Not only would the noise-in-the-morning problem be solved, but breakfast would be ready as soon as I was. Can't beat that for convenience!
I know what you're thinking - couldn't any smoothie be made the night before? Sure, but I know from past experience that when I've put leftover smoothies in the refrigerator to drink later, they just don't seem as nice.
So what's different about the Make-Ahead Oatmeal Smoothie recipe? Matheny says that the inclusion of chia seeds helps the smoothie stay thick well in advance of being drunk - in fact, the mixture needs to sit at least four hours ahead of time to soften the chia seeds and the oatmeal.
Yes, oatmeal in a smoothie. It may seem like a weird ingredient for that beverage, but it's not as if you can taste it. I've occasionally added a scoopful of granola to a smoothie (a handy way to use up granola recipes that didn't turn out as well as I'd hoped), so the inclusion of oatmeal didn't faze me.
Fresh or frozen fruit can be used. I've tried both and actually prefer frozen fruit. As it thaws in the smoothie, it makes the drink a bit thinner. Made with fresh fruit, I found the smoothie a bit too thick for my liking and I had to add more liquid to it.
(Dried fruit can be substituted for fresh or frozen fruit. I haven't tried that option yet).
Matheny mentions the thick/thin factor in her excellent post, which can be found HERE:
Not only does she give a very detailed breakdown of the ingredients, she also includes step-by-step directions with plenty of photos and storage tips. There's six smoothie flavors plus an "invent your own smoothie" master formula.
Speaking of photos, here's one of my own:
This is only a small portion of my blueberry smoothie. Doesn't look too exciting, I know, but I was excited to come across such a handy, make-ahead recipe!
Note: Matheny's direction call for blending the oatmeal and chia seeds together first. If you have a powerful blender, as I do, it's fine to skip this step and just mix everything together all at once.
Have fun making your own make-ahead oatmeal smoothies!
Hello! As I browsed among the stalls at the local farmers' market this morning, I noticed that there were at least two or three vendors selling cookies. That reminded me that I'd been wanting to try a particular oatmeal-raisin cookie recipe in a community cookbook I'd gotten awhile back (thrift store purchase).
I happen to love oatmeal-raisin cookies but the rest of my immediate family doesn't. However, they already had their own desserts: my husband's box of chocolates (a Father's Day gift) and our daughter's batch of snickerdoodles (a birthday treat I'd baked for her). I was the only one in the house without a goodie - oh, the horror of it! So it was a good time to make a cookie they don't like.
Farmhouse Oatmeal Cookies (recipe courtesy of the Helping Hands Society cookbook; Sue Mys, contributor)
2 cups flour
1 cup whole wheat flour
1 teaspoon baking powder
1 teaspoon baking soda
1 teaspoon cinnamon
3/4 cup butter, softened
1 1/4 cups brown sugar, packed
2 eggs
1/4 cup molasses
1 1/2 cups quick-cooking oatmeal
1 cup raisins (see notes below)
1 cup walnuts (see notes below)
Stir together first 5 ingredients and set aside. Cream butter and brown sugar until light and fluffy. Beat in eggs and molasses. Stir in flour mixture, oatmeal, raisins and nuts.
Drop by 1/4 cupfuls 3 inches apart on greased baking sheet. Flatten with bottom of drinking glass which is greased and dipped in white sugar. Bake at 350-375 about 12 minutes.
Notes: I used walnuts, and I toasted them lightly before adding them to the recipe. My husband doesn't like raisins, which is why he doesn't like oatmeal-raisin cookies. Oh, and he doesn't like nuts in baked goods either. But leave out those two ingredients, add chocolate chips and coconut instead - and he'd gobble these up.
Thus, feel free to add other dried fruits, any baking chip, etc. to this recipe. (If I was making a variation with chocolate chips, I'd omit the cinnamon, as I don't care for the taste of those two ingredients together. I'd add a teaspoon of vanilla instead. But that's me.)
Yes, a quarter cup of cookie dough is a bit on the large side, but on the other hand most of the cookies I saw at the farmers' market looked like they were made with that much dough, if not more (depending on the vendor). Sometimes bigger is better, so I followed the recipe as it was written. But feel free to make them smaller if you prefer.
As for that baking temperature range: since these are big cookies, I decided to try the 375 temperature. This was fine; the cookies were neither too soft or too hard once cooled.
Although I've included the full-size recipe here, I actually made a half recipe, which yielded nine cookies that look just like this:
This recipe turned out great - very easy and fast to mix up, and I liked that they didn't really spread during the baking process. They looked as nice coming out of the oven as they did going in.
As for the taste - well, I'm not sorry the rest of my family doesn't like them, as that means more for me!
Hello! Yesterday was our daughter's 20th birthday, so of course I needed to make her a card. Technically she's not a chemist yet, as she's a chemistry major, but already has two years of college lab research work under her belt, plus has an internship doing more research this summer. So a birthday card with a chemist theme seemed appropriate:
Materials used:
- white card stock
- page cut from college-level chemistry textbook
- scrap of page from same textbook, "aged" with Tim Holz's "old paper" Distress Ink
- woman image cut from 1947 Sears catalog
- "Maria" cut from an old grade school folder (the birthday girl's handwriting when she was in 4th grade)
- "You Experiment" and "The Scientist Observes" cut from a 1950's children's science textbook
- "junior" cut from 1947 Sears catalog
- "CHEMIST" stamped on white card stock scrap
- "at" stamped on white card stock scrap
- "large" cut from 1960's children's dictionary
I've been using the phrase "junior chemist at large" affectionately all summer in reference to our daughter's internship at a local facility. She thinks it's funny, so she laughed when I used those words on her birthday card.
A couple of close-ups:
Above, the aging effect of that "old paper" Distress Ink is noticeable, as the paper with molecular structures on it looks darker and, well, older than the text behind it, even though both were from the same 1990-issue chemistry textbook.
I prefer to work with vintage books in my crafting, but didn't have one on hand with a chemistry theme. 1990 may seem like a long time ago by now, but still not old enough for me. Thus, I "aged" a page scrap from the textbook for contrast.
The technique was easy: I just crumpled up the page scrap, smoothed it out, rubbed the "old paper" ink pad directly onto the page and then wiped off the excess.
The page with all the text on it discussed the various careers chemists can have, which I thought was very fitting for our "junior chemist".
She enjoyed her card, and I enjoyed making it for her!
Hello! My dad's 93rd birthday is tomorrow, so recently I began deliberating the making of his birthday card.
I often make him cards with a green theme since that's his favorite color. But then I spied this wallet-sized card in an Italian cookbook I'd just brought home from a thrift store:
"Speak Italian in 10 minutes or less!" this handy-dandy card proclaims. I'm sure learning to speak Italian takes longer than that, but since my dad was born in Italy, my birthday card theme was launched:
Materials used:
- white card stock
- map of Italy from vintage world atlas, photocopied to reduced size
- Italian language card, photocopied to reduced size
- pictures of statues cut from a vintage travel guide for Rome
- words cut from vintage textbook about Europe
- "happy birthday" stamped in black ink on white card stock scrap and glued to card
A couple of close-ups:
The words "the island of Sicily" and "Sometimes it is said that 'Italy is kicking Sicily'" pay homage to my dad's roots; he is 100% Sicilian.
Close-up of the statues, the word "Milan" and the language card. My dad's roots are Sicilian, but he was actually born in Milan.
My dad does speak some Italian, but I don't think I've heard him say "Buon Compleanno", which is Italian for "Happy Birthday". Nevertheless, I enjoyed making this card for him, and I hope he likes it!


