Hello! A pot of soup is simmering on the stove - that'll be our dinner, plus homemade trifle for dessert. (My late mother often made trifle for the new year). A bottle of bubbly (sparkling grape juice, actually) and a platter of homemade sushi await the ringing in of 2015.
And 2015, of course, means new calendars. I have the big one for the kitchen wall, ready to write in meetings, appointments, vacation days, birthdays and other events that merit our attention.
But I also have a number of other ways to mark the upcoming year, as seen below:
My collection of daily journals and another calendar. I'll describe them and how each will be used, starting from the top of the small stack.
1. My Gardening Journal, produced by Suncast Corporation (manufacturer of lawn and garden products); thrift store find. The journal has pages for each week of the year, with sections on these pages to keep track of what's blooming, what garden tasks were performed, what garden plans were dreamed up and weather conditions.
There's ample space in the back to sketch layouts, add photos, and more. One can really pack a lot of info in this slim volume!
The only thing I don't like about it is that it starts with March; January and February come at the very end. Perhaps the journal was organized this way with the assumption that gardeners tend to look forward to spring as the kick-off for their outdoor efforts. January and February are times to reflect how well their garden work had gone the year before.
However, I like to think of these two months as a time to start planning ahead for the upcoming growing season. I've already received one 2015 gardening catalog and look forward to more in our mailbox. So guess what? I'll start this journal tomorrow.
2. The Old Hermit's Almanac, Edward Hays; bag sale portion of the AAUW used book sale this fall. There are short passages pertaining to noteworthy events each day - for example, January 1st has mention of New Year's Day and a few customs associated with it, the feast of St. Clarus and the opening of Ellis Island. Following each write-up is a small space for noting any special occasions in one's life that occurred on the date.
There appears to be a mix of spiritual and secular info throughout this almanac, and I think it'll be fun to read.
3. Our Country Diary For 2015, edited by Marcia Leonard, purchased new. Yes, I actually buy new items on occasion! I've ordered each year's version of Our Country Diary starting back in 1994. The diary was in production before then; seems to me I used to see it advertised in the 1980's. I was too cheap to buy one for years but finally started doing so. Now I get a notice every year, around late summer, that the upcoming year's diary is available.
There's a small space each day for writing a synopsis of the day's events; this only takes a couple of minutes each night. There are also extra blank pages devoted to how major holidays were celebrated, but I have to admit I don't always bother to fill these in.
I'm glad I've gotten it for many years now, as past diaries have become good references. "What year did we do such-and such?" my husband will ask, and I'll look in one of my diaries to find the answer.
4. The Cat Lover's Companion, Joan Moore, thrift store find. I'll use this as a food journal - a place to write down what new recipes were tried, what I bought at the farmer's market, etc.
Two previous years I've used:
I've found two copies of this cooking calendar (issued in 1962) at thrift stores over the years, and of course I'd buy yet another copy should I find it again at a thrift store. I passed on the $37 the MSU Surplus Store was asking for one copy recently. $37! I don't think I paid more than a dollar for either copy I got.
So for this year, the cat journal will do. Not only are there nice photos of various felines, there are also snippets of information on the species as well. Thus, with this journal, along with the almanac, I'll get a little "book learning" throughout the year.
5. Family Vacations Calendar 2015 (white calendar on bottom of pile), created by our daughter as a Christmas present. It's been her tradition for the past several years now to make separate calendars for her parents. "Organic Compounds" is the 2015 theme for my husband. Unlike either of them, my chemistry background is limited to a high school course, so I'm fine with a calendar with nice vacation photos we've taken over the years.
I tell my daughter that her calendar is the most important one I have all year, for I use it to keep track of my workouts. I place a sticker on each day that I've done some exercising, along with a brief mention of the workout and how long it was performed. It's a nice way to keep track of my progress and also helps me remember what exercises I've been doing (I vary my workouts to prevent boredom).
And speaking of workouts, I need to do one before I serve up dinner! Happy New Year's Eve, everyone! Have fun but if you're going out somewhere to celebrate, stay safe!
Merry Christmas to everyone! We had a nice Christmas ourselves, and got a bonus "gift" of good travel weather for going to spend the day with relatives some 2 1/2 hours away. Last week talk had begun of a nasty storm possibly hitting our region on Christmas Eve/early Christmas day.
This was dismal news, especially since last year we'd been forced to stay home due to heavy snow on Christmas morning. But when Christmas Eve rolled around, the precipitation that arrived was rain, and that stopped late in the evening. By today everything was high and dry!
So it was a Merry Christmas indeed! And I hope that you and yours had a nice one as well.
(image shown above: vintage Nativity set purchased last month at a church rummage sale. The figures are tiny, which is what I love about it!)
Hello! Spied this on our front porch yesterday morning:
The note on top of the stocking had been inside; I pulled it out to take its picture as well:
The stocking is meant to be a round-robin neighborly gift - once filled with gifts of one's choice (goodies such as cookies or jam, or gifts of time such as a dinner invitation or offer to shovel snow), the stocking is passed on to another neighbor. An enclosed greeting card showed where the stocking had started and where it had been, as people left messages for the neighbors they were gifting.
Our gifts(from some super-nice new neighbors) were beautifully-decorated cookies and a hot chocolate mix. I'd already planned to give some goodies to a particular neighbor, so I filled the stocking with homemade versions of Chex Mix, chocolate-mint fudge and cappuccino mix.
This close to Christmas, I had a couple of concerns: filling the stocking and passing it on might be thought of one more task to complete at a time when to-do lists seem to multiply! (I'm hoping the neighbor I delivered it to this morning doesn't think so. I don't know what date the stocking began circulating). Also, if the neighbors you gave the stocking to had already left town for the holidays and you weren't aware of this, the stocking would languish there until they return. (I'm mindful of this, having traveled recently - met people who were heading east for the holidays and would be gone two weeks.)
The card's instructions did indicate to return the stocking to the family who'd begun the round-robin after the New Year, so it appears people have until then to circulate it.
But these are minor concerns, really. It's the spirit that counts, of course, and I was delighted that the family who started the round-robin had thought of it. I don't even know them, as they live around the block. They had a lovely idea, and one that spread to my block as well.
I realize that this post is too late for others to do the same thing in their own neighborhoods, but who knows - maybe next holiday season someone will remember this idea and replicate it.
Hello! Continuing where I left off in yesterday's post...rain was imminent Monday, so indoors activities were a must. With that in mind, we headed toward Fairfield and the Jelly Belly factory tour there.
First, we got lunch at a In-N-Out Burger place. I'd long heard that In-N-Out burgers are sorely missed by those who move away from the chain's locations, which are currently only in California, Nevada, Arizona, Utah and Texas. I wanted to see what all the fuss is about.
I can't say I was overly impressed, but I am hard to please when it comes to restaurant meals. One appeal of In-N-Out is its adherence to fresh ingredients. Another positive aspect is its business practices, which are said to be employee-centered.
Then there's this:
That's the size of the entire menu: three types of burgers, French fries, shakes and fountain drinks. No chicken, no salads, or any of the myriad other choices found at its competitors. (note: there's a so-called "secret menu" with burger configurations customers have requested over the years. This "menu" is on their website).
I imagine that the brevity of the In-N-Out menu is similar to what the McDonald's menu looked like when that chain first started. In-N-Out may be on to something: McDonald's recently announced it would be taking several items off its menu.
Don't have any photos from the Jelly Belly factory tour - none were allowed. It was still a cool experience. I've always loved to see how things are made on a large scale. The level of automation, the design that went into the productions of all the machinery - it just boggles my mind. It was something to see a gigantic robotic arm lift up three different sizes of boxed candies, one at a time, and place each on the correct pallet for shipping. It was also quite something to see hundreds of pounds of Jelly Bellys, ready to be packaged up in various ways. At one point, our tour guide directed our attention to a conveyor belt with large swathes of different Jelly Bellys, heading toward a mixing step that would result in the multi-flavored blend commonly found where that candy is sold. Too bad we weren't allowed to take pictures - that would have been a very festive-looking photo!
The rain had subsided for the time being, so we decided to drive over to Petaluma; I had heard it's a cute town. We traveled through the Napa Valley wine country on our way; saw many signs for wineries. Also saw signs of flooding; this area had been hard-hit by recent heavy rains. Some vineyards were flooded and every so often we'd see standing water on the road.
Petaluma turned out to be as cute as I'd heard - lots of charming shops and restaurants, most in restored Victorian-era buildings. I'd sure it gets crowded on the weekends and for special events, but as we were there on a Monday with iffy weather, there were very few people around.
We didn't have much time to shop, unfortunately, but a couple of small purchases were made. One business that we gave our money to was the Petaluma Seed Bank. The shop is housed in an old former bank building and is a gardener's dream! We saw rack upon rack of heirloom seed packets, garden tools, garden/hobby farm magazines, garden tools, cookbooks, soaps and more. We limited ourselves to four seed packets, but later on I learned that a free seed catalog is available, as seen HERE (click on "catalog" to order one).
I also checked out a secondhand store called The Thrifty Hippy. It was a bit disorganized, as those types of stores can be, so looking around was a bit of a challenge. Then I spied a familiar sight: a miniature pair of wooden shoes, tied together with a red ribbon, and with green and red windmills painted on the sides. Also familiar was the town name and state written on the sides next to the windmills - yes, this object came from the town where I now live. Judging by the red and green color scheme, I'm guessing that the pair of shoes was meant to be a Christmas ornament.
I'm sure I could buy something just like this in my town, but hadn't. It seemed more "exotic" to find it on the West Coast. Once back home, I wrote on the bottom of the shoes the date and place where this ornament had been found. Not a bad little souvenir for a buck, I'd say!
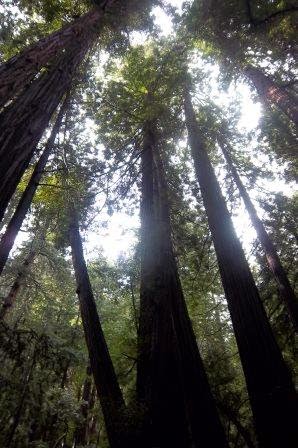
That was basically it for Monday. Tuesday's weather sounded similar to Monday's, only the rain was supposed to hold off until the afternoon. So off we went to the Muir Woods National Monument, home to old-growth coastal redwoods. We'd made a brief visit there in 1996 and were glad to return. It is a special place.
Entrance to the trails.
Portion of a fallen redwood, with growth rings labeled by age. An explanation of what the rings represent can be seen HERE. The tree had been "born" in 909 AD and lived until it fell in 1930!
The bottoms of some of the redwoods...
and the treetops. My pictures don't do these majestic trees justice.
The above signage says "CATHEDRAL COVE enter quietly". This admonition is there to enable visitors to enjoy a stand of redwoods in peace. Even a group of young women who looked to be giggly types walked around this section of the park in whispers.
More evidence of recent heavy rains: one hiker advised us to turn back on one trail since it was covered in water, and a main access road to and from Muir Woods was closed. We had to return the way we'd come, on a rather convoluted route out of the nearby town of Mill Valley.
And Mill Valley is where we headed for lunch, at a Puerto Rican restaurant my husband had suggested, Sol Food. I wasn't crazy about my chicken sandwich, but that was in part because it was rather drippy to eat. And the various components of the sandwich didn't seem to blend well. However, the restaurant is well-regarded on various online review sites, so maybe it's just me.
It was a cute place, and in general the other customers seemed to be enjoying their meals. And I have to admit, it was very pleasant to take advantage of Sol Food's outside seating on a mid-December day! While waiting for our lunches to arrive, I wandered down the plaza to a nursery. Ah, to see flowers meant for outdoor plantings (pansies and other cool-weather bloomers) for sale! Long past that where we live, of course.
Downtown Mill Valley looked very cute, but we acquiesced to our daughter, who wanted to shop at the mall near our hotel in another local town, San Rafael. Since the rain was due to hit any second I agreed, and found a Christmas present for my dad there.
Mall-saturated, but still not quite hungry for dinner, we headed to downtown San Rafael and took refuge from the rain at an indie bookstore, Copperfield's Books(actually a small chain, but still indie). It was the perfect place to relax for a spell, and then we headed down the block to Crepevine. It, too, is a small chain. Despite its name, it serves much more than crepes - sandwiches, salads, pastas and egg dishes are also on the menu.
Do you ever feel like breakfast for dinner? I did, perhaps because of the rain. I also wasn't hungry enough for a big meal, so was delighted to learn that I could order the cinnamon-raisin bread French toast for my dinner. My husband got a crepe and our daughter, a sandwich. Both their meals came with mounds of potatoes and organic mixed greens - large amounts of food. It seemed like the sort of place where just about anything one ordered would be good. I can recommend it.
Our Bay area stay was winding down. Weather was nice again Wednesday as we drove across the famed Golden Gate Bridge and toward the airport in San Jose. Lots of babies and small dogs on our flight, but other than a few cries or whimpers, all behaved just fine!
Was hit with a blast of cold air as we got off the plane at Chicago's Midway Airport - welcome back to the Midwest! Back to reality for us, but it had been a fun trip.
Hello! There's an old song titled "California Here I Come" - well, that's where we went for a short family vacation recently. We were in the San Fransisco area from last Saturday night through the middle of this Wednesday. That's not really a lot of time in an area with so much to see and do, and we were hampered by rain part of Monday and Tuesday. But we still had a good time!
I'd last been to the San Fransisco area in 1997 (had also visited in 1989), so I looked forward to seeing what I'd remembered from that trip. Our daughter was just two then, so she had no memories of that time. We were hoping she would enjoy the area as much as we had during those prior trips. In a way the trip was for her, since she's been working very hard ever since she began her college career. My husband thought she needed a break from her studies and research job.
I didn't have time to take a lot of photos, but I'll have enough commentary to go along with them, so I'll do two posts. I'll start with our trip to San Francisco last Sunday.
Traffic was pretty thick as we drove into the city. Our daughter and I looked longingly at the designer boutiques as my husband inched the car forward, block by block. I sadly viewed the closed doors of Britex, a fabric store with a huge selection of buttons and trims. I had gone there during my two previous visits, mainly for the eye candy offered by all those notions, but it was not to be this time. They're not open on Sundays.
The dim sum menu from our lunch stop in Chinatown. We hadn't scouted out online reviews in advance, so picked the Grant Place Restaurant at random. It was fine. Dim sum is a lot of fun to order; if you've never had it, you're in for a treat. Larger dim sum restaurants have rolling carts that are continuously wheeled around for the customers to select from, but we were in a smaller eatery, so just pointed to the above menu.
Chinatown is densely populated with shops as well as people. The climate is mild enough that most of the shops have an open-air feel to them - no doors or windows to block one's view. I suppose that a lot of the wares being peddled are cheaply made (hence the low prices we saw), but it's still fun to look.
We continued on our way to the waterfront, walking through the Italian-style North Beach area. There looked to be many nice restaurants there too. We ate at one back in 1989, but didn't see it this time.
Our first stop at the waterfront was Ghirardelli Square - once the home of the chocolate company of the same name, it's now a mini-mall of shops and restaurants. Ghirardelli, who still manufactures its products in the area, has a factory store and ice cream parlor at Ghirardelli Square. The ice cream parlor has rather eye-popping prices, but that didn't stop us from ordering some sundaes anyway. They were good!
Normally I wouldn't even want to eat an ice cream sundae in December, but the climate in the San Francisco is much different than it is back home, of course. Michigan's weather was milder than normal when we left, but there were no sailboats out on the water, no green grass, no leaves left on trees - and no palm trees either. All these were evident during our trip, and the temperatures were in the 50's and low 60's.
From Ghirardelli Square it was a short walk to the waterfront and the Pier 39/Fisherman's Wharf area. This is a very touristy spot, but it was fun to see the different shops, restaurants and street performers.
Our daughter and I visited a bath-and-body shop. We'd never heard of the chain but learned it was based in Israel and its three US shops are all in the San Fransisco area. We saw two of those three, since they're only about two blocks from each other!
Since I'm now in possession of a sourdough starter, I popped into Boudin Bakery, whose starter dates from the Gold Rush days. I wanted to check out how their breads were shaped, plus was hoping to see some samples out for tasting. But the place was so crowded I could barely see anything! Well, after all San Fransisco sourdough is supposed to be world-famous. Guess I'll have to settle for mine being famous within my own home!
In the distance, a view of the Golden Gate Bridge. I'm partial to the longer suspension bridge in my home state, the Mackinac Bridge, but of course the Golden Gate Bridge is better known.
In the holiday spirit: this inflatable Santa is trying to lure waterfront visitors to a boat tour. One such business was advertising "holiday lights" tours on Saturday evenings in December. That sounded quite delightful, I thought.
Alcatraz Island, home of the notorious former prison. It's open for tours now.
Another now-famous sight along Pier 39, the sea lions. According to information located on the pier, the sea lions began hanging out at Pier 39 after the 1989 earthquake (the informative sign didn't say why). This is just one small group; there were dozens more napping and/or vocalizing on nearby docks. They're fun to watch, especially since back home we can only see their ilk in zoos!
Ah yes, another famous sight around the city, the iconic cable cars. This is the car we took back to the Chinatown area (we'd left our rental car in a parking garage near there). As it was already painted red and green, it had been decked out for the season with tinsel garlands, bows and a big wreath in front (not shown). There were also cable cars painted brown and tan; they hadn't gotten the holiday treatment. That didn't seem fair to me.
Cable car rides may seem the ultimate in touristy behavior, but they really are a can't-miss in San Fransisco. They are a blast! Just think of a cable car as a rather slow roller coaster. Yet it's not just for tourists - I saw riders pull out their commuter passes to show the conductor.
It had been a fun day, even if we'd only been to a small corner of the city. My next post will cover some of the surrounding area.
Hello! Our daughter, who's away at college, informed me last weekend that she needed new sleep pants. No problem, I told her, I'll make or buy some for you.
Decided to go the easiest, cheapest route first - the thrift store, of course. It just so happened that I had to run an errand on Monday that was across the street from a local Goodwill. And it also just so happened to be a color tag sale day - all the blue tags were 50% off. I hadn't even remembered that that Goodwill had tag sale days (that's a more recent thing at that location), but of course I wasn't going to pass up the special.
With such savings, I spent only $7.00 on two sets of sleepwear:
Our daughter had only asked for sleep pants, but I got her a couple of matching tops as well. Neither top was specifically meant for sleepwear (ie they don't look like pajamas), so I figured she could wear them as daytime tops instead if she felt she didn't need any more sleep tops.
Picked her up at the end of her fall semester today and brought her home for Christmas break. I showed her the two sleepwear sets and she was happy!
If I hadn't found sleepwear for her that I deemed worth buying (good condition, colors/patterns she'd like), I certainly would have bought her brand new sleep pants or sewn her some. But with December being a rather spendy month, and with other sewing/craft projects ongoing, I was glad that once again a thrift store came through!
Hello! Well, it's another day, another coffee creamer recipe. This time it's Chai Coffee Creamer. The recipe source is the same magazine clipping from where the previous post's recipe (Malted Coffee Creamer)had come.
Chai Coffee Creamer
1 1/2 cups nondairy powdered creamer (see my notes below)
1 cup powdered sugar (see my notes below)
1/2 cup powdered milk
2 teaspoons cinnamon
2 teaspoons ginger
1/2 teaspoon cardamon
1/2 teaspoon white pepper (see my notes below)
1/4 teaspoon cloves
1/4 teaspoon ground allspice
In a medium bowl, combine all ingredients. To serve, stir 1 tablespoon creamer into 1 cup hot coffee.
Notes: as I'd done with the previous recipe, I swapped the nondairy creamer for the same amount of powdered milk, and used white sugar in place of the powdered variety.
I didn't have white pepper on hand, so I just left it out. However, I did add a couple dashes of ground red pepper. That addition is totally up to you!
Here's how this creamer looks:
The faint brownish color you see is from the spices, of course. Next to the creamer is another of my Scandinavian holiday figures. This little guy is labeled on the bottom as being from Sweden, and the date "1971" is written there as well. He's is great shape considering he's 43 years old this year!
I liked this creamer a lot! It gave my coffee a nice "warm" taste due to all those spices, and no, the bit of red pepper I'd added to the mix didn't make it spicy. I think it just enhanced the flavor of the other spices.
While it adds more flavor to coffee than the Malted Coffee Creamer does, it didn't "lighten" the coffee as much as that recipe does. Thus, I had to add a bit more of the Chai Creamer to my mug. I think I'll try adding more powdered milk to the recipe next time.
As with the Malted Coffee Creamer, it was also suggested by whomever supplied this recipe that this could be placed into "gift jars of choice".
So there you have it - another day, another easy gift idea for the coffee lover in your life. (even if that means you!)
Hello! I had a gift card to a coffee chain, so decided to use it the other day. Got sticker shock when I saw the prices of the specialty coffee drinks, so I selected some coffee beans instead. Figured I'd get better use of the gift card that way.
And really, I didn't need a flavored coffee anyway since I already have a couple of syrup recipes that I use, as seen HERE.
However, I'm always on the lookout for more coffee flavorings, so awhile back I clipped a recipe for Malted Milk Creamer out of a magazine (not sure which one, but I think it was a specialty publication devoted to the South). Here's the recipe:
1 cup nondairy powdered creamer (see my notes following the recipe)
1 cup malted milk powder
1 cup powdered milk
1/2 cup powdered sugar (see my notes following the recipe)
In a medium bowl, combine all ingredients. Store in lidded container. To serve, stir one tablespoon creamer into 1 cup hot coffee.
Notes: I don't use nondairy powdered creamer, so I just substitute powdered milk, using the same amount. And I use regular white sugar instead of powdered sugar. Why? Well, I normally use white sugar in my coffee, so I stick with that. But of course you can make the recipe as written.
The creamer just looks like a white powder, but I took a picture of it anyway:
I don't have much left, so I put in a juice glass to show it off better. Next to it is a figure from my Scandinavian holiday collection; country unknown but the date 1968 is written on the bottom (thrift store purchase).
I really like this creamer; the malted milk powder seems to mellow the coffee nicely. It doesn't really change the taste of coffee, though, so if you wish to add some flavor, you could try adding cinnamon and/or nutmeg. Or why not use chocolate-flavored malted milk powder? I haven't done so but might for my next batch.
The magazine suggested dividing the creamer into "gift jars of choice", and indeed, this would be a nice little present for a coffee lover.
Hello! 'Tis the season for holiday decor, and if you're like me you hunt for vintage decor at the thrift stores. Here are a few recent finds:
Whitman's "Christmas Frame Tray Puzzle", with the date 1961 on it. (I have a brother born that year, so I guess he's vintage too, ha).
It's in pretty good shape given its age and the fact that it's all cardboard. Something like this would have been wrecked in no time when I was growing up. Heck, I can still recall the time one of my siblings got a Battleship game for Christmas. The game was promptly opened up and played over the course of the day. But in the general melee of the day (a family of ten plus a visit from a drama-filled grandmother), one of the battleships was lost, never to be found.
The name "Vern" is written on the top border of the puzzle in a childish script. (When's the last time you met a kid named Vern?) On the bottom left corner of the puzzle is a statement attesting to its usefulness: "For Developing Coordination and Motor Control". Who knows, if Vern put the puzzle together often enough, his handwriting might have improved over time.
Actually, my handwriting isn't the best either, but I bought the puzzle for its graphics:
Cute angel and ornaments on that tree!
The next item may seem mundane, but it's in a category that seems to have some collectible value:
A roll of vintage ribbon that appears to have never been used. I bought it for the Santa graphic. Thanks to thrift store pricing, I paid only a penny more than that original price, but try finding something like this that cheaply on eBay or Etsy - not going to happen! Oh, and the ribbon - it's dark green, about 3" wide. One Etsy seller estimated that this item is from the 1950's.
The other side of the ribbon roll has the same label, along with the original price tag from a place called Neisner's. Had never heard of that store so I googled the name out of curiousity. Wasn't really expecting to find anything, so to my surprise I learned that Neisner's was a dime store chain based in Rochester, NY. At one time it did have stores in Michigan, but I don't recall seeing any (an Internet search showed they were located in the Detroit area). The chain was bought out in the late 70's, so it exists no more.
The last find is my favorite, so I have several photos to show off, starting with:
Make your own World of Christmas, a 1972 publication by Rosemary Lowndes and Claude Kailer. Again, purchased for the graphics, though this book is meant to be cut up. My copy is intact - perhaps, like me, a previous owner felt it was too pretty to take apart.
But the book is more than pretty artwork - it also has brief histories of holiday customs the world over. Since there's a 12 Days of Christmas theme, there are 12 sections for these customs, whether by countries (separate nations such as Italy, Denmark, etc.) or by groupings (Scandinavia, Spanish-speaking areas, etc.).
An important holiday figure associated with each country or region is printed in several pieces to be cut out, folded and glued together. There are kindly saints, an angel, the Three Kings, and more.
Each chapter is preceded by artwork representing one of the 12 Days of Christmas; these are meant to be cut out and assembled as a calendar.
Today is Sinterklaas Eve, a Dutch holiday that anticipates St. Nicholas Day (Dec. 6th). As I live in a town that was settled by Dutch immigrants, the occasion will be celebrated locally tonight with a procession led by Sinterklaas, games, stories and refreshments.
So of course I'll show the book's rendition of Sinterklaas:
This is a photo of the Sinterklaas figure after the various pieces have been cut out, folded and glued together.
And above is a portion of what the Sinterklaas figure looks like in its pre-construction state.
As a bonus, each chapter has an accompanying scene with cut-out figures. Let's go Dutch again:
Above, the scenic backdrop for the Dutch figures. The authentic windmill (ie, it actually comes from the Netherlands) here in town looks just like the one in the scene.
These are the figures to cut out and pose in front of the scene. I think these are meant to show examples of traditional folk costumes from the respective countries or regions. I recognize several of these Dutch outfits from the Dutch dancing performed during my town's annual Tulip Festival.
Of course, a similar format is followed for the other countries or regions: a brief write-up of holiday customs, the meaning behind the figure to be assembled, and costumed figures to be placed in front of a scene.
The illustrations for a couple of the 12 Days of Christmas calendar pages:
A partridge in a pear tree and three French hens. Gorgeous artwork!
I would have loved this book had it been given to me as a kid! I wouldn't have thought twice about cutting out those figures and playing with them in front of the corresponding scenes. And before I did my snipping, I would have enjoyed learning about all those holiday traditions.
As an adult, however, it seems a little silly to cut up such a pretty book (though several appealing display options are shown, such as shadow boxes, ornaments, mobiles, and so on). I was half-tempted to cut out and display the Sinterklaas figure in honor of the local Dutch heritage.
But I think I'll hold off on the scissors, at least for this year. If the book has lasted 42 years thus far without being cut up, I guess that can wait at least one more Christmas! (Guess I could make photocopies if I want.)
Hello! I'm probably like many crafters out there when something around the house gets worn out and is beyond repair. This may mean the item gets tossed, but on the other hand it may mean I'll hold onto it with the intent to use it in a craft project sometime.
Such was the case with a pair of knee socks our daughter wore out a few years back - they had a cute striped pattern and a few crocheted flowers attached to each sock. Definite crafting potential!
Never got around to making anything with the socks, though, until I purchased Stray Sock Sewing: Making One of a Kind Creatures from Socks (authored by Daniel) at a local Goodwill recently. I'd seen this at a bookstore and had liked it, so of course I was happy to find it at a thrift store! (I didn't forget Daniel's last name; he doesn't give one).
The book is really pretty basic. About half of the volume is pics of various sock creatures, posed very appealingly. The photos may be filler, but they do make you want to craft some sock creatures of your own.
Next Daniel gives several lessons on supplies, sewing tips, embroidery and so on. Lastly, there are directions for eight projects. I wanted to make a cat, but not the one shown in the project instructions, so I just read up on the tips and went from there. I should add that Daniel apparently sews his sock creatures by hand, but I used a sewing machine to create my cat's ears.
Here's how my Crazy Cat turned out:
Even though I'd cut the sock down a bit (this eliminated the worn-out toe area), my cat still is nine inches tall and needed a fair amount of stuffing. That's what happens when you use a stretchy material like socks!
As I'd said, I formed ears by sewing their shapes with my sewing machine. The bottom was sewn together by hand once I'd stuffed the sock.
Then came the fun part, the embellishing. You can see two crocheted flowers on the bottom part of the figure; they were already there. I cut another crocheted flower from the other sock in the pair, along with a bit of that sock itself. I sewed this embellishment onto the doll with a vintage button.
I embroidered the nose, mouth, whiskers and wavy line with black pearl cotton. It was a bit tricky stitching on such stretchy material but I made it work.
I experimented a bit with how to add character with the eyes. Finally cut two fabric circles out of a funky old vest (bought at a garage sale from a woman who liked to use funky old clothes in arts and crafts projects - you see, I'm not the only one who saves stuff like that). These circles were attached to the face with more vintage buttons.
For a final embellishment, I cut a heart from the same funky vest and glued it to one ear.
This is a simply-shaped sock creature, I'll admit that. The book shows more complicate creatures, such as those with attached heads and limbs, or those with hand-sewing done to create the suggestion of arms. Mine is basically a tube with sewn-in ears. I still like how it turned out, though - not bad for a first effort!
If you'd like to learn more about the book I referenced, look HERE.
Hello! Happy Thanksgiving to all those celebrating the holiday tomorrow! May you and yours have safe travels, wonderful food and much to be thankful for.
I don't have a lot of Thanksgiving decorations, but above you see a vintage postcard I own, postmarked November 24th, 1908. The postmark reads "Sykesville", but I couldn't make out where that is.
And due to the illegible nature of the sender's handwriting, I couldn't read where the postmark's destination was, nor could I decipher most of the greeting being sent. I did make out "...killed 10 big hogs" but that was about it. Sounds like a lot of ham though!
I love the close-up on one side of the postcard:
"Dec 22 1620 LANDING OF THE PURITANS" is written underneath the drawing of the Pilgrims arriving at Plymouth Rock, with their stalwart ship The Mayflower in the background. It's really very nice artistry, but is rather eclipsed by the turkey strutting its stuff!
Oh well, it's still a nice postcard and has held up well for over 100 years.
Hello! Did you notice that Christmas is one month from today? Yikes! Fortunately for me, I recently came across a fairly easy but cute Christmas ornament project on Pinterest. I decided to adapt it for the yearly handmade ornament gifts I make for my nieces and nephews.
The project was labeled "Layered Circles Christmas Ornaments". The examples I saw used plastic ornament balls, a glue gun, and circles punched out from a flower painting book with a 1" punch.
I had a few plastic ornament balls, bought on clearance years ago, but not enough of all the same size for the number of ornaments I needed to make (that's what happens sometimes when you get stuff on clearance). I hunted in the thrift stores for more plastic ornament balls, but didn't come across any. I broke down and bought some new ones (gasp!) from the craft department at Meijer (I'm sure that the craft stores have them as well).
I wasn't going to use a book on flower paintings for my ornaments. I doubted that my nieces and nephews would appreciate that look. Instead, I turned to my collection of secondhand books, both vintage and newer, to craft their gifts. I tried to find books that fit the ages of the kids - for instance, pages from a book on the history of architecture for a studious, brilliant high school sophomore nephew.
Here's how two of the ornaments turned out:
The top ornament was crafted from pages of a 1962 baseball guide. Since this is going to a nephew who lives in southeastern Michigan, I made sure to use pages from the section on the Detroit Tigers.
Next to it is an ornament whose circles were punched from a vintage children's textbook. This ornament is earmarked for a young niece.
The instructions called for a glue gun, but I did fine sticking the circles on with craft glue. It was also suggested to draw guidelines around the ornaments to help in placing the circles, but I didn't bother doing this. I found I had a little time to move the circles around as needed before the glue set.
The directions didn't call for glitter, either, but I added some to dress up the ornaments a bit. I just dabbed a little craft glue onto the circles' edges and sprinkled away with glitter. (vintage glitter no less, lol)
And the thin curved piece near the tops of my ornaments? That's actually narrow organza ribbon tied to the ornament caps. But before I tied the ribbons on, I wrote the names of the recipients plus the year 2014 on them. I like to personalize the ornaments I make with the name/date every year.
The names change over time - once the kids graduate from high school, I no longer make them ornaments. I figure once they're on their own, they'll need room on their Christmas trees for other ornaments! But as I come from a large family, I still had several ornament gifts to make this year.
And with Christmas fast approaching, I'm glad I have the ornaments finished! If you'd like to make these yourself, look here.
Hello! The dining room remodeling is over - new drywall installed, walls and trim painted, furniture moved back in and wall hangings back up. It looks really nice! Well, all except for the built-in china cabinet.
After we'd moved in and I was arranging my knick-knacks in that china cabinet, I saw that portions of a thin backing on its interior wall (painted-over wallpaper, perhaps) were cracking and even peeling off. We had not noticed this problem while house hunting; likely the previous owner had placed her knick-knacks in such a way as to cover up the defects.
I did the same, arranging my objects to hide the problem. But when that part of the dining room suffered substantial water damage due to a burst pipe, the eventual tearing out and rebuilding of the wall and ceiling caused even more of the backing to come off.
Here's an example of what I mean:
This is near the corner of the topmost edge of the wall. Portions behind the lower three shelves had even more damage. It seemed a shame to leave the china cabinet as is when the rest of the room had been redone. But I'd already done plenty of painting (including the exterior of the china cabinet itself) so I didn't really feel like doing any more at this time.
Then I saw various "wallpapering" projects online, with the use of fabric or wrapping paper to line the walls behind kitchen shelves, bookshelves and china cabinets. One example I saw for using fabric called for the fabric to be wrapped around foam board cut to size. Since our china cabinet has glass panes on its sides, I didn't want something that thick to project out. So I decided to use poster board instead.
Since poster board is, of course, thinner than foam board, it made sense to use a thin, fairly stiff material like wrapping paper instead of fabric, but I also considered the rolls of vintage wallpaper I had bought dirt cheap(10c/roll)several years ago. I scouted around town a bit for suitable wrapping paper, but nothing grabbed my attention, so I went with the old wallpaper.
I won't lie and say this was a quick project: I had to remove everything from the shelves, measure the inner walls, and cut the poster board to fit. As it wasn't long enough as is, I had to tape more than one sheet together and then cut the whole thing to correct size.
I'd purchased four sheets of large poster board and ended up using most of it. By the time I was down to the wall behind the last shelf, I had to do extra piecing together to get the height and length I needed. I also had to cut away portions of each top corner of my poster board sections; this was to allow for the molding at the inner corners at the top of the wall and underneath each shelf.
I used an extra-strong craft glue to adhere the vintage wallpaper to the poster board sections. I had the option of using spray adhesive, but it's messier to use and I wasn't sure how it would react with my old wallpaper. I could have used double-sided tape as well, but it would have been very difficult to remove the wallpaper if I needed to realign it on the poster board. The craft glue seemed to hold well, but I could still move the wallpaper around a bit if I needed to before pressing it down firmly onto the poster board.
I was afraid the vintage wallpaper would tear, but it was in better shape than I thought. The excess cut away cleanly with an Exacto knife.
For the top and bottom shelves, the sections fit snugly enough that I didn't need any other means to keep them up against the walls. The sections for the wall behind the two middle shelves didn't fit as tightly, so I used Command poster strips to help the corners stay in place.
Okay, enough chatter, now I'll show off some results:
Here's a view of the china cabinet - wallpaper backing instead of that crumbling stuff. I have a little bit of everything in there - gifts from my husband and friends, estate sale finds, things that had belonged to older relatives - and even a horseshoe found on Pennsylvania's Horse-Shoe Trail (picked up for good luck).
This photo shows off the same top corner of the china cabinet's interior as seen in the first photo. You'd never guess there's something that looks much worse behind the wallpaper!
(In case you're curious about the objects shown, the two vintage-style dessert plates - part of a set of four - were a Christmas gift from my mom one year. The vintage pinecone-motif dishes are part of a set of six, meant to be for tea, I think. The set includes tea pot, sugar and creamer, cups and saucers and dessert plates. It was a gift from two of my sisters, purchased at a consignment shop in Ann Arbor, MI. I haven't been able to find out anything about the set, which is labeled Ucagco Ceramics Japan. I love it though).
I think this project turned out very well, though it was a bit tedious to do all that measuring, cutting, taping and gluing. It didn't break the bank though - total cost was a little under $4.00. And another nice thing: the poster board sections are easily removed if I want to change the look inside the china cabinet. If I ever feel like painting over the inner wall, I can - or use another wallpaper or some wrapping paper.
Plus, the improved appearance of the china cabinet now matches the rest of the newly-renovated dining room!
Hello! As promised in my previous post, I'll continue with my kitchen "tour" today.
The 2nd half of the tour starts here:
A collection of vintage items displayed on a doorway. The doorway leads to the rear of the kitchen, but likely looked different at one time. It appears that the back section was added on after the house was built in 1895. One of the men who worked on our recent remodel speculated that the back section may have been originally been a back porch that was enclosed to enlarge the kitchen.
Although it would have been nice to have the original architecture intact, I appreciate the larger kitchen - especially since a ton of storage was put in that newer part.
Close-ups of the doorway decor:
Crocheted potholder, which came from the same estate sale that the doll clothes (shown yesterday) had come from. The tray with the daffodil design came from a different estate sale, and the hot dog plate came from a secondhand store. It was a gift from a relative who'd been with me when I'd admired this goofy plate at that store. I'd passed on purchasing it because I was already making another purchase there at the time. The relative went back to the store at a later date and bought the plate and its mate as a Christmas present for me. I was thrilled and appreciative!
Another potholder from the same estate sale, and above it a framed embroidery purchased at a thrift store. From the inscription on the back, I know it's now 50 years old.
Final pic from the doorway display. Notice the mate to the hot dog plate. This one is cow-shaped and is, appropriately, meant for serving hamburgers. An eBay search suggests that my two animal-shaped plates were made in Japan, but no sellers mentioned a date of manufacture. No matter, I love them!
The yellow tray has a tulip decal on it and the name of the town where tulips are famous - Holland, MI. The crocheted potholder was purchased along with the other two I'd just shown. At the time I was sad that family members let these handcrafted gems be sold at an estate sale, but now I'm glad they did. I like the retro charm the potholders bring to my kitchen.
Now let's step to that rear section of the room:
Someone had built a small niche of shelves. It's perfect for decorating with knick-knacks, which I rearrange when I feel like it.
Don't recall now where I got the three vintage German spice containers, but they were inexpensive - probably because the set is missing most of its pieces and the clove container is missing its lid to boot. They're still pretty, I think. The vintage salt and pepper shaker set came from a garage sale decades ago. At one time I thought I'd collect salt and pepper shakers, but didn't get too far with that.
Cock-a-doodle do! The smaller roosters are a salt and pepper shaker set and are Japanese-made. The large rooster figurine isn't labeled but might have come from the same country. This small flock came from a garage sale run by an antiques dealer. (the two bud vases aren't vintage; they were purchased at a local fair trade store).
Continuing with the chicken look, vintage ephemera from the Pickin' Chicken restaurant in Miami, FL. My father-in-law went to Florida a few times in the 1950's, as a bachelor and then as a honeymooner. So I assume this bit of advertising came back to Chicago with him after one of those jaunts.
This concludes my little tour. As you can see, my kitchen will never look like the sleek beauties one sees in shelter magazines - but I like how it looks just the same!