Hello! While cruising the crafts section of a local thrift store several weeks ago, I came across various sizes of embroidery hoops, all of which had some sort of mesh-like material inserted in them. Hadn't encountered this type of material before, but it appears to be made of very thin wood strips. I assumed it was meant for counted cross-stitch.
That craft seemed to have fallen out of favor in recent years. But my friend Ms. Kayak Chickee told me that counted cross-stitch seems to be making a comeback, with updated patterns and colors. She'd purchased some British magazines devoted to the craft and there were some great projects in them.
Knowing of her interest in cross-stitch, I bought one meshed hoop for her and one for me. I forget what I gave her, but my purchase was an oval hoop with a design area that measures about 9"x5 1/2".
Wasn't sure what to stitch within the hoop, but when Ms. Kayak Chickee suggested doing a word, I though that was a great idea.
First, I had to find a counted cross-stitch alphabet to use. I could have probably found one online if I needed to, but then I spotted a 1986 Leisure Arts leaflet, The Alphabet Book, at a thrift store - perfect! Several fonts were included, so I knew I would find one I liked.
Next, had to pick a word to stitch on the mesh. Peace? Love? Smile? Decisions, decisions. But before I settled on a word, our decorative plaque that said "Welcome Friends" fell off its hanger outside the entrance to our house and broke - another victim of our severe winter (the suede cord from which the plaque had hung must have deteriorated without my noticing it).
So, why not stitch the word "Welcome"? But alas, that word proved too long for the fonts that would have been the proper scale (there are smaller fonts in the leaflet, but they would have stitched up too small to look right).
Switched to the shorter "Hello" and I was on my way with the lowercase version of the Stencil font. The project was easily completed, using all six strands from a skein of embroidery floss in variegated blues:
I will bring the hoop inside for the winter, but as it's going to hang outside for now, I put a dab of waterproof glue on all thread ends to keep them in place. That was the only finishing I needed to do, so overall this was a very easy project.
I really like how this turned out and now I kind of wish I'd gotten the other meshed hoops that I'd left behind at that thrift store - but Ms. Kayak Chickee went there and bought the rest!
Oh well, I still have The Alphabet Book in case I want to stitch up words on anything else.
Edit: upon doing some online research, I think that the mesh in the hoops is something called "radio weave cane" and is normally used in chair caning. Not sure if it was often used in embroidery though.
Hello! Our daughter is renting a sublet this summer as she takes a couple of classes and works at an on-campus job. This marks the first time she's had to cook for herself on a regular basis.
Although the apartment came furnished, and her roommates said she could borrow their kitchen utensils and cookware, inevitably there were a few things she needed.
No sense in buying new (other than a bath mat and a shower curtain liner) when she'd just be heading back to the residence hall come late August. On the other hand, I wanted her to have decent stuff that could be reused in the future when she's done with dorm life for good.
Thus far, I've purchased her a couple of Tupperware food storage containers, a Wusthof paring knife, a lidded Corningware casserole dish (the type that can go in either regular or microwave oven) and a small wastepaper basket for her bathroom. Everything came from a church rummage sale or a thrift store.
All were in good shape - the knife sliced fine, no chips or stains on the casserole dish or on its lid, and no stains and very little wear on the Tupperware containers.
This is basic stuff, so I didn't bother to take photos of any of it. The price was pretty basic too: I spent around $6.00 for all of the above.
If brought brand new, I figured out that I would have paid between $45-$60 for everything. The knife alone retails for around twenty dollars! But I paid a mere fifty cents for it.
Can't beat those prices! It's nice to know that secondhand merchandise is available for anyone's living quarters, whether it be a summer sublet or a permanent residence. Come to think of it, I could use some replacement knives myself...
Hello! It's Memorial Day Weekend, which means the start of many summertime activities. Grills are fired up, boats are brought out of storage, cottages are opened up for the season, garden plans are put into place, and on and on.
It's also time to make ice cream! Of course, ice cream can be enjoyed all year round, but in general I only make it in the summer. Winter time is for using the oven to bake cookies, cakes and other goodies. But who wants to heat up the kitchen more than necessary when it's hot out? Not I! And short of going swimming, what could be a better way to cool off than eating ice cream?
I have a Krups ice cream maker, the kind that comes with an insert that must be frozen before ice cream can be made. But once that step has been completed, the ice cream mixture only needs 20-30 minutes of churning. The ice cream is more like soft serve at this point, so a few more hours in the freezer are necessary in order to harden it to a more scoopable stage.
(Incidentally, I think my Krups model is no longer available, but there are models from Cuisinart that are similar.)
Why make ice cream? Well, for one thing, it's fun to do, and is also a way to have flavors that are typically absent from the grocery store shelves.
For instance, is raspberry ice cream common? I don't think so, but it's been well-received around here this weekend:
I already mentioned that there's a bit of advance preparation involved in the making and eating of homemade ice cream. One also needs to plan ahead if a cooked custard base is preferred. The cooking together of eggs, dairy product and sugar makes for a very creamy ice cream, but the resulting custard needs to be chilled before being churned. When I make one of these bases, I'll cook it the night before and let it chill overnight. Then it's ready for the ice cream maker first thing in the morning.
Even simpler are the ice cream recipes that don't require any cooking, just a stirring together of the ingredients. The texture is a bit more coarse than that of ice creams made from cooked custard, but these ice creams are still very good. My raspberry ice cream was made from one such uncooked recipe, called "Choose-a-Fruit Scoops". It came courtesy of Midwest Living magazine. I had to reduce the recipe to fit the capacity of my machine, but that's okay - the resulting ice cream is pretty rich, so small servings are satisfying.
And though the recipe is meant to be fruit flavored, I don't see why other flavors (coffee, chocolate, etc) or add-ins (crumbled Oreos, crushed candies, etc) couldn't be used instead. As I'd said, that's the fun part of making ice cream - you can flavor it any way you want!
If you'd like to make your own "Choose-A-Fruit" (or other ice cream flavor using the same base), you can find the recipe HERE.
Here's to the beginning of summer - and to its perfect companion, ice cream! I know I'll enjoy using my ice cream maker throughout the season.
Hello! Made a quick visit to Michigan State University in East Lansing, Michigan yesterday. Didn't have much time to look around, but did take a few photos.
My lunch spot:
The MSU food truck; how cool is that? By going HERE, I was able to scout out the food truck's daily location in advance and view the menu and daily specials.
I had the grilled chicken sandwich with cilantro/lime aioli. Although I felt the sandwich was a little skimpy for the price, I could fault nothing else about it. It truly was one of the tastiest chicken sandwiches I've had in a long time.
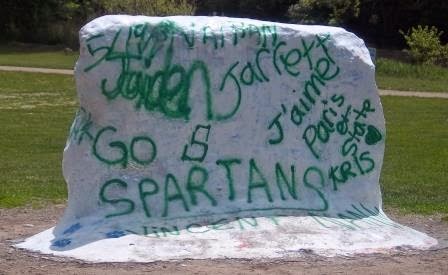
The website had informed me that yesterday's food truck location was "at The Rock near the MSU Auditorium". Having gone to MSU, of course I knew what "The Rock" was, but in case you don't know, here's what it looked like yesterday:
This is rather a subdued look; besides the "GO SPARTANS", the other statement of interest to me was the "J'aime Paris et State", which I assume referred to someone's love of their study abroad session in Paris. Well, why not - I would have liked to study abroad when I was in college too but couldn't afford it. Oh well.
The Rock is constantly painted over, with all sorts of slogans, event notifications, declarations of love and affection to others, Greek letters and so on. It very well may look completely different today!
The Rock has been on campus since 1873, and as a student I remember its original location near Beaumont Tower. It was moved to its current spot in 1986. The reason for moving a large boulder such as this? The health of nearby trees at the Beaumont Tower location had been threatened by them being spray-painted along with the Rock.
Spotted some more signs of personal expression on campus, this time in chalk.
The top photo reads "Dream a little dream everyday" while the bottom one encourages passerby to "love yourself". In the background of the bottom photo is a peace sign drawn over a manhole cover. These chalk writings made me smile. Both had been written on the path near the Bikes Service Center.
A stenciled message on a sidewalk near the Union Building was less positive though:
Perhaps a graduating senior had left this message, thinking not only of all the good times of the past four years but of the student loans that would have to be paid off in the future. Not a pretty thought.
There was one last picture I took, and that was in the Union Building itself. There is an electronic sign in the lobby that features the names of all the students who had made the Dean's List (3.5 or better GPA, I believe) during the most recent semester. Not only that, but one can press a name on the list, thereby blowing up that student's name all by itself on a new screen.
It's a fun thing to do if you're a proud parent, as I was yesterday. But to spare our daughter's embarrassment, I'm not showing the photo I took of her name here.
I hope to return to the MSU area in the near future; summer is a pleasant time of year there. Perhaps I'll head over some Thursday, when the Rock is host to the Student Organic Farm Stand. That sounds even cooler than the food truck!
How does my garden grow? So far this year, very slowly! Between waiting for the snow to melt and for both the soil and the weather to warm up, it seemed like forever before I could start my vegetable garden.
But finally, on April 9th I sowed some seeds of a couple of lettuce mixes, spinach and snow peas. I also unearthed the spinach seedlings that had emerged from the soil; I'd sown them late last fall and had covered them with a heavy layer of leaf mulch. First time I'd done this and it worked in spite of the seemingly never-ending polar vortexes we'd endured.
Because both soil and air were still chilly, I had to wait awhile for the seeds to germinate, and after that they grew rather slowly. It wasn't until today that the lettuces were big enough to thin out and pick. Those, plus the fall-sown spinach, became the base for a nice lunch salad:
Worth the wait? Yes! I love the delicate flavor and texture of fresh lettuces, and look forward to picking more for future salads.
Fortunately there's an easy way to "grow" another salad staple inside the house, year round:
Above, a tray of clover sprouts is ready to use. Besides salads, I like sprouts on sandwiches, and I've heard that some people toss them in their smoothies.
There are a number of sprouting systems out there, ranging from jars, bags and trays. I've used a couple different jar systems, a homemade sprouting bag (a mess) and a couple of tray systems.
Don't recall the brand of the first tray system I used, but do recall that it didn't seem to work well. There were three stackable trays. Rinsing occurred by pouring water into the top tray, which would drain through to the bottom tray and into a base for emptying. But it seemed like small sprouting seeds (alfalfa and clover being two examples)were always clogging up the water flow and I'd have to take trays apart to remove the impediments. It was a nuisance, so I ended up giving it away.
A few years back, I paid 50c for the above tray sprouting system at a church rummage sale. It had three trays and seemed complete in the box minus the directions. Those were easily found and printed off the Internet. The brand is Victorio Kitchen Products.
At this point, I'd say that I like the sprouts from this tray system better than those grown in jars. There's obviously more surface area for the seeds to sprout, so germination and the resulting yield are higher. They look better too, probably because they have more room to spread out. I've read that some people feel too much water is left in the bottom of the trays after draining, which can lead to molding, but I haven't found this to be a problem.
The seeds do occasionally block the drainage holes in this unit, but not as often as they did in the previous tray model I owned.
Sprout seeds may seem expensive at first; they can be priced somewhere in the $15-$20/lb range. But unless you're in commercial production, you wouldn't buy a whole pound of sprout seeds at a time! My tray of clover sprouts began with a mere 1 1/2 teaspoons of seeds, so the half-pound bag I paid $7.95 for at a local health food store will last me forever.
I don't know if I eat enough sprouts to improve my health, but I like the way they taste, and it's nice to have something so fresh, especially when I'm waiting impatiently for my vegetable garden to get going.
Hello! It's back to the 70's once more as we flip through the pages of The Total Tote Bag Book, published in 1977 (Joyce Aiken and Jean Ray Laury, authors).
Tote bags of all shapes and sizes are still popular home sewing projects. This particular book, a recent church rummage sale find, received several positive reviews on Amazon.com. A couple of reviewers commented that they've used this book just as much, if not more, than the much newer patterns they also own. Considering how old this book is, that's high praise!
I have to agree - there's a wide variety of tote patterns before, some pretty cool, some quite unique, and some a little crazy!
For example:
Above, a Shopper's Tote. "A piece of clear plastic provides a surface on which to list errands to be run or groceries needed...Nonpermament marking pen or wax crayon can be used for writing notes. Both wipe off". Don't think I'd ever keep my grocery lists in this fashion, but I hadn't seen this idea before, so I thought it was rather clever.
A piece of clear plastic appears again in this tote:
This is a Window Tote, with a clear plastic panel open at the top. By inserting fabric that matches a blouse or dress, we are told, the tote will match anything. But a scarf (shown above), photograph, cartoons or a calendar could be placed in the window instead.
Most of the bags, however, are more about carrying various items inside them, such as:
The designer's tote: "Sketch pads, graph paper, and architectural drawings fit easily into a big over-the-shoulder bag...always has room for one more illustration board or one more set of plans".
I don't know if computer graphics programs and other high-tech tools have made the lugging around of such materials obsolete, but it would have been a very useful tote back then.
And still a good idea:
This is the "Ms.'s Tool Kit", we are told, "For kitchen or car, here's a way to keep your tool collection intact for emergency use". I am not sure why this was considered to be a woman's tote, as a Mr. would have likely found this type of "tool kit" handy as well.
But it wasn't all work; The Total Tote Bag Book has many totes for recreational uses as well - picnics, sports, gardening, birdwatching, photography - you name it, your favorite leisure time activity could be enhanced by a special tote bag.
I enjoyed the book's back cover photo of a gentleman ready to head off to the tennis courts:
I was in high school when this book came out, so I do recall tennis being very popular at the time. But I don't recall if many people had their own home-sewn Tennis Tote, complete with "Pockets inside and out (that) provide spaces for everything. The racket is zipped into a racket-shaped pocket, and small pockets in the interior hold billfold, car keys, or change".
I was amused that they had to specify that the racket is zipped into a racket-shaped pocket - what other shape would that pocket be? Nevertheless, a practical tote, I'm sure. The gentleman, who looks like he could be related to Barry Gibb (of Bee Gees fame), seems happy with it.
If tennis wasn't your thing, there was biking. More than one tote project was dedicated to that sport, one of which was:
The Biker's Bag. "Bicyclists will enjoy this bag since it leaves both hands free. Anyone would find this type of carrier handy..." I dunno...seems to me it would get in the way on that side of the body, but the woman above seems pleased to have both her hands free.
Running - or, as it was often called back then - jogging (I think jogging was used to describe a slower pace) - had become popular by the time this book came out, so yes, there's a tote for this sport as well.
I think the word "tote" was rather loosely-applied for the following project, and I think it qualified as "crazy" as well. Are you ready to see it?
Okay, here you go:
If you're thinking that this looks like some sort of winged-shaped object around the jogger's ankle, you are correct:
As the description above mentions, "the winged portion is a pocket to contain the house key, a dime for a phone call (very dated now, of course), or a bus ticket". (in case of exhaustion, it's explained)
Certainly it's a good idea to have such practical items on one's person when out for a run, but a pocket shaped like a wing? I think I'll run right past that one!
But the craziest tote of all was in the "Totes For Children" chapter:
The caption accompanying the above photo explains: "A boy's special tote carries his white rat, leaving his hands free to ride his bike". The description of the tote's features is charming: "The designer made this bag for her son who found it difficult to carry his white rat while riding his bike. The shoulder strap slips over his head so that the pak fits smoothly against his side. The white rat (or mouse, hamster, or gerbil) enters through the zipper door. The buttonhole-stitched circle at the bottom allow the animal to stick his nose out to sniff the air...The rat pak is not meant to provide protection over any long period of time. But it does provide a safe, easy way to transport a very small pet for a short distance, leaving the cyclist with both hands on the handlebars".
Hmm...when I was growing up, I had siblings who had white mice, while another kept gerbils. I don't remember these siblings expressing a desire to transport their pets around town on bikes. But then again, we didn't own The Total Tote Bag Book, so rat paks weren't known to us.
Just as well, I think. For although our mother was an expert seamstress who could have whipped up a rat pak in no time, I'm willing to bet she would have refused to do so!
Hello! Several years ago, we stopped at Zingerman's Deli in Ann Arbor, MI on our way to a Detroit Tigers game. Zingerman's is known for their breads, but before that visit I'd never heard of sourdough/chocolate chunk bread. At that time, Zingerman's baked it in fat, individual breadstick-like shapes, and I bought one as a snack to nibble on during the game.
We attended the game with several relatives, all of whom asked what I'd gotten from Zingerman's when they saw its distinctive bag. All seemed skeptical when I told them it was a sourdough bread with chocolate chunks in it. But when I tore into it several innings later, everyone said it looked good. And upon passing around samples, we all agreed it tasted as good as it looked!
Sometime later Zingerman's stopped making this breadstick-type goodie, but a few years ago reintroduced the sourdough/chocolate chunk flavor in loaf form. Never bought it, though.
Then this Sunday we encountered another bakery's sourdough/chocolate chunk bread, being sold at a grocery store in the Lansing area. I saw my husband eyeing it with interest, then saw the $7.99 price tag. I told him I could make it at home, for less money.
I'd never made sourdough bread before, but since I'd said I could do so, I wanted to keep my promise. Fortunately, I recalled a sourdough starter and several accompanying recipes in one of my cookbooks, More Bread Machine Magic (Linda Rehberg and Lois Conway, authors).
Sourdough starters had always felt intimidating before, which is why I'd never made one. It seemed like the starter would need a calendar schedule all its own, what with all the stirring, using and feeding involved. I would read through the various steps and get lost in what to do.
But not so with the Rehberg/Conway Basic Sourdough Starter. "...this is an easy and nearly foolproof recipe" they assure the reader. And guess what - it is!
Milk or water and yogurt are stirred together and set aside for 24 hours. Then white or whole wheat flour (I used the latter) is stirred in and set aside to ferment. A once-a-day stirring was the only additional work needed at this point.
The starter was supposed to be ready within two - five days after the flour was added. I let it go four days, which meant that this morning was the moment of truth for my first-ever sourdough attempt. I used the Whole Wheat Sourdough Bread recipe in the same chapter. Made the dough in my bread machine, then took it out for a second rising on a baking sheet.
Before that second rising I chopped up some dark chocolate. Zingerman's and the other bakery probably use a better-quality chocolate than I did. I had a package of Hershey's dark chocolate eggs, bought on clearance after Easter. These were the size of Hershey's kisses and were just as much a pain to unwrap and chop up, but it wasn't too bad. I would have saved time if I'd used a package of chocolate chunks, like those found in the baking chip section at grocery stores. It took some doing to add all that chocolate in, but by folding it into the dough a little at a time, I got it in there.
After all this discussion, time for a couple of pictures:
An epic loaf of bread! I'd made the large size, and it baked up to a 3 lb, 6 oz size. It was probably at least twice the size of the one we'd seen in the grocery store last weekend. Of course, part of the weight is in chocolate chunks. I wasn't sure how much chocolate to add and was too lazy to research this on the Internet. I just kept cutting up chocolate candy until I had around 2 cups of chunks.
I baked the bread at 375 for around 35 minutes.
After cooling, I cut myself a small slice:
Yum! The tangy sourdough flavor is noticeable, as it should be, but the dark chocolate holds its own. It was quite a treat! My husband agreed when he tried some at lunchtime. We both agreed, though, that I could have gotten by with less chocolate - one to one and a half cups would have been plenty.
I replenished the starter, as specified in the recipe, and right away it started bubbling again. That means I can try a number of other sourdough bread recipes in the chapter and in other cookbooks. If I get tired of sourdough, Rehberg and Conway say I can freeze my starter as is, or else dry it and then freeze it (supposedly the dried starter holds up in the freezer longer).
Or I can throw the starter out and just make a new one some other time. As easy as it was to start, that's an option.
If you'd like to try making your own sourdough starter, the sourdough chapter from More Bread Machine Magic can be found HERE. I'm guessing the recipe can be made without a bread machine, using the usual hand mixing/kneading/rising steps.
PS I used dark chocolate because the two commercial breads I discussed both had done so. I can't vouch for how using other types of chocolate would taste, but feel free to try them if you wish!
Hello! Along with not knowing what I'll find at a thrift store each time I visit one, I also don't know what prices I'll find on the items that don't have a pre-determined cost (such as clothing or books). For instance, it's not unusual to find a price of 99c - on a dollar store knick-knack.
But then there's the prices I noted yesterday while browsing in the office supply section of a local thrift store. Within a few inches of each other, I came across a like-new but generic-looking clipboard that had a Staples logo on it. Next to it was a portfolio-type stationery package with this on the cover:
I'd not heard of this brand, but assumed that "1774" referred to how long the company has been around. The back cover said "Made in Italy". I already knew that Italy is home to high-quality paper purveyors, so I felt that whatever was inside would be nice stuff.
The portfolio wasn't sealed, so I opened it up(picture taken later on at home):
A variety of papers inside. There are envelopes on the left-hand side, which appear to go with the sheets on the right. In between these are two note card sets. I believe the larger of the two note cards is what's called a correspondence card, but I'm not sure what the smaller card - it measures about 2 1/2" x 4" - would be used for. Perhaps a gift enclosure?
Anyway, it was clear this was high-quality stuff indeed. Wasn't sure how much of this stationery set had already been used, but there was still enough to make the asking price a bargain.
How much did the thrift store want for it? $2.00. And what price did they they slap on the ordinary, Staples-brand clipboard? $2.00. Yep - the same price for two very different items of two very different qualities.
Read up on the Pineider brand when I got home, and learned that indeed, 1774 refers to the year the company set up shop in Florence, Italy. Since then, various well-known writers, business leaders, entertainers and royalty have purchased Pineider products. Their stationery is handmade, with deckled edges and tissue-lined envelopes.
My particular stationery set doesn't appear to be available anymore, so I don't know what it had originally cost. The prices I saw for Pineider stationery were eye-popping though. Needless to say, my purchase was worth more than two bucks!
Admittedly, I don't have much use for stationery since I make my own greeting cards, but there's times when I don't feel like making a card, or else an occasion pops up suddenly and there's no time to make one. I like to keep a small amount of commercially-produced stationery on hand for such times.
Nothing I had on hand already is as nice as the Pineider brand is. But thanks to the thrift store, I can have a little champagne taste on a beer budget. Not bad!
Hello! With our daughter home from college last week, I got a little behind on Tulip Time blogging. But with her back at school this week, no time like the present to do a post from the last day of the festival.
The tulip festival features three parades, and the largest of the three, the Muziek (Music) Parade, is on the last day. In previous years, it seemed like this event has been marred by poor weather, but not so this past Saturday! It was sunny and in the 60's, so a large, festive crowd of spectators was on hand. After the very harsh winter we had endured, you could sense everyone was happy to be outdoors on such a nice day, with it finally looking and feeling like spring!
Photos of the parade follow:
Above, all the way from Philadelphia, a group of Mummers strut their stuff. From living near that city for several years, my husband and I knew about the Mummers and the big parade they put on every New Year's Day. We weren't sure how many other spectators at our parade knew who they were, so my husband and I yelled out very specific things to them, like the area in which we had lived and the street their parade travels. Got a thumbs up from one of the Mummers for our efforts.
The local high school marching band, wearing their customary wooden shoes:
I always give them a huge amount of credit for marching in that footwear!
Town criers, some of whom had come from other countries to participate in a competition later on the day:
I liked the bagpipes the fellow in front was playing. I don't know why, but the town criers typically dress as if it's the 1700 or 1800's. I like that though. Criers from Ontario, Canada, ended up winning the awards in the competition. Not sure how many towns in the US have their own town criers, but around here, both Holland and Saugatuck do!
Next up, the best college mascot around:
Sparty, the mascot of Michigan State University! Above, Sparty is giving the thumbs down in response to some people who yelled "Go Blue!" - an obvious reference to MSU's in-state rivals, the University of Michigan. As soon as we heard that, my husband, daughter and I immediately took up MSU's "Go Green! Go White!" chant. We were rewarded with a big thumbs up from Sparty!
The Muziek Parade features a lot of music,of course. Most of it is in the form of high school marching bands from around the state and even a few from out of state. But the coolest high school band is different from the rest:
The Petoskey Steel Drum Band. They first popped up in the Muziek Parade a few years back and are a lot of fun to watch! Cool island vibe, and it always look like they have a good time performing.
They were the last act in the parade, so after they cruised on by we went home. Tulip Time was nearly over except for the last Dutch Dance performance:
Always fun to see the variety of Dutch folk costumes at this event!
One last photo, to show off the signature flower of the festival:
A stand of tulips at the Window on the Waterfront Park. The photo doesn't do them justice, and this is only one of several such tulip plantings in the park. It's well worth a visit if you're in the area.
For although Tulip Time is now over, there's still plenty of tulips to view. Thanks to our harsh winter, blooming times were delayed. It must have been disappointing to those who came to the festival hoping to see plenty of flowers. We locals, however, will get to see all the tulips we want - without the crowds of festival goers around.
Hello! Although I wasn't around in 1936, it would seem to me that the days weren't especially happy that year, what with the ongoing Great Depression and a couple of guys named Hitler and Mussolini acting up over in Europe.
Nevertheless, I came across the 1936 children's book, Happy Days, in a thrift store a couple of days ago and was taken with its charming illustrations.
This volume was a little beat up, but for quarter, what do you expect?
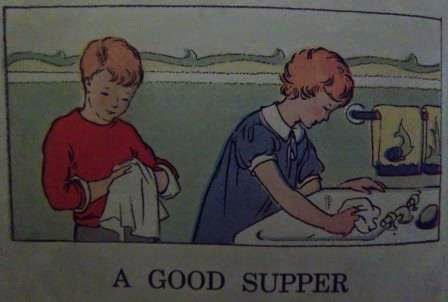
It wasn't until I got home and began flipping through some of the pages that I realized that Happy Days had been a textbook for what we'd now call a wellness curriculum. The health teachings of the day were woven into the story of city slicker siblings David and Joan, who spent several days of summer vacation visiting their Aunt Annie and Uncle George.
Naturally, the aunt and uncle live on a farm, which lends itself to many discussions of wholesome foods:
Above, David and Joan are washing their hands before having a "good supper", which consisted of lettuce leaves topped with a tomato with cream cheese, a pile of peas and carrots, and slices of eggs. Brown toast with butter and a dessert of cup custards and little cookies rounded out the meal.
It actually sounds like a pleasant supper for summertime, especially when you consider that they wouldn't have had air conditioning. The only disappointment for David and Joan is that they have to drink milk with the meal, while their aunt and uncle have tea. When David asks why he and his sister can't have tea or coffee, Uncle George sagely replies: "You should not drink tea or coffee...because tea and coffee leave no place in a meal for milk. Tea and coffee will keep you awake when you need sleep and rest. Tea and coffee do nothing to help boys and girls grow or keep well."
Note that Uncle George didn't say anything about carbonated beverages with caffeine in them. David should have asked for a Coke!
After supper, Aunt Annie uses the phrase "Happy day" and Joan wonders about this. Her aunt responds with:
Well, there you have it - Aunt Annie's philosophy, which is a pleasant one, of course. She should have added: "Because when I say 'Happy day', it becomes such a sweet title for this book we're all going to be in!"
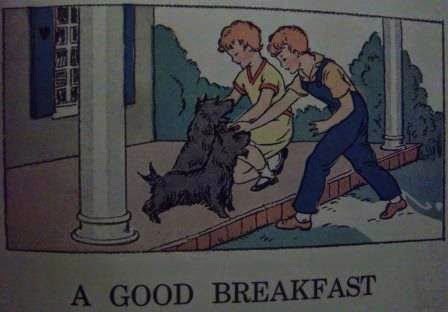
The next morning, another nutritious meal awaits them. Pop-Tarts hadn't been invented yet:
Above, David and Joan greet puppies Skippy and Tricksy (the children had been allowed to name them the night before upon their arrival at the farm) after watching their uncle milk a cow. After washing their hands, of course, they drink tomato juice (made from Uncle George's tomatoes), "brown toast and butter, and good fresh milk".
Rather conveniently, I thought, David and Joan go to school one day during their stay, attending with a neighbor's child, Nancy. She explains school days had been lost due to a fire at the old school and the subsequent building of a new school. Thus, the kids had to make up a month of school during the summer.
I think this was just a literary ploy to introduce another wise adult, in the form of Nancy's teacher Miss Long. She instructs a health unit on colds. Kleenex was around, but the students were cautioned to always carry clean handkerchiefs:
Above left, a young girl is taking a clean handkerchief out of the neat stack in a drawer, and on the right, a young boy has a smartly-folded handkerchief in the pocket of his sailor suit.
After school, David and Joan return to the farm and have a snack:
Of course, only natural sugars for these children (Nancy had come with them) - Aunt Annie had a bowl of fruit waiting for them!
After their snack, the children meet up with some kids for:
Some outdoor play. Looks like they're having a boat race in a pond. I don't live near a pond, so I don't know if kids still play in this manner. But I often hear complaints that youngsters today don't play outside enough. Too bad.
The next evening, after a supper of soft-boiled eggs, toast with butter, milk and fruit salad, Aunt Annie tells a story about a young girl who was tardy for everything:
Since we're in the midst of the Tulip Time festival, I thought I'd include this illustration of the girl dashing past some tulips.
Eventually the girl tires of being late for everything, so on her own, she develops a schedule of her daily activities. The new routine included: "Be asleep at eight o'clock at night". I wonder how many kids today would voluntarily make up such a schedule - especially for a rather early bedtime!
It just so happened that David and Joan's birthday fell during their visit, so Aunt Annie and Uncle George help them celebrate. Dinner is another vegetarian entree, peas and carrots with a mashed potato crust (perhaps they only had meat for their noonday dinners?). They do have a birthday cake with ice cream, though - I suppose the occasion was special enough for such rich treats.
For presents, their aunt and uncle give David and Joan Skippy and Tricksy, the puppies. The children are thrilled, but their parents are less so when they arrive to take the kids back home and learn that the puppies are to come with them as well.
David and Joan waste no time trying to assure their dad that they'll take good care of their new pets. Eventually David says something that seems to resonate:
"We will take them out to play every afternoon," said David.
"That will be better than going to the movies," said Father.
"Why?" asked David.
"Because," said Father, "outdoor play helps you grow and keep healthy. The movies do not. Many movies are so exciting that children do not sleep well after them."
Well, there you go, kiddies - if you want a dog and your folks are refusing to get one, just tell them Rover will help you grow and be healthy. And keep you away from ultra-exciting movies as well!
After a glowing report from Aunt Annie concerning David and Joan's health habits during their visit, they begin their trip back to their city home.
And I closed the book on their happy days in 1936.
Hello! Tulip Time, a local festival, is in full swing this week. Along with the flowers, it's a celebration of Dutch traditions. While I can't claim that nationality as my heritage, I am a bit of a foodie, so I like to see what Dutch foods are offered in conjuction with the festival.
Thus, earlier this week I had one of the two Dutch food plates offered during Tulip Time at a local restaurant, 8th Street Grille: Dutch pea soup (Erwtensoep), Pigs in the Blanket (Saucijzenbroodjes, meat-filled pastries), and Dutch Apple Bread. My husband had the other plate, which featured Dutch pot roast, red cabbage and mashed potatoes.
Had learned that homemade stroopwafels ("syrup waffles in English)were going to be sold at the Dutch Marktplaats, a Tulip Time shopping/dining venue. I'd only had the imported version of this cookie (two thin wafers sandwiched with a caramel filling)before, so was curious to see what a freshly-made stroopwafel would taste like.
I saw that the stroopwafel cookies were being baked in something that reminded me of a pizelle iron, so I asked the employees manning the booth if the cookies could be made in one. They didn't seem to know what a pizelle cookie was, though. (In case you don't, it's an Italian wafer cookie).
I bought a package of their stroopwafels and sampled one at home:
It was good, but I have to admit, I'm used to the taste of the commercial version. The home-style one seemed richer and sweeter. From doing some online research, I learned that people do, indeed, make their own stroopwafels using pizelle irons for the baking of the cookies. The recipes were loaded with butter and sweeteners, which is why my cookie tasted so rich.
We'd had a late Easter dinner on Sunday, to coincide with our daughter's visit home from college. Had some ham left over from the meal, so decided to make Dutch Rye Bread for future sandwiches. This recipe came from Dandy Dutch Recipes, edited by Mina Baker-Roelofs. It's a small specialty cookbook I'd picked up awhile back from the thrift store.
Here's a couple of slices, ready to be made into my sandwich:
And here's the recipe:
Dutch Rye Bread
2 cups rye grits (see notes following recipe)
1 cup white flour
1/2 cup brown sugar
1 teaspoon salt
2 cups buttermilk
1 1/2 teaspoons baking soda
2 tablespoons dark molasses
2 tablespoons vegetable oil
Mix the first 4 ingredients in a large mixing bowl. In a smaller bowl, mix buttermilk and baking soda. Add molasses and oil. Add this mixture to the first bowl and mix well, but do not beat. Pour into a greased bread pan and set aside for 1/2 hour. Bake at 350 for 1 hour. Remove from oven and invert another bread pan over the loaf. Remove from pan when cold. Wrap with waxed paper and store in refrigerator.
Notes: the recipe states that "rye grits are available in most health-food stores". I must admit I took some liberties with this ingredient, for I had something called "pumpernickel flakes" already on hand. From what I could gather online, it appears that rye grits are to pumpernickel flakes as what steel-cut oats are to rolled oats - in other words, the former is a less-refined version of the latter. I reasoned that I could substitute the pumpernickel flakes for the rye grits - I'd either end up with a flop, or else the bread would turn out fine, just a softer-textured version of the recipe.
The recipe didn't specify what size bread pan to use, but I used a 8x4 pan. This seemed to be fine.
Result: well, my flakes-for-grits substitution worked. It seemed hearty enough as is, though I assume using rye grits would have resulted in a coarser texture. The bread was a little sweet for me; I'd cut down on the brown sugar next time. And perhaps because of the molasses, it didn't seem like a rye bread to me. Instead, I was reminded of a bran bread I used to make (equally dense and sweet). It was very easy to mix up, but of course you do have to plan ahead for the 1 1/2 hours of setting aside/baking times.
And that's my touch of Dutch today, as in a few Dutch foods!
Hello! Had recently volunteered to make six dozen cookies for a local event, which meant a pleasant perusal of recipes from my various sources. It's the sort of occasion that seemed to call for a more genteel cookie than the usual kind I bake, which is chocolate chip with a bunch of other goodies tossed in.
I eventually settled upon the recipes for these two cookies:
Top, a Brown-Eyed Susan Cookie and below, a Crispy Cornmeal Sugar Cookie. Both recipes are courtesy of Marcia Adams' New Recipes From Quilt Country.
The recipe for Crispy Cornmeal Sugar Cookies:
1 cup (2 sticks) butter, at room temperature
1 cup sugar
2 egg yolks
1 teaspoon vanilla extract
1 teaspoon grated lemon zest
1 1/2 cups all-purpose flour
1 cup yellow cornmeal
1/2 teaspoon salt
Sugar and grated nutmeg, for topping
In a mixer bowl, combine butter and sugar and beat until light and fluffy, about 2 minutes. Add the egg yolks, vanilla, and zest and mix well. Stir in the flour, cornmeal, and salt and combine thoroughly. Refrigerate the dough (see Note) for 3 to 4 hours, until firm.
Preheat the oven to 350. On a floured surface, roll the dough out to a 1/4-inch thickness. Cut into shapes using a 2 1/2-inch cutter. Transfer to an ungreased baking sheet and sprinkle the cookies liberally with sugar and nutmeg. Bake for 8 to 10 minutes or until edges are browned. Remove to a rack to cool, then store in an airtight container. Makes 30 cookies.
NOTE: The dough may also be rolled into a 2-inch cylinder before chilling and cut into rounds about 1/4-inch thick before baking.
My notes: I did follow the above note and shaped the dough into a cylinder on a large piece of waxed paper, then rolled the waxed paper around the dough to cover. Popped the whole thing in a plastic bag and refrigerated it overnight. It didn't need that much chilling time, I'm sure; I just felt like waiting until the next day to bake them!
Perhaps I made my cylinder smaller than Ms. Adams had specified, for I got 52 cookies. Since I needed a total of six dozen that was fine with me. And I used cinnamon instead of nutmeg, because I like the taste of it better.
And speaking of taste, these are buttery-rich, with just a hint of lemon flavor. The texture is a bit grainy due to the cornmeal, but that was fine.
While these are good, I liked the second cookie even better:
Brown-Eyed Susans
1 cup (2 sticks) butter, at room temperature
1/4 cup confectioners' sugar
1 teaspoon almond extract
1 teaspoon vanilla extract
2 cups all-purpose flour
1/2 teaspoon salt
Frosting:
1 cup confectioners' sugar
2 tablespoons cocoa powder
2 tablespoons hot water
1 teaspoon vanilla extract
48 whole almonds
Preheat oven to 350. In a mixer bowl, cream together the butter and sugar until light and fluffy, about 2 minutes. Blend in the extracts. Add the flour and salt and mix well.
Using a cookie scoop or your hands, lightly shape the dough into 1-inch balls and place on ungreased baking sheets. Flatten slightly using the bottom of a glass. Bake for 12 to 14 minutes or until bottoms are lightly browned. Remove to a wire rack and cool the cookies completely before frosting.
To prepare the frosting: In a mixing bowl, whisk together the confectioners' sugar and cocoa. Add the hot water and vanilla; mix well. Frost each cookie and top with an almond. Store in an airtight container, using wax paper or plastic wrap between layers. These also freeze very well. Makes 4 dozen cookies.
Notes: Since the oven temperature was the same for both recipes, I made up the dough for the Brown-Eyed Susans while the Crispy Cornmeal Sugar Cookies were baking. I stashed that dough in the refrigerator until I was ready for it.
Since I liked the taste of almond extract so much, I increased its
amount to 1 1/2 teaspoons. But to balance that extract, I also increased the vanilla to 1 1/2 teaspoons as well.
I'm sure the whole almond atop each cookie would have been pretty, but since not everyone likes nuts, I left them off.
I got 34 cookies instead of the supposed yield of 4 dozen; I must have shaped my cookie balls a little larger than specified.
I liked these a lot - nice little buttery, almnond-y morsels, and the chocolate frosting is a nice touch. One reason why I decided to make these cookies was Ms. Adams' comment about them: "...these disappear very quickly from the cookie tray".
I won't be at the event to see them disappear, but I wouldn't be surprised if her comment turned out to be true!


