Hello! Although much of the first three weeks of June found me busy getting ready for our daughter's Open House, I still did job jar tasks nearly every day. But thanks to previous tasks that had involved heavy cleaning before June had begun, I found that I didn't have as much cleaning as I would have otherwise. So this system works well! (still had plenty of cleaning to do though.)
And how did the June tasks go? Well, I worked on filing and decluttering as well as some cleaning chores.
I prayed for someone, wrote a letter to a woman I know who had recently entered a nursing home, and made a special treat for our daughter.
I enjoyed reading a shelter book, a cookbook, did some birdwatching, worked on craft projects (came up with a good idea for a Thanksgiving craft), took photos and did some sewing.
I used my mom's paraffin wax spa kit, did some spiritual exercises, went on walks, and tried the following aromatherapy "recipe":
Twinkle Toes Foot Bath (from Gooseberry Patch)
1 pint boiling water
6 tablespoons fresh mint, chopped
2 tablespoons sea salt
2 drops lavender essential oil
Pour boiling water over mint leaves; let steep eight minutes. Strain and add sea salt; let cool. Add lavender essential oil. Pour into container large enough to soak feet or pour into pint jar with tight-fitting lid to use later or to give as a gift. Makes one bath.
I had everything on hand, so this was easy to make and smelled nice too. It made for a pleasant soak of my hard-working feet.
Well, on the next month starting tomorrow. Hard to believe that this year is already half over!
Sunday, June 30, 2013
Thursday, June 27, 2013
Get Carded - Birthday Card And Gift
Hello! A friend's recent birthday was recognized with a handmade card and homemade gift.
The card:
 Materials used:
- white card stock
- art paper pieces
- gift shape cut from art paper with a stencil
- "happy" cut from a 1960's spelling paper (my husband's)
- "through all your future days" cut from a vintage greeting card
Behind the card is the matching envelope, made from the same paper used to make the gift shape. I don't typically make matching envelopes but it adds a nice touch. Maybe I'll do this more often.
The gift:
 A jar of homemade strawberry jam, made possible by the strawberry picking I'd done earlier in the week. Hot and humid the day I went but it was worth it.
In case you want to make your own jam, you can find the recipe I used here. One thing I did differently this time was using a bit more sugar than what the recipe calls for - about 2 tablespoons more. I have found the jam a bit too tart when I've made it in years past, especially when adding it to plain yogurt. But even with this extra amount, it's still far less sugar than many other jam recipes call for.
The card:

- white card stock
- art paper pieces
- gift shape cut from art paper with a stencil
- "happy" cut from a 1960's spelling paper (my husband's)
- "through all your future days" cut from a vintage greeting card
Behind the card is the matching envelope, made from the same paper used to make the gift shape. I don't typically make matching envelopes but it adds a nice touch. Maybe I'll do this more often.
The gift:

In case you want to make your own jam, you can find the recipe I used here. One thing I did differently this time was using a bit more sugar than what the recipe calls for - about 2 tablespoons more. I have found the jam a bit too tart when I've made it in years past, especially when adding it to plain yogurt. But even with this extra amount, it's still far less sugar than many other jam recipes call for.
Tuesday, June 25, 2013
Eats - Taco Recipes
Hello! The Big Event (aka our daughter's Open House) happened this past Sunday. All kinds of cooking and cleaning occurred leading up to the day, and then there were the inevitable last-minute issues like worrying about the weather and late-notice no-shows. But the weather held and while the no-shows were missed, we were glad to welcome those who could come.
The food turned out pretty good, if I say so myself. For the main course, we set up a taco bar with plenty of fixings, anchored by ground beef and chicken fillings. I'll share the recipes for these below:
Taco Seasoning Mix (from Make-A-Mix, Karine Eliason, Nevada Harward and Madeline Westover, authors)
2 teaspoons instant minced dried onion
1 teaspoon salt
1 teaspoon chili powder
1/2 teaspoon cornstarch
1/2 teaspoon crushed dried red pepper flakes (reduce for a milder
taco)
1/2 teaspoon minced dried garlic
1/4 teaspoon dried oregano
1/2 teaspoon ground cumin
Mix together in small bowl. Makes about 2 tablespoons seasoning.
To make tacos:
Brown 1 1/2 pounds ground beef in skillet; drain grease. Add 1/2 cup water and entire amount of taco seasoning mix. Reduce heat and simmer 10 minutes, stirring occasionally.
Notes: I used less salt than what is called for. I didn't have minced dried garlic on hand, but did have a garlic-herb blend, so I used that instead of the specified amounts of minced dried garlic and oregano. I found that I needed to add a bit more water from time to time so that the meat mixture wouldn't stick.
Since I was cooking for a crowd, I multiplied the seasoning mix amounts to cook up several pounds of ground beef at a time. I cooked up the filling in advance, when the weather was cooler, and froze it. (at times like this I am very glad we have a freezer in our basement). As it was hot and humid the weekend of the open house, this was a smart move!
Since there are those who like to limit the amount of red meat they eat, I also made:
Smokey Roasted Chicken Tacos (adapted from the blog How Sweet It Is)
2 pounds boneless, skinless chicken breasts
1 onion, sliced
1 teaspoon smoked paprika
1/2 teaspoon salt
1/2 teaspoon pepper
1/2 teaspoon cumin
1/2 teaspoon chili powder
1/4 teaspoon garlic powder
2 tablespoons olive oil
1 tablespoon lemon or lime juice
Preheat oven to 425. Spray a baking dish with nonstick spray and place the sliced onion all over the bottom. Place the chicken in a large bowl. Mix the smoked paprika, salt, pepper, cumin, chili powder and garlic powder in a small bowl, then add to chicken. Pour in the olive oil and toss all to mix well.
Place in baking sheet, sprinkle with lemon or lime juice, and cover with foil. Bake for 30 minutes, or until chicken is tender. Remove from oven, let cool slightly, then shred.
Notes: the recipe author used boneless, skinless chicken thighs instead of breasts - cooking method is the same, but she said to cook the thighs for 45-60 minutes. I don't like dark meat, so I used breasts.
I searched her recipe over and over and couldn't find any mention of when to add the olive oil, but to me it made sense to mix it in with the chicken and seasonings. This step would help would help the seasonings adhere better to the chicken, I reasoned.
The recipe author had used fresh lime wedges, which she tucked in between the chicken pieces. (she doesn't mention them again after that step, so presumably they aren't included in the shredding step). I know that fresh citrus fruits have nicer flavors than their bottled equivalents, but bottled juice is what I had on hand, so that's what I used.
What if you don't have smoked paprika though? I did, and it added a nice flavor to the chicken. However, if I hadn't had this ingredient already on hand, I still would have made the recipe; I just would have added more chili powder and cumin. It still would have tasted good, I'm sure!
As with the ground beef filling, I made this recipe in batches and froze it in advance.
Come the day of the Open House, I thawed out the fillings and kept them warm in a couple of slow cookers. Both fillings held up very well all day. But being mindful of vegetarians, I also heated up cans of refried beans.
That's the nice thing about a taco bar (or any fix-it-yourself entree): something for everyone! And everyone seemed to enjoy their tacos, so I was happy!
Friday, June 21, 2013
Made It - Summer Weathergram
Hello! Back in March I blogged about weathergrams, as seen here. Since it's the summer solstice today, it's time to put out a new weathergram:
 It was very simply made, with rubber-stamped words and a rubber-stamped image of the sun on a scrap of vintage yellow paper. Underneath the flap I wrote a few words about what always seems to be a truism about summer: why does it seem to go by so much faster than winter?
I've always used old manila folders to make my weathergrams, but just for fun, I also used a paper bag and an art paper scrap for spring equinox weathergrams in March. They were all hung in the same place, a burning bush shrub in our backyard. And here is how they weathered:
 From left to right: paper bag, art paper scrap, manila folder. As you can see, the art paper weathergram weathered the most.
But no matter what you use to make a weathergram, it's a fun way to mark the changes in the seasons!

I've always used old manila folders to make my weathergrams, but just for fun, I also used a paper bag and an art paper scrap for spring equinox weathergrams in March. They were all hung in the same place, a burning bush shrub in our backyard. And here is how they weathered:

But no matter what you use to make a weathergram, it's a fun way to mark the changes in the seasons!
Monday, June 17, 2013
Thrifty Acres - Graduation Dinner
Hello! Our daughter's open house is this weekend, and a taco bar, tortilla chips with dip and salsa, a few side dishes, cake and a few other goodies are on the menu.
But I told my daughter last night that it's too bad I hadn't consulted my 1962 Betty Crocker's Cooking Calendar in advance, for right there on page 80 is a Graduation Dinner menu.
Are you ready for it? Keep in mind that this same publication's "Supper Before the Basketball Game" read more like the menu for a ladies' luncheon. (you can see what I mean here.)
So, what does the Graduation Dinner menu have on it?
 Well, look at that - other than that Fruit Platter Pie subbing for pumpkin pie, it's a dead ringer for a Thanksgiving dinner!
My question - why? I get that a turkey dinner with all the trimmings can seem special, but as June can be a warm if not hot month in most of the US, why would anyone want to heat up the kitchen to roast a turkey? And wouldn't all this food be too heavy on a hot day as well?
I have no idea why the folks at Betty Crocker's decided the above dinner was just the thing to celebrate a graduation - I'm going to stick with my taco bar theme!
But at least Betty Crocker's Cooking Calendar got the accompanying illustration right:
 (the orange sauce is served over the Fruit Platter Pie).
But I told my daughter last night that it's too bad I hadn't consulted my 1962 Betty Crocker's Cooking Calendar in advance, for right there on page 80 is a Graduation Dinner menu.
Are you ready for it? Keep in mind that this same publication's "Supper Before the Basketball Game" read more like the menu for a ladies' luncheon. (you can see what I mean here.)
So, what does the Graduation Dinner menu have on it?

My question - why? I get that a turkey dinner with all the trimmings can seem special, but as June can be a warm if not hot month in most of the US, why would anyone want to heat up the kitchen to roast a turkey? And wouldn't all this food be too heavy on a hot day as well?
I have no idea why the folks at Betty Crocker's decided the above dinner was just the thing to celebrate a graduation - I'm going to stick with my taco bar theme!
But at least Betty Crocker's Cooking Calendar got the accompanying illustration right:

Sunday, June 16, 2013
Get Carded - Father's Day Cards
Hello! As Father's Day 2013 winds down, it's time to show off the two cards I made for the occasion.
For my dad:
 Materials used:
- white card stock base
- photocopy of my dad from his WWII days in the Army Air Corps (pre-
cursor of the Air Force). He was not a pilot; he repaired radio
equipment. He was stationed in several places, including the South
Pacific and Japan (after the atomic bombs were dropped).
- photo corners for mounting the photocopy onto the card
- blank bingo markers stamped to spell out "dad"
- red art paper scrap cut into a heart shape
This card came together pretty quickly, but I liked how it turned out!
My husband's card took longer to make.

I recently came across the Ben Franklin picture I'd cut out and saved some time ago(don't recall the source). I decided to use it for my husband's card since he's been avidly following the US Open tournament. No, he's not a golfer, but we used to live about 1 1/2 miles from the site of this year's tournament in suburban Philadelphia.
Materials used:
- white card stock
- cutout of Ben Franklin
- copies of "conversation balloon"; source was a vintage pamphlet
advertising a book about the artist Jean Arp. The pamphlet was
free and I picked it up specifically because I knew I could use
the balloon-like shape for a "conversation balloon".
- printed copies of three Ben Franklin quotes. As I couldn't find
any quotes that pertained to fathers, I chose ones that I
thought my husband would find amusing.
- "What Does Ben Franklin Say?", "Or, How About" and "Happy Father's
Day!" were printed out.
My husband loved the card; he found the quotes very amusing!
For my dad:

- white card stock base
- photocopy of my dad from his WWII days in the Army Air Corps (pre-
cursor of the Air Force). He was not a pilot; he repaired radio
equipment. He was stationed in several places, including the South
Pacific and Japan (after the atomic bombs were dropped).
- photo corners for mounting the photocopy onto the card
- blank bingo markers stamped to spell out "dad"
- red art paper scrap cut into a heart shape
This card came together pretty quickly, but I liked how it turned out!
My husband's card took longer to make.

I recently came across the Ben Franklin picture I'd cut out and saved some time ago(don't recall the source). I decided to use it for my husband's card since he's been avidly following the US Open tournament. No, he's not a golfer, but we used to live about 1 1/2 miles from the site of this year's tournament in suburban Philadelphia.
Materials used:
- white card stock
- cutout of Ben Franklin
- copies of "conversation balloon"; source was a vintage pamphlet
advertising a book about the artist Jean Arp. The pamphlet was
free and I picked it up specifically because I knew I could use
the balloon-like shape for a "conversation balloon".
- printed copies of three Ben Franklin quotes. As I couldn't find
any quotes that pertained to fathers, I chose ones that I
thought my husband would find amusing.
- "What Does Ben Franklin Say?", "Or, How About" and "Happy Father's
Day!" were printed out.
My husband loved the card; he found the quotes very amusing!
Thursday, June 13, 2013
Made It: Even More Graduation Decorations
Hello! Can you stand seeing a couple more handmade graduation decorations from me?
To greet our Open House attendees:
 A green, black and white windsock - green fabric top with assorted green, black and white trims swaying in the breeze. I used whatever I had on hand: ribbons, vintage and new rickrack and vintage seam binding.
This project is based on this:
 Its directions had come from a women's magazine.
But the following project was my own:
 I made two sets of three, which I've hung up from a rack I'd already made and have hanging in our dining room. The altered bingo card I'd shown off in a previous post hangs from the middle of the rack with the two sets of hanging "graduation caps" on either side of it.
This was easy to do, though of course it helped that I had the components already on hand. I began by selecting a graduation cap stencil (from a thrift store purchase of several dozen scrapbooking stencil shapes), which I traced onto pages of a vintage dictionary.
Not just any pages, though - I zeroed in on words (with their definitions) of relevance to the occasion, picking "black", "river" and "rat" for the grouping seen above. The other set has "high school", "salutatorian" and "graduate".
After tracing and cutting out each "cap", I then looked for paper scraps in the school colors. Would you believe I found the colors I needed - in sizes that didn't need any trimming? So it was just a matter of gluing the caps onto black paper and affixing the black paper to the green. Punched holes at the top and used green crochet cotton for hangers.
A close-up of a couple of the "caps":

 I wanted to show off this idea since it can be readily adapted to other occasions and projects. For instance, with a heart-shaped stencil, a dictionary word pertaining to love, affection, friendship, etc., red or pink paper: a Valentine's Day card. Or a baby rattle stencil, pink or blue paper, and words related to babies for a baby shower theme.
Our daughter liked the latest batch of decorations. The only thing she hasn't liked so far was the idea I had for a cooler to keep pops chilled at the open house. Oh, well, I was bound to mess up at least once!
To greet our Open House attendees:

This project is based on this:

But the following project was my own:

This was easy to do, though of course it helped that I had the components already on hand. I began by selecting a graduation cap stencil (from a thrift store purchase of several dozen scrapbooking stencil shapes), which I traced onto pages of a vintage dictionary.
Not just any pages, though - I zeroed in on words (with their definitions) of relevance to the occasion, picking "black", "river" and "rat" for the grouping seen above. The other set has "high school", "salutatorian" and "graduate".
After tracing and cutting out each "cap", I then looked for paper scraps in the school colors. Would you believe I found the colors I needed - in sizes that didn't need any trimming? So it was just a matter of gluing the caps onto black paper and affixing the black paper to the green. Punched holes at the top and used green crochet cotton for hangers.
A close-up of a couple of the "caps":


Our daughter liked the latest batch of decorations. The only thing she hasn't liked so far was the idea I had for a cooler to keep pops chilled at the open house. Oh, well, I was bound to mess up at least once!
Tuesday, June 11, 2013
Thrifty Acres: I Can Make You Thin
Hello! Yes, my previous post was about the cookbooks I'd recently purchased. But now I'm switching gears to talk about another thrift store purchase, Paul McKenna's I Can Make You Thin.
I tend to gain weight over the winter, and this year was no exception. Perhaps I fooled myself into thinking that all the snow shoveling I did in February (we set a record for snowfall totals for that month) warranted hearty meals. Or maybe it's because "comfort food" just seems to hit the spot during the winter months.
I wasn't happy about this winter's weight gain, especially since I weighed more than I wanted to already. So I bought a pedometer to encourage myself to move around more, cut out most sweets, and changed up some exercise routines. I lost 4.5 lbs over several weeks - not very fast, but at least it was a start.
During this time I investigated information on what to eat. I came across a juicing "reboot" plan; looked interesting, but I don't own a juicer and didn't want to buy one if I wasn't going to stick with the regimen.
The "clean eating" plan proposed by another person certainly looked healthy, but I couldn't get past the six egg whites she listed in her typical breakfast, nor all the chicken breasts for that matter. Her menus looked a bit on the monotonous side IMO.
Then, a month ago I came across I Can Make You Thin. The name of the author, Paul McKenna, sounded vaguely familiar (I think I had heard of another of his books before), so I looked at the book more closely. "Includes Guided Hypnosis CD" was written on the cover. Well, considering that I was in a thrift store, I figured that the previous owner had removed the CD before donating the book - this has happened with other books w/CD's I've seen in secondhand markets.
But I looked in the back - the CD was there and what's more, it looked unused. And the wallet-size card with easy reference to some key points in the book was still in place as well. In short, the whole package basically looked unused.
The price was $2.00 (full price is $22.95), so I figured I had little to lose by purchasing it.
Read the book from cover to cover - easy to do rather quickly, as it's not that long. Learned that the author takes a relaxed view toward diet and exercise, but there are four "golden rules" for eating: when you're hungry, eat; eat what you want, not what you think you should; eat consciously and enjoy it; stop eating when you're getting full.
I was one to gobble down my food, I admit - and, like probably a lot of people, I had gotten into the habit of reading or working on the computer while eating. Consquently, I was eating more food than I needed to - without really noticing what I was eating!
So right away, I began to eat much more slowly, putting down the fork or the sandwich between bites. I put down the newspaper, magazine and laptop as well. (this is the "conscious eating" component of the golden rules)
A sample of "success journal" pages is in the back of the book, so I copied those into a notebook to keep track of how well I was doing in following the four golden rules and other things like exercising and listening to the CD.
I listened to the CD for three weeks; the author suggests using it for at least two weeks. I found it a bit contradictory at times as compared to the book. For instance, the golden rule "eat what you want", which the author insists he means: "From this day forward, nothing is off-limits to you. Ever." Yet during one part of the CD, he intones something along the lines that the listener will now eat healthy foods. What if said listener would normally rather eat unhealthy foods?
Nevertheless, the CD is soothing and pleasant to listen to, and at around 26 minutes, quite doable as well.
Both the book and CD have a number of self-improvement visualizations, which I think is a good thing, and the book also has techniques for dispelling cravings.
So, is there any merit to any of this? Well, after one month I am seven pounds lighter. During this time I had several meals away from home: restaurant meals out with my family and several social occasions (picnics and a lunch gathering with relatives). There was also a hotel breakfast buffet during an overnight stay.
At home, I enjoyed deep-dish pizza, barbequed ribs, even a couple of doughnuts. Doesn't exactly sound like "diet food", does it?
I'm not saying it was all a breeze, though, especially at first. It can seem quite laborious at times to eat slowly if you're used to rushing through your meals as I was, and I would glance longingly at the newspaper instead of it being my breakfast companion. But I discovered something interesting: I was tasting my food much more thoroughly. This meant that some of it tasted even better than before, like the fresh lettuce I had just picked from my garden. (However, the store-bought tomatoes tasted much worse.) I realized I could reduce the sugar in my homemade banana muffins and should cut back on the seasonings in my homemade barbeque sauce.
And of course, since I was eating much more slowly, I needed less food. That deep-dish pizza and barbequed ribs? They lasted much longer than they would have in the past: less eaten at dinner, so I had leftovers for several lunches.
Most telling for me was the hotel breakfast buffet. We'd stayed at the same hotel before, so I know what the breakfasts there are like. Despite eating heartily enough, it seemed like I would still always be hungry before lunchtime anyway. However, during this last stay, I ate a bit less than I had before - but didn't get hungry as soon as I would have in the past!
I realize that some of you reading this may be thinking that you're rushed enough as it is and so you can't afford to take more time to eat. Yes, I take longer to chew my food now, but I figure it's not always as much additional time as it may seem. For one thing, I'm rarely going back for seconds, and am rarely eating dessert. So dinnertime isn't really much longer. And since I have more leftovers, I can eat those for lunch instead of having to take the time to fix something new.
Eating more slowly also helps with the golden rule of stopping when full. I certainly know what happened in the past when I ignored feeling full and continued on to another helping or a dessert: heartburn, discomfort - and weight gain.
I haven't always followed the four golden rules perfectly this past month, but I'm still happy at how things have gone thus far. Individual results may vary, but it has worked for me!
PS So why did I buy those cookbooks if I'm trying to lose weight? Well, I still like to cook and eat - I'm just eating less.
Sunday, June 9, 2013
Thrifty Acres: Now You're Cooking
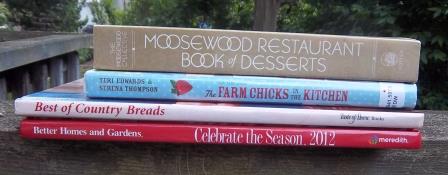
Hello! I purchased these secondhand cookbooks last Thursday:

Celebrate the Seasons 2012, Best of Country Breads and The Farm Chicks in the Kitchen all came from a library used book sale.
Celebrate the Seasons 2012 is a Better Homes and Gardens book, the kind that the company sends mailers out well in advance of Christmas, hoping to entice would-be buyers with glossy photos of the wonderful crafts, decor and recipes that will be theirs to replicate. Said buyers can save money by sending for the book at some special price - but with shipping and handling tacked on, of course.
I know about these come-ons because I often get these mailings. But by now I've gone to enough thrift stores and used book sales to know that these special publications often show up at these places - usually looking like they'd never even been cracked open. So instead of paying somewhere between $25-$30 for a book that's less than one year old, I paid $2.00.
Best of Country Breads is a 2000 Reiman Publications issue and includes results of a recipe contest from Taste of Home, Quick Cooking and Country Woman magazines. These recipe-compilation issues often show up secondhand as well - I already have a volume from the same company featuring the results of a cookie contest. The bread cookbook has recipes for yeast and quick breads, rolls and muffins - in short, lots of good, solid recipes! I look forward to going through this book and marking up some recipes I want to try.
I know I had checked out The Farm Chicks in the Kitchen (a Country Living publication) from the libary, so I was glad to see it offered at its used book sale. The Farm Chicks, out in Washington State, run a very popular antique show. Their cookbook is a lot of fun, packed with yummy recipes, crafts using vintage items, gift wrapping techniques, ideas for home decor and more. As the book is barely three years old, I don't know why the library staff wanted to get rid of it, but I'm glad they did!
The last book, Moosewood Restaurant Book of Desserts, was a thrift store find. I can say that this purchase fits the saying "good things come to those who wait". Almost two years ago, we ate lunch at the Moosewood Restaurant in Ithaca, NY. This long-standing vegetarian restaurant has published a number of cookbooks, four of which I already own (thrift store purchases or were given to me).
While waiting to be seated at lunch, I browsed through Moosewood's "library": copies of all their cookbooks were available for perusing. Of course, this was a bit of a marketing ploy, since next to the "library" were copies of the same cookbooks for sale.
I grabbed the "desserts" cookbook and saw some nice recipes. Was tempted to purchase it, but, after all, I didn't really need another dessert cookbook. I told myself I'd consider buying it if I came across it at a thrift store.
And that day came last Thursday. My patience paid off - and I saved twenty dollars by waiting. I'll gladly take those savings!
Saturday, June 8, 2013
RIP Marie Catrib
A few days ago, my husband came into the kitchen, where I was busily making dinner. He informed that our local newscast had announced that Marie Catrib had died. She was 65 and had had ovarian cancer.
I was instantly saddened even though it had been over a year since I had last been to her restaurant in Grand Rapids. The last time we tried to go there, there was too long a wait for lunch, and so we went elsewhere. That is how it often was at Marie Catrib's, and it was completely understandable, for she was an extremely talented chef and one of the warmest, friendliest people one could hope to meet.
We first met Marie Catrib in the mid-1980's, up in Houghton, MI. I had a sister who was teaching at Michigan Tech then and she would take us to Marie's Deli there. It always was a bit of a struggle to try to decide what to order off of the menu. Whether it be French toast from the breakfast menu or a Lebanese specialty for lunch (Marie was from Lebanon), you couldn't go wrong.
My sister left Michigan Tech after a few years to return to our native southeastern MI. My husband and I continued to make vacation treks up to the Houghton area, and a trip to Marie's Deli was one of the stops we always looked forward to. And even though Marie only saw us once a year, she seemed to remember us and would greet us as long-lost friends. I know she was like that with all her customers though!
Then came the time we went to her restaurant, only to learn she wasn't running it anymore. Her assistant was now in charge; Marie had decided to go off to culinary arts school. Although the menu still had Marie's signature dishes, we missed her friendliness and cheer.
We figured we would never see her again and that was that. But then in 2005 - or maybe 2006 - I happened to be reading through the latest edition of On The Town, a free monthly publication of happenings in and around Grand Rapids, MI. And with astonishment and delight, I saw a review for a new restaurant in Grand Rapids - Marie Catrib had opened it with her adult son.
Shortly thereafter we went to the new restaurant and it was like seeing an old friend again. Although there were some new menu items, there were many of the old favorites from her Houghton eatery as well. And there was Marie, with a bit more gray in her hair, but as friendly and welcoming as ever. She said she remembered us from our visits to her place in Houghton - who knows if she really did? After all, it would have been over 10 years since we'd last seen her. But it didn't matter - we were glad to see her again and eat more of her excellent cooking.
Marie Catrib's was popular from the day it opened, so it didn't surprise us that she soon expanded into the space next door to the restaurant, but that didn't seem to help much - it was still as crowded as ever on the Saturdays when we would stop in. We would brave the wait if we weren't too hungry or if we didn't have to be somewhere else in awhile. I always envied people who lived or worked much closer to the restaurant, for there were probably off-peak times when it wasn't so hectic there.
And now I'm sorry that we didn't wait in line to be seated the day last year when we wanted to eat lunch. Marie's sons will be carrying on with the restaurant, so we are glad of that. I know they will carry on admirably, but I will miss Marie.
An article about Marie can be found here.
Wednesday, June 5, 2013
More Graduation Decorations
Hello! As promised, a few more graduation decorations:
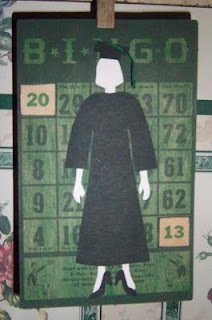 I love using vintage bingo cards in craft projects. For this project, I painted a bingo card, then constructed the graduate figure using art paper scraps. The Klutz Press books Paper Fashions and Paper Fashions Fancy (both dirt-cheap thrift store finds) were the sources for the stencils I used. There wasn't actually a graduation gown stencil, of course, so I just adapted a dress stencil and cut paper bits to make the cap (green crochet cotton for the tassel).
The numbers "20" and "13" were cut from the board that came with the same set of bingo cards (the board was used to keep track of which numbers had been drawn). These numbers were already green, so they are perfect for our green/black color scheme.
An addition to the tabletop feather tree:
 This vintage Hallmark decoration is about 5 1/2" high. I'm not sure where it came from, but I'm thinking it had something to do with a graduation of my husband's - either 8th grade (early 1970's) or high school (1976). Yeah, I know it's a male figure and we have a daughter, but I couldn't resist using it. If our daughter protests I'll remove it or else add some paper "hair" to make it look like a girl.
Got this last night and put it on the feather tree:
 We attended a picnic hosted by the local alumni club for Michigan State, the school our daughter will soon be attending. The above buttons were passed out there. As alumni ourselves, we were happy to take them!
Besides fellowship and good food, the picnic was an opportunity to ask questions of various school representatives. The beloved school mascot, Sparty, was on hand as well to ramp up some school spirit.
And just for fun, there were door prizes to be won by answering various questions about Michigan State. Some questions were student-only while others were for the parents to answer.
My husband, our daughter and myself each won door prizes; aren't we smart? We answered the following questions:
1. A student question: before the MSU teams became the Spartans, what were they called?
2. Alumni question: what is the name of the campus building where students go to look for jobs?
3. Alumni question: what is the name of the alma mater song?
Give up? The answers are:
1. The Aggies
2. Student Services Building
3. MSU Shadows (in case you were wondering, this is the question I answered, though I'm sure I wasn't the only one who knew the answer).
For our efforts, we came home with two MSU t-shirts and one MSU umbrella.
It was a nice time and we appreciated the effort made by the local alumni club. As I told one of the picnic organizers, there were no such picnics to welcome us to MSU when my husband and I were incoming freshmen. I'm glad that more is being done on the behalf of freshmen today!

The numbers "20" and "13" were cut from the board that came with the same set of bingo cards (the board was used to keep track of which numbers had been drawn). These numbers were already green, so they are perfect for our green/black color scheme.
An addition to the tabletop feather tree:

Got this last night and put it on the feather tree:

Besides fellowship and good food, the picnic was an opportunity to ask questions of various school representatives. The beloved school mascot, Sparty, was on hand as well to ramp up some school spirit.
And just for fun, there were door prizes to be won by answering various questions about Michigan State. Some questions were student-only while others were for the parents to answer.
My husband, our daughter and myself each won door prizes; aren't we smart? We answered the following questions:
1. A student question: before the MSU teams became the Spartans, what were they called?
2. Alumni question: what is the name of the campus building where students go to look for jobs?
3. Alumni question: what is the name of the alma mater song?
Give up? The answers are:
1. The Aggies
2. Student Services Building
3. MSU Shadows (in case you were wondering, this is the question I answered, though I'm sure I wasn't the only one who knew the answer).
For our efforts, we came home with two MSU t-shirts and one MSU umbrella.
It was a nice time and we appreciated the effort made by the local alumni club. As I told one of the picnic organizers, there were no such picnics to welcome us to MSU when my husband and I were incoming freshmen. I'm glad that more is being done on the behalf of freshmen today!
Saturday, June 1, 2013
Made It: Graduation Decorations
Hello! Our daughter's high school graduation is next Friday and her open house is two weeks after that. So of course it's time to get some decorations going! I'll show off what I've done so far, but more will be made as time and inclination permits.
The school colors are green and black, and the mascot name is the rat, so of course the decorations I've made follow these themes.
The dining room's table top feather tree was my starting point:

 Some time ago, I found a nice graduation-themed rubber stamp set at Tuesday Morning, so I stamped some of the images on card stock pieces and hung them up with green crochet cotton.
Some little critters have taken up dwelling in the feather tree:

 These were quick to make, being only 2" high (first photo) and 1 1/2" high (second photo). I think I'll make a few more.
They were made from this pattern set:
 You can see the 1980's country-style mice in the photo, done up in a rather blah brown calico. I did a post back in early March about sewing up a couple of cat patterns (also in a fabric I found more appealing than what's shown in the pattern's photo). The pattern, and the fabric I used for the mice (pretend they're rats!), both came from thrift stores.
Also from a thrift store was a pattern booklet for making this:
 Our scholarly rat, 6 1/2" high, has a felt body and cap, a tassel made from embroidery floss and a fabric gown. She is holding a parchment paper diploma and scaled-down copies of the two certificates our daughter was awarded on Honors Night: AP Scholar With Distinction and Salutatorian. (yes, we are very proud of her!)
One look at the photo of this rat in the pattern booklet and I knew I had to make it for our daughter's graduation. Alas, what I didn't realize was that although the pattern pieces were intact, the directions for making the outfit were missing. The body directions were present, so that wasn't a problem, but I had to figure out how to make the cap and gown with just the pattern pieces and the photo to go on. I came pretty close, and our daughter, who saw it earlier today for the first time, was pleased.
I've made a few decorations to hang from doors and windows:
 Rubber-stamped numbers from a vintage printing set one of my husband's older relatives had had. I've made several of these on various green art paper pieces.
Last but not least, a thrift store find from last week:
 At 16 1/2" tall, he was apparently noticeable enough in my shopping cart that another shopper looked askance at it. I explained I was buying it as a decoration for my daughter's open house, since her high school's mascot name is the rat. "Oh, you're very creative", the woman then commented. Not really - just looking for some interesting decor!
The rat was undoubtedly handcrafted, and is weighted at the bottom, so the clerk speculated that it had been made as a doorstop. There was no price tag, but at this particular store the clerks can set a price on the spot. I held my breath, wondering how much I would be willing to pay for a stuffed, 16 1/2" high rat. When she told me I could have it for a dollar, I was more than willing to part with that sum!
Once paid for, my next concern was what our daughter would think of this creature. I was worried she'd think it was hideous and that her mother had really lost it this time. But she loved it! I guess that proves she's used to my wacky thrift store finds by now. And as I pointed out to her, what graduation party decoration could you buy at Party City for a mere dollar?
Of course, the rat didn't come with the graduation cap, but I fashioned one using the same method I had come up with to make the cap for the felt mouse seen a couple of photos previously.
That's it thus far - there's still the open house menu to plan, more decorations to make, and, of course, the dreaded house cleaning. But, after all, you only graduate from high school once!
The school colors are green and black, and the mascot name is the rat, so of course the decorations I've made follow these themes.
The dining room's table top feather tree was my starting point:


Some little critters have taken up dwelling in the feather tree:


They were made from this pattern set:

Also from a thrift store was a pattern booklet for making this:

One look at the photo of this rat in the pattern booklet and I knew I had to make it for our daughter's graduation. Alas, what I didn't realize was that although the pattern pieces were intact, the directions for making the outfit were missing. The body directions were present, so that wasn't a problem, but I had to figure out how to make the cap and gown with just the pattern pieces and the photo to go on. I came pretty close, and our daughter, who saw it earlier today for the first time, was pleased.
I've made a few decorations to hang from doors and windows:

Last but not least, a thrift store find from last week:

The rat was undoubtedly handcrafted, and is weighted at the bottom, so the clerk speculated that it had been made as a doorstop. There was no price tag, but at this particular store the clerks can set a price on the spot. I held my breath, wondering how much I would be willing to pay for a stuffed, 16 1/2" high rat. When she told me I could have it for a dollar, I was more than willing to part with that sum!
Once paid for, my next concern was what our daughter would think of this creature. I was worried she'd think it was hideous and that her mother had really lost it this time. But she loved it! I guess that proves she's used to my wacky thrift store finds by now. And as I pointed out to her, what graduation party decoration could you buy at Party City for a mere dollar?
Of course, the rat didn't come with the graduation cap, but I fashioned one using the same method I had come up with to make the cap for the felt mouse seen a couple of photos previously.
That's it thus far - there's still the open house menu to plan, more decorations to make, and, of course, the dreaded house cleaning. But, after all, you only graduate from high school once!
Subscribe to:
Posts (Atom)