Hello! In 1999 I bought an antique dining table/chair set. The chairs were covered with a blah beige-ish fabric that I never cared for. But since the chair seats are the kind that are easy to recover (only a screwdriver needed to remove the seats and to put them back in), I figured I'd do just that.
Never got around to doing so, but over time I got more tired of looking at those blah chair seats. More recently I began looking at replacement fabrics, but didn't see anything I liked.
Then last summer I stopped at an interior design firm in our downtown that was participating in the annual sidewalk sales. They were selling fabric sample books for practically nothing. There were so many many pretty choices in one book, I decided to see if those fabrics would work for my seat do-over.
It's a bit of work taking apart a fabric sample book, as they're typically put together by glues, heavy-duty staples and screws. But eventually I pried everything apart. I laundered and ironed the fabric pieces I wanted to use, and they sat around for a few months more.
But finally I began my project earlier this week. Here's an example of what I started out with:
As you can see, nothing special about the above fabric!
Now, the one thing about my fabric pieces is that none of them were big enough to cover a chair seat. I'd have to sew more than one fabric together to get the size I needed. It may seem unusual to cover a chair seat with more than one fabric, but I asked the interior design firm employee who sold me the fabric sample book if it'd be okay to do. She said it would be. And since anything seems to go these days, I figured it'd be all right to take a chance. If I didn't like how it turned out, I could try looking for more fabric again.
I cut four 10" squares of my sample fabrics per chair, then sewed the squares together. For interest, I alternated darker and lighter prints. After prying the beige fabric from the seats, I used one of those pieces as a pattern to cut my sewn squares down to the right size and shape.
(Yes, I had to use a different set of four fabrics for each chair, but stuck to those that had at least some pink in each print.)
And voila:
A big improvement, I'd say! The fabrics I used are all very nice quality. They should be, as the price per yard is astronomical for this stuff.
A close-up of some of the fabrics:
I can't say I did the best job ever of recovering the seats, as I don't have much experience with a staple gun. But by the time I was working on the last chair seat I got better at it.
I also don't know how durable these seat covers will be, since the friction of one's posterior could cause stress on the seams over time. But we really don't use our dining room a lot - mainly for holidays and when we're having people over. The latter includes dinner guests, family parties and house guests, but still not frequent occasions for us.
Use or no use, I wanted to get rid of that blah, beige-ish fabric anyway! I'm glad I finally did so.
Hello! Almost one month ago, I blogged about beginning to participate in International Correspondence Writing Month, or InCoWriMo for short. I did manage to follow through on writing something to someone every day:
- one birthday card
- several Valentines
- several letters to people I know
- one letter to an InCoWriMo correspondent
- several thank you notes
- one sympathy card
- several letters left for strangers to find (fun to do and saved me some postage)
- one letter to myself (yes, this counts as a correspondence, according to the InCoWriMo organizers. I wrote it on the last day of February to sum up my experience)
The letters to people I know took awhile, but that's because they went to folks I hadn't written to in quite some time. It felt good to get those responses out in reply to those who had sent us Christmas cards.
The letter enclosed with the birthday card was a struggle to write, for it was meant for an old friend I'd stopped communicating with several years ago. It was all my fault, not my friend's, and for years after that she would send us a Christmas card stating she would love to see me again. But I never wrote back, and over time wondered if I could even patch things up between us. Frankly, I was afraid she'd be hurt enough to not consider me a friend anymore.
But I took a deep breath anyway, apologized, explained what had caused me to break things off, and then updated her on what's been going on lately. I mailed the card/letter off, having no idea what she'd think of it.
A few days later I got an email response from her, thanking me for the card and letter, and saying that no matter what happened, she would always consider me a friend. I actually cried a little when I read that. She's a better person than me, obviously.
Also got another very nice email response from another old friend, one I only keep up with here and there. She's always been very nice to touch base with though, so I wrote her as well. She said I was the only one of her friends who still writes letters! I replied that my latest letter was in part because of InCoWriMo and explained a bit about it. She said it sounded great and would check out their website.
Because of my husband's Slovak heritage, I sent a letter to someone on the InCoWriMo list who's from Slovakia. Haven't heard back from that person and am not sure if I will. I imagine that those who put their contact info on the list get a lot of letters!
I send out Valentines as a matter of course, so that habit made it easy to add to my daily correspondence count.
The sympathy card went to my brother-in-law, whose 97 1/2 year-old mother had died. I didn't know her really well, but I knew enough to write a letter along with the card that reflected on the many nice qualities she had had. I got a nice email response from him in return that expanded on those qualities I had touched on.
The thank you notes were fun to write, as always. Although most were to people I know, two of them weren't.
I'd always wanted to express my appreciation to the city snow removal employees. Sure, it's their job, but I live in a town where snow removal often seems like never-ending work. And I heard the snowplow going down our street in the wee hours of Christmas Day morning this past year. It's got to be rough, not even being able to plan for a Christmas morning with your family if you have to go out and drive a snow plow.
Since I wanted to bake something for a neighbor who'd done us a favor (and, of course, write a thank-you note too), I decided to find a recipe that would make enough to give to both the neighbor and the snow plow workers. So that I did, which meant hand-delivering both.
The desk clerk who took my humble gift for the snow plow folks seemed surprised but appreciative. She said they generally only hear from citizens when there's snow removal complaints; thank-you's are rare. So I felt pretty good about my effort!
As for the other thank-you note to someone I don't know, I sent it to Chad Salmela, my favorite Winter Olympics announcer, thanking him for another great job. If you heard, or heard of, the guy screaming "Here comes Diggins!" as the US women won their first-ever cross country skiing medal - gold, no less - that was Mr. Salmela. I love his enthusiasm, and from reading online reactions to that gold medal win, I know I'm not the only one.
I also wrote a letter to a local columnist, praising him for the chuckles his essay had given me. I'm not sure that I'd ever even written to a newspaper columnist before.
And lastly, my previous post highlighted another mailing, which was a letter and some vintage photos that went to the archives at the Catholic University of America. I'd been wanting to send those photos to the proper place for a few years now, so I'm glad I finally did it.
So all in all, participating in InCoWriMo took me out of my comfort zone a bit (heck, I even had to look up where to drop the baked good to the snow plow people) and got me to take some actions that I'd been wanting to do for years. Yes, I got tired of writing on some days, but overall I was glad I stuck with it. The positives definitely outweighed any negatives.
And I learned, anew, to never underestimate the power of handwritten correspondence!
Hello! I'm old enough to remember when Paul Simon's song, "Me And Julio Down By The Schoolyard" was a hit in 1972. And having grown up Catholic, I was always amused by this part of the song: "And when the radical priest come to get me released we was all on the cover of Newsweek."
What do these lines have to do with my post? Well, I'm about to show off some vintage photos that represent a bit of "radical" priestliness!
The backstory: my husband was a student at a Catholic high school in the 1970's, and while there some photos came into his possession. He was told that one of the priests in the photos had a connection to his high school, but that's all he was told.
I encountered these pics during a recent cabinet decluttering and decided to find out more about them. Between a close perusal of the photos and a bit of Internet research, I determined that the pictures had a connection to the Catholic University of America, which is in Washington, DC.
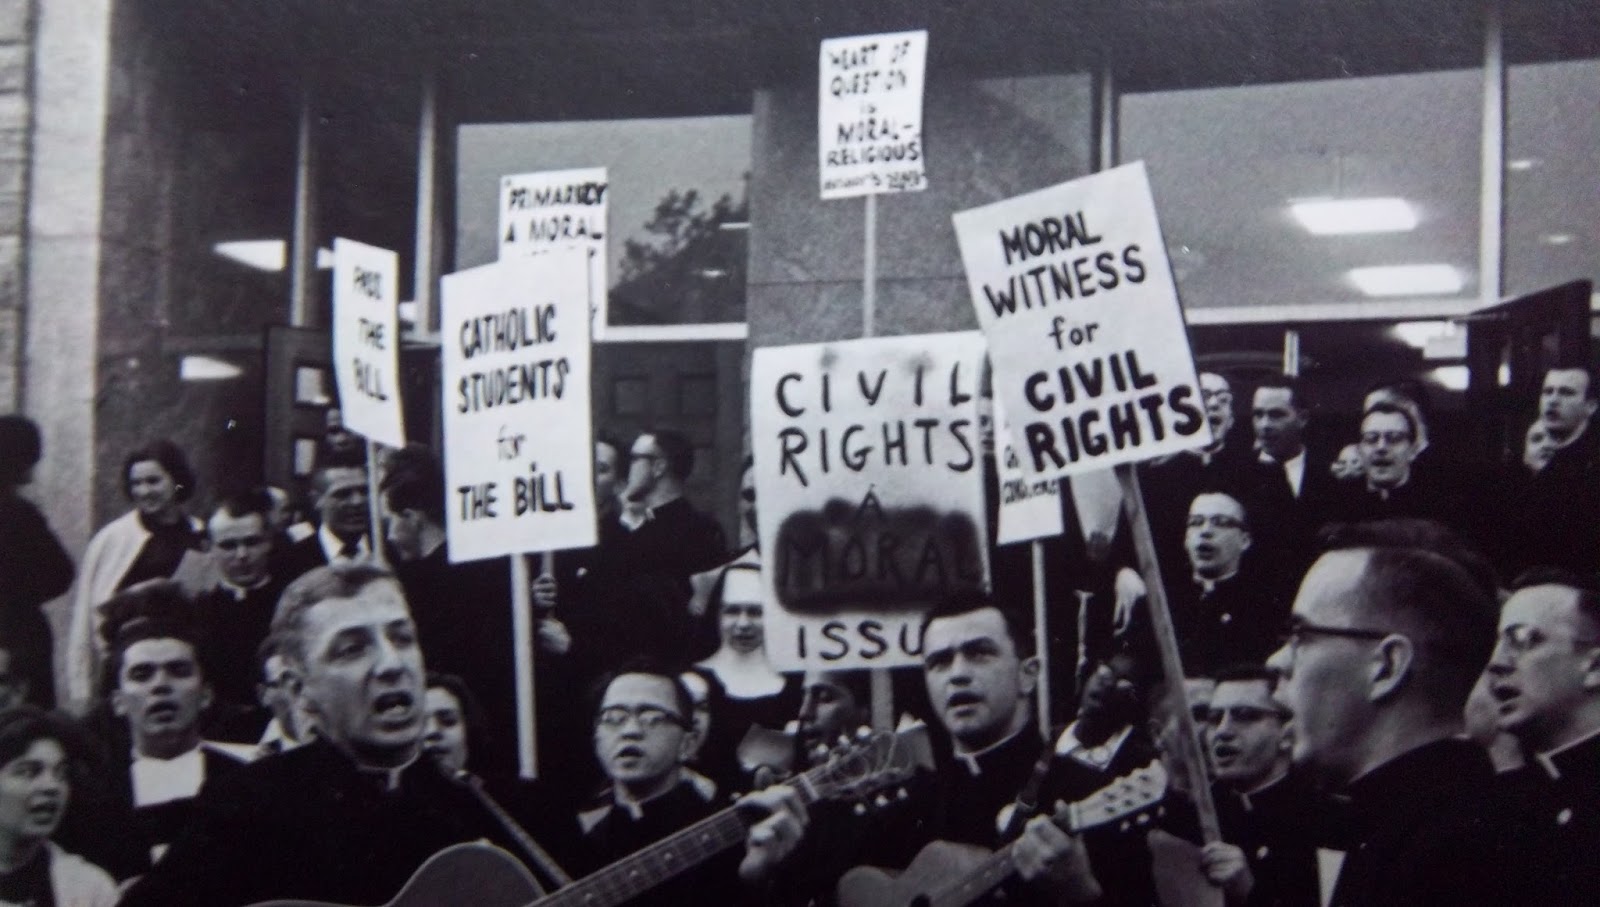
The photos appear to be of a civil rights protest. Someone had written "C.U. May 4th 1964" on the back of one of the pics, which led me to believe the protest was related to the ongoing politicking surrounding the Civil Rights Act. It was signed into law on July 2nd that year.
Above, the "radical priests"and some students carrying protest signs have congregated in front of Caldwell Hall on the CUA campus.(that name was visible in some of the photos, which is how I was able to determine where the action had occurred).
Another view of the gathered crowd.
In the front of the crowd, the priests are playing guitars and leading the singing. I found myself wondering what songs they were performing.
Some of the signs read "Civil Rights - A Moral Issue", "Moral Witness for Civil Rights", "Catholic Students for The Bill" and my favorite, "Come! See The Real Professional Bigot" (the large rectangular sign visible in the lower right side of the photo). Alas, I have no idea who the "professional bigot" was supposed to be.
A close-up of some of the signs.
At some point, the protest moved to some sort of gymnasium or auditorium.
Warning: the next photo may be disturbing to some, but in the context of what was going on, not surprising.
Look at me, I'm waving the Confederate flag in defiance. Yippee! A police officer looks on behind him.
Our "radical priests" have brought their guitars and bongo drums to the locale.
A close-up of the above photo:
This particular photo is noteworthy because of the stamp on its back, identifying that it had been taken by a United Press International employee. Obviously, the protest was newsworthy enough to have gotten the attention of UPI.
I'm showing off this set of photos because of their historical content, and also because they're no longer in our possession. In the spirit of InCoWriMo (mentioned in this post), I decided to mail them to the CUA archives office, along with a brief note. I wrote that I hoped they'd find the photos of interest, and to please contact me if they had information on the event related to them. My Internet research hadn't come up with anything.
The priests in the photos may not have ended up on the cover of Newsweek, but their protest, like others of its kind around the country then, may have very well had something to do with the ultimate passage of the Civil Rights Act.
Hello! Valentine's Day is a busy holiday for a greeting card crafter. In my previous post, I showed off some of the cards I made for the Valentines for Vets project. After making those, I switched gears to make cards for family and friends. Below, you'll see how the Valentines for our daughter and my husband turned out.
For our daughter:
And a couple of close-ups:
Materials used:
- white card stock
- hand-stamped paper scrap on right side of card; one of the stamps used was a hand-carved heart I'd made
- portion of time card (piece with pink border on the left)
- pink floral scrapbook paper piece
- piece from children's memory-matching game
- heart cut from art paper scrap
- "el amor" cut from Spanish flash card set
- "happy valentine's day" stamped in red ink on scrap of 1890's ledger paper
Hmm, the card turned out a bit "busy", but our daughter liked it anyway. As for myself, I really liked the graphics on that piece from the children's game; so charming! Moving on, here's my husband's card:
And a close-up:
Materials used:
- white card stock
- scrapbook paper piece (reproduction of vintage ad), painted over with ivory acrylic paint to tone down the yellowed-paper look
- paint chip piece; the two visible paint names are "Heartfelt" and "Valentine" (couldn't go wrong with using that paint chip for this occasion!)
- game piece from children's memory-matching game (pink with red heart)
- red and white scrapbook paper heart affixed to game piece
- "happy valentine's day" stamped in red ink onto 1890's ledger paper
- "el corazon" cut from Spanish flash card set
- red eyelet
- red and white baker's twine threaded through eyelet and tied.
You'll notice that there's a few common elements in both cards: the Spanish flash cards, the pieces from the children's game and the same stamp used on the same vintage ledger paper. Using some of the same elements makes card crafting easier, a must at a time when many cards were being made over the course of a couple of weeks.
I jokingly told my husband that the eyelet might very well be older than he is, and he was born in the late 1950's. About a ago I bought a vintage eyelet plier and various colored eyelets, all in the original packaging. Cost me just one dollar at a church rummage sale. I could tell by the packaging that the set is from sometime in the 1950's. The pliers are fun and easy to use, and I like the way an eyelet adds a bit of color to a corner of a card. Plus, I can add further color by tying a piece of ribbon, cording, etc. through the eyelet, which I'd done for my husband's Valentine.
I liked how his card turned out, and he did too.
Hello! With Valentine's Day being just one week from today, it's time to get this year's Valentines for Vets cards in the mail. As I've been doing for the past several years now, I made 24 valentines, wrote a short greeting inside, and bundled them up to go out in today's mail to a regional medical facility. It didn't take much time or effort on my part, and I'd like to think it's a nice way to show 24 vets that I appreciate their service to our country.
Here's a sample of what's going out in the mail:
And a close-up of one of the cards:
Materials used in the above card:
- White card stock
- Border cut from 1890's sheet music
- Heart cut from scrapbook paper
- rectangle cut from decorator-weight fabric
- "Love" stamped in red ink on card stock scrap
- Fabric and "Love" paper piece affixed to card with foam sticky-back pieces; the foam gives the card a bit of dimension
The border was cut using a scrapbook tool, Borderlines (made by Creative Memories). I found a set of these recently at a thrift store for a dollar. I'm not a scrapbooker myself but have learned that many supplies produced for that craft work well in other paper-based projects.
I almost didn't buy the set because I thought even a dollar was too much for what's merely thin plastic shapes. But then I saw a current Amazon listing, asking almost $15.00 for a set of three out of the four I came across at the thrift store. So I realized a buck for four was a good deal after all!
The cards I made varied a little, in regards to the fabric scraps and decorative papers used for the hearts. But all had the sheet music border design and "Love".
And all are being sent with gratitude to the veterans.
.
Hello! The title of this post mentions something called "InCoWriMo" - you may be wondering what the heck that means. So I'm here to tell you.
"InCoWriMo" (I'm still having trouble remembering the name) stands for "International Correspondence Writing Month". Participants are supposed to write one handwritten piece of correspondence a day for the month of February. It doesn't have to be a lengthy letter, a quick note or postcard will do. In fact, today's email from the organization mentioned that you can even write a note to yourself to count as a daily correspondence.
I tend to get the winter blues real bad around this time of year, especially at the moment since the mild weather we had most of January has morphed into a colder, snowier February. That's a drag. So I thought InCoWriMo would serve as a nice pick-me-up.
And truth be told, I always liked to write letters, back when that was an important way to keep in touch (ie before email, texts, etc). I went through a time of living far away from family, and leaving friends behind as we moved from state from state. I valued writing letters and sending cards to loved ones then. As a Christmas "gift" to my mom one year, I told her I would write her one letter a week during the next year. And yes, I did just that.
(After my mom died, I learned that she had seemingly kept every letter I'd sent her from that year, plus those written other years I lived out of state. I say "seemingly" because I've yet to have to heart to even look them over, let alone re-read them. But if I ever do so, it'll be like having a journal of my life for whatever time period in which my letters had been written.)
The InCoWriMo folks explained that they picked February because it's the shortest month of the year, and so it'd be the easiest month for people to handle a daily correspondence. I don't know if I agree with that, since after all it's a month when folks might be sending out Valentines. Thus, they're already doing more correspondence than usual. I typically send out 24 cards for the Valentines for Vets program. Does that mean I'm covered for 24 correspondences? I suppose InCoWriMo could argue no, since all the cards getmailed out at once, to one address (a regional VA facility).
But February is the month they'd chosen, so be it. Thus far I've sent out two thank you notes and one birthday card. Beyond that, there are other Valentines I can send out, besides my Valentines for Vets bunch.
We've slacked off over the past few years with sending Christmas cards, but still have a few stalwarts who sent us Christmas cards this past December. So I can always return the favor by dropping them notes in return.
Closer to home, I can make Valentines for neighbors. It may sound like a lot of card-making to you, but by now I'm an experienced in that craft. I also have a rejuvenated sense of creativity due to the recent relocation of my studio from a drab, dark basement to a sunny 2nd floor room. And I've come up with a simple Valentine card design this year, so there's that.
As for the "international" aspect of InCoWriMo, the website has a link to this year's address submissions. A quick perusal showed that's there plenty of folks from other countries who would love to hear from other InCoWri writers.
If one would prefer to keep postage costs down, there's loads of American addresses as well. But personally, I think I have plenty of American family and friends to write to, so probably not much need to write to my countrymen/women on the list - unless I spy an address from a town or region of particular interest.
I realize that so many folks are extremely time-challenged these days. I happen to be an empty nester who tends to burrow indoors during the winter months, so as I'd said earlier, this is a good project for me. And judging from the long list of address submissions on the InCoWriMo site, I know I'm not the only one!
If this project interests you, go here. The link goes to the website where I first learned about InCoWriMo. There's a link within the initial post that mention the project, links to the InCoWriMo site, and also shares links to other correspondence sites.
.
Hello! In my last post I showed before-and-after pics of our daughter's old bedroom, now forever rid of a less-than-stellar color scheme. Today's post will give a peek into how this room's usage has been transformed: it's now a combination small bedroom for a guest, and a studio for me! Both are a work in progress, but so far, so good with the transformation.
In the bedroom section, white curtains, a vintage plant stand used as a side table, a small bedside lamp, a twin bed, a framed print over the bed and a vintage, unframed oil painting waiting to be hung up.
Another view of the bed and the other window.
Near the doorway, a small wire rack. Our daughter slept here during her recent Christmas break, and so I'd put a small, decorated artificial Christmas tree on that rack.
I "shopped" from our house to furnish most of the room. The only thing I bought was a new set of curtains and a thrifted twin-size comforter. The decor will do for now, but I'd like to find a nicer-looking bedside lamp and a replacement for the beat-up quilt at the foot of the bed.
I was glad to set up this small bedroom area, but it was really the studio that I was looking forward to putting into place! We moved into this house in 2002, and since then my studio had been in the basement. I know it's common to set up studios in that part of a house, and while house-hunting we looked at houses whose basements would have been fine for my studio. But for various reasons, we bought our current house.
Our basement is a full one and so there was plenty of room for my studio. And to help organize my arts/crafts supplies, a number of metal storage racks were already in place, left behind by a previous owner. There was even an unopened box containing the components of another metal storage rack, which I put together in due time.
But I hated working down in that basement, which was dark and was chilly-to-cold much of the year. The addition of several lights barely helped dispel the darkness, although a space heater did make things toastier for me by my worktable.
Actually, it was much nicer working down in the basement studio in the summer; then it was comfortably cool. But the problem that time of year was the trend toward unwanted visitors at night: I'd be happily immersed in collage work or a sewing project, only to suddenly be unnerved by a bat flying by. Yikes! That would send me scurrying up the stairs! We were never sure how the bats got down there; perhaps from the weird outside entrance to the basement. They always seemed to find their way out, and without messing things up, but I still didn't like the possibility of their surprise appearances!
Then, too, there was the general dustiness and mustiness of our old-house basement. I have a dust allergy and so it wasn't healthy for me to work down in the basement for any real length of time.
And so eventually my most-used arts and crafts supplies migrated to several rooms on the 1st floor. And supplies what stayed down - or, in the case of "new" supplies from thrift stores, what went down - to the basement tended to pile up into barely-organized heaps. Needless to say, it was often frustrating to locate a particular craft book or piece of fabric.
But that was then, this is now! I began my studio set-up by putting two work tables into place, one for sewing and one for paper crafting. I was thinking of putting another table in the room for painting, but I'm not sure if I'll have the space, so I'll wait and see on that.
The worktable here is an old metal folding table that had belonged to my in-laws. My sewing machine is a mid-80's Singer. It needs a tune-up now and then, but basically still runs fine. Various containers behind the machine hold patterns, sewing scissors, rulers and other supplies.
For decoration, I propped up this vintage sewing kit box on the window frame behind the sewing machine. The box had been in my mother-in-law's sewing basket, which was given to me after she died.
Adjacent to the sewing table is the papercrafting work area. The table, which had been left behind by a previous owner, has a wood top and metal legs. Certainly not a top-of-the-line piece, but it's perfect for this space! To the right are several small plastic storage units with drawers for small art paper pieces, and to the left are a couple of storage units for storing rubber stamps and stamp pads. More rubber stamps are in a storage container underneath the table, and more stamp pads are in a basket on the table.

Getting ready for doing a spread in my current scrappy journal: the journal itself, a bird I'd made from art paper scraps, small scissors for detail cutting, a glue stick and a stamp pad. The large paper you see underneath these objects keeps the desk surface clean. Over time a paper used as such collects paints, stray rubber stamp images, markers tested to see if they're dry and so on. When the paper gets filled up, another one is put down - and I then have another "art paper" to cut up and use. On the windowsill is a brayer (I use it to press down glued items in my collages)and several small storage containers.
I took these photos last week, when I was in the beginning stages of setting up the studio. Since then I've hauled up what seems to be a never-ending amount of fabrics, crafting books and magazines, ribbons, more art paper pieces, stenciling materials, paints, glues, vintage matchbooks, vintage playing cards/flashcards, and on and on. It sometimes seems like it'll never end! The books will go in a small bookcase our daughter left behind, supplies used the most will be stored on one of those metal storage racks, and other things
are destined for the closet.
I still haven't brought up my felt collection, nor the vintage board games,vintage bingo cards, my bag of vintage rick racks, a basket crammed with vintage jewelry parts, counted cross-stitch stuff, and more.
And then there's the Christmas crafting supplies - books, magazines and vintage holiday doodads like jingle bells and adorable gift tags. Since Christmas crafting is still a ways off, I'm not in a hurry to bring up these materials up just yet.
Yes, I have a lot of stuff! Too much, really, so I'm taking the time to declutter as I go along. But I probably haven't gotten rid of as much stuff as I should.
Oh well, Rome wasn't built in a day, and neither was my studio. In spite of the work involved in setting it up, I'm thrilled to finally get out of that dark, cold, dusty basement!
And now if you'll excuse me, I have to go up to my studio and work on another scrappy journal page! (I have a goal of doing one page a day for the year.)




 I


