Hello! I often like to read books that correspond with the calendar. I've read some that take the reader month by month throughout a year. These are typically set out in the country, so observations about wildlife, the weather and gardening are prominent.
However, there's a book I plan on re-reading right now because most of its action takes place in the summer:
Then There Were Five by Elizabeth Enright. Yes, it's a kid's book - according to Amazon.com, it's for ages 8-12. And yes, I read it as a kid - I was probably around 9 when I read it for the first time.
I liked the book well enough that I bought my own copy as an adult - before I had a kid as an excuse for buying a children's book. My edition is the 1987 version; there is a more recent edition shown on Amazon, with a stupid-looking front cover.
Not that I'm particularly fond of the cover shown above, for the kids look too modern on it. Then There Were Five first came out in 1944.
Too dated to enjoy today? Our daughter didn't think so when she read it as a youngster - and the reviews over at Amazon seem to agree. Oh, and some of the reviewers were adults like me who'd read this book when they were kids and wanted to enjoy it again for themselves and to share with their own kids as well.
As I'd mentioned at the beginning of this post, most of Then There Were Five takes place in the summer. The book begins with siblings Mona, Rush, Randy and Oliver Melendy building a dam to enlarge their swimming hole. The book ends with a festive October picnic out in the country at an abandoned house site.
In between the children have many adventures, some of which are related to World War II - a scrap metal drive that leads to new friends, a Victory Garden, canning efforts of the garden surplus, and a country fair and auction to benefit the Red Cross.
Arrowheads are found, music is played and written, criminals are dodged, there is a lot of nature talk, and the kids have a spell of freedom due their housekeeper's trip out of town for two weeks (their mom had died years ago and their father was often away at his government job in Washington). Due to a tragic house fire, one of their new friends, a boy named Mark, is left with no relatives at all. In rather short order, it seemed to me, the Melendy kids convince their dad (whom, like I said, wasn't even around all that much)to adopt their friend, and that's what happened. Thus, the title of the book.
Enright had a gift for descriptive writing - people and places alike come alive. Whether it be the wonderful treats baked up by a foodie neighbor, the gloomy exterior of Mark's cousin's home, the vivid red of all those tomatoes Mona and Randy canned (with the help of that foodie neighbor), the backwoods flora and fauna, or the various people that are in the Melendys' lives that summer - everything and everyone is detailed just enough.
The natural-world talk is informative enough for kids to learn from - I know I did as a kid. And although there's no talk of wounded or dead from the battles of WWII, we do get some sense of the impact the war had on those on the home front. So besides learning about nature, kids can learn about this time period of American history as well.
But even without the educational element, Then There Were Five is just plain fun to read. Sure, it's a world without high-tech electronics - not even any TV - but the world of the Melendy kids and their family and friends is still a joy to read. If you and your kids haven't read this book, I'd suggest getting it from the library or a bookseller.
And why you're at it, read the other three Melendy books as well - The Saturdays, The Four-Story Mistake and Spiderweb For Two: A Melendy Maze. Then There Were Five is actually the third book in the series (and yes, I own the first two as well), but since it's a book mostly about summertime activities, I'm going to re-read it now!
First off, let me explain what "ICAD" means. It sounds like the acronym for some important organization or a new workout plan, doesn't it? But actually it stands for "index card a day".
And, according to Tammy of the blog Daisy Yellow, "Simple materials push you to think in new ways". Thus, the June-July ICAD project is meant to be a fun way to do something creative during these two months, on one index card per day.
It doesn't have to be visual art, either - she suggests writing and haiku as other possibilities.
She has a kid's version of the challenge as well, so this may be something fun for the kids to do over the summer.
Kids not out of school just yet? You didn't see this post on June 1st? (hey, I just learned about the challenge a couple of hours ago myself) No problem, Tammy says - just start wherever you are.
There's no advance registration and no fee to join. But there are ways to share one's index cards throughout the duration of the project.
At this point, it's easier for me to just share the link to the ICAD FAQ's - so go HERE to learn more! Tammy has explained it all much better than I can.
I'd just picked up an unused pack of 3x5 index cards at a thrift store recently, intending to use them in a particular project. But then the project went in another direction and I didn't need to use the index cards after all. Nice to find an alternate use for them!
Provided I remember to do the ICAD project on schedule, I think this will be a lot of fun. During the summer months my creativity is often directed toward trying to get the most of my vegetable garden and trying new recipes for ice cream and iced tea. It'll be fun to have a daily dose of index card creativity too!
Hello! While cruising the crafts section of a local thrift store several weeks ago, I came across various sizes of embroidery hoops, all of which had some sort of mesh-like material inserted in them. Hadn't encountered this type of material before, but it appears to be made of very thin wood strips. I assumed it was meant for counted cross-stitch.
That craft seemed to have fallen out of favor in recent years. But my friend Ms. Kayak Chickee told me that counted cross-stitch seems to be making a comeback, with updated patterns and colors. She'd purchased some British magazines devoted to the craft and there were some great projects in them.
Knowing of her interest in cross-stitch, I bought one meshed hoop for her and one for me. I forget what I gave her, but my purchase was an oval hoop with a design area that measures about 9"x5 1/2".
Wasn't sure what to stitch within the hoop, but when Ms. Kayak Chickee suggested doing a word, I though that was a great idea.
First, I had to find a counted cross-stitch alphabet to use. I could have probably found one online if I needed to, but then I spotted a 1986 Leisure Arts leaflet, The Alphabet Book, at a thrift store - perfect! Several fonts were included, so I knew I would find one I liked.
Next, had to pick a word to stitch on the mesh. Peace? Love? Smile? Decisions, decisions. But before I settled on a word, our decorative plaque that said "Welcome Friends" fell off its hanger outside the entrance to our house and broke - another victim of our severe winter (the suede cord from which the plaque had hung must have deteriorated without my noticing it).
So, why not stitch the word "Welcome"? But alas, that word proved too long for the fonts that would have been the proper scale (there are smaller fonts in the leaflet, but they would have stitched up too small to look right).
Switched to the shorter "Hello" and I was on my way with the lowercase version of the Stencil font. The project was easily completed, using all six strands from a skein of embroidery floss in variegated blues:
I will bring the hoop inside for the winter, but as it's going to hang outside for now, I put a dab of waterproof glue on all thread ends to keep them in place. That was the only finishing I needed to do, so overall this was a very easy project.
I really like how this turned out and now I kind of wish I'd gotten the other meshed hoops that I'd left behind at that thrift store - but Ms. Kayak Chickee went there and bought the rest!
Oh well, I still have The Alphabet Book in case I want to stitch up words on anything else.
Edit: upon doing some online research, I think that the mesh in the hoops is something called "radio weave cane" and is normally used in chair caning. Not sure if it was often used in embroidery though.
Hello! Our daughter is renting a sublet this summer as she takes a couple of classes and works at an on-campus job. This marks the first time she's had to cook for herself on a regular basis.
Although the apartment came furnished, and her roommates said she could borrow their kitchen utensils and cookware, inevitably there were a few things she needed.
No sense in buying new (other than a bath mat and a shower curtain liner) when she'd just be heading back to the residence hall come late August. On the other hand, I wanted her to have decent stuff that could be reused in the future when she's done with dorm life for good.
Thus far, I've purchased her a couple of Tupperware food storage containers, a Wusthof paring knife, a lidded Corningware casserole dish (the type that can go in either regular or microwave oven) and a small wastepaper basket for her bathroom. Everything came from a church rummage sale or a thrift store.
All were in good shape - the knife sliced fine, no chips or stains on the casserole dish or on its lid, and no stains and very little wear on the Tupperware containers.
This is basic stuff, so I didn't bother to take photos of any of it. The price was pretty basic too: I spent around $6.00 for all of the above.
If brought brand new, I figured out that I would have paid between $45-$60 for everything. The knife alone retails for around twenty dollars! But I paid a mere fifty cents for it.
Can't beat those prices! It's nice to know that secondhand merchandise is available for anyone's living quarters, whether it be a summer sublet or a permanent residence. Come to think of it, I could use some replacement knives myself...
Hello! It's Memorial Day Weekend, which means the start of many summertime activities. Grills are fired up, boats are brought out of storage, cottages are opened up for the season, garden plans are put into place, and on and on.
It's also time to make ice cream! Of course, ice cream can be enjoyed all year round, but in general I only make it in the summer. Winter time is for using the oven to bake cookies, cakes and other goodies. But who wants to heat up the kitchen more than necessary when it's hot out? Not I! And short of going swimming, what could be a better way to cool off than eating ice cream?
I have a Krups ice cream maker, the kind that comes with an insert that must be frozen before ice cream can be made. But once that step has been completed, the ice cream mixture only needs 20-30 minutes of churning. The ice cream is more like soft serve at this point, so a few more hours in the freezer are necessary in order to harden it to a more scoopable stage.
(Incidentally, I think my Krups model is no longer available, but there are models from Cuisinart that are similar.)
Why make ice cream? Well, for one thing, it's fun to do, and is also a way to have flavors that are typically absent from the grocery store shelves.
For instance, is raspberry ice cream common? I don't think so, but it's been well-received around here this weekend:
I already mentioned that there's a bit of advance preparation involved in the making and eating of homemade ice cream. One also needs to plan ahead if a cooked custard base is preferred. The cooking together of eggs, dairy product and sugar makes for a very creamy ice cream, but the resulting custard needs to be chilled before being churned. When I make one of these bases, I'll cook it the night before and let it chill overnight. Then it's ready for the ice cream maker first thing in the morning.
Even simpler are the ice cream recipes that don't require any cooking, just a stirring together of the ingredients. The texture is a bit more coarse than that of ice creams made from cooked custard, but these ice creams are still very good. My raspberry ice cream was made from one such uncooked recipe, called "Choose-a-Fruit Scoops". It came courtesy of Midwest Living magazine. I had to reduce the recipe to fit the capacity of my machine, but that's okay - the resulting ice cream is pretty rich, so small servings are satisfying.
And though the recipe is meant to be fruit flavored, I don't see why other flavors (coffee, chocolate, etc) or add-ins (crumbled Oreos, crushed candies, etc) couldn't be used instead. As I'd said, that's the fun part of making ice cream - you can flavor it any way you want!
If you'd like to make your own "Choose-A-Fruit" (or other ice cream flavor using the same base), you can find the recipe HERE.
Here's to the beginning of summer - and to its perfect companion, ice cream! I know I'll enjoy using my ice cream maker throughout the season.
Hello! Made a quick visit to Michigan State University in East Lansing, Michigan yesterday. Didn't have much time to look around, but did take a few photos.
My lunch spot:
The MSU food truck; how cool is that? By going HERE, I was able to scout out the food truck's daily location in advance and view the menu and daily specials.
I had the grilled chicken sandwich with cilantro/lime aioli. Although I felt the sandwich was a little skimpy for the price, I could fault nothing else about it. It truly was one of the tastiest chicken sandwiches I've had in a long time.
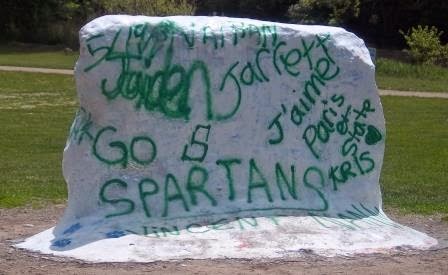
The website had informed me that yesterday's food truck location was "at The Rock near the MSU Auditorium". Having gone to MSU, of course I knew what "The Rock" was, but in case you don't know, here's what it looked like yesterday:
This is rather a subdued look; besides the "GO SPARTANS", the other statement of interest to me was the "J'aime Paris et State", which I assume referred to someone's love of their study abroad session in Paris. Well, why not - I would have liked to study abroad when I was in college too but couldn't afford it. Oh well.
The Rock is constantly painted over, with all sorts of slogans, event notifications, declarations of love and affection to others, Greek letters and so on. It very well may look completely different today!
The Rock has been on campus since 1873, and as a student I remember its original location near Beaumont Tower. It was moved to its current spot in 1986. The reason for moving a large boulder such as this? The health of nearby trees at the Beaumont Tower location had been threatened by them being spray-painted along with the Rock.
Spotted some more signs of personal expression on campus, this time in chalk.
The top photo reads "Dream a little dream everyday" while the bottom one encourages passerby to "love yourself". In the background of the bottom photo is a peace sign drawn over a manhole cover. These chalk writings made me smile. Both had been written on the path near the Bikes Service Center.
A stenciled message on a sidewalk near the Union Building was less positive though:
Perhaps a graduating senior had left this message, thinking not only of all the good times of the past four years but of the student loans that would have to be paid off in the future. Not a pretty thought.
There was one last picture I took, and that was in the Union Building itself. There is an electronic sign in the lobby that features the names of all the students who had made the Dean's List (3.5 or better GPA, I believe) during the most recent semester. Not only that, but one can press a name on the list, thereby blowing up that student's name all by itself on a new screen.
It's a fun thing to do if you're a proud parent, as I was yesterday. But to spare our daughter's embarrassment, I'm not showing the photo I took of her name here.
I hope to return to the MSU area in the near future; summer is a pleasant time of year there. Perhaps I'll head over some Thursday, when the Rock is host to the Student Organic Farm Stand. That sounds even cooler than the food truck!
How does my garden grow? So far this year, very slowly! Between waiting for the snow to melt and for both the soil and the weather to warm up, it seemed like forever before I could start my vegetable garden.
But finally, on April 9th I sowed some seeds of a couple of lettuce mixes, spinach and snow peas. I also unearthed the spinach seedlings that had emerged from the soil; I'd sown them late last fall and had covered them with a heavy layer of leaf mulch. First time I'd done this and it worked in spite of the seemingly never-ending polar vortexes we'd endured.
Because both soil and air were still chilly, I had to wait awhile for the seeds to germinate, and after that they grew rather slowly. It wasn't until today that the lettuces were big enough to thin out and pick. Those, plus the fall-sown spinach, became the base for a nice lunch salad:
Worth the wait? Yes! I love the delicate flavor and texture of fresh lettuces, and look forward to picking more for future salads.
Fortunately there's an easy way to "grow" another salad staple inside the house, year round:
Above, a tray of clover sprouts is ready to use. Besides salads, I like sprouts on sandwiches, and I've heard that some people toss them in their smoothies.
There are a number of sprouting systems out there, ranging from jars, bags and trays. I've used a couple different jar systems, a homemade sprouting bag (a mess) and a couple of tray systems.
Don't recall the brand of the first tray system I used, but do recall that it didn't seem to work well. There were three stackable trays. Rinsing occurred by pouring water into the top tray, which would drain through to the bottom tray and into a base for emptying. But it seemed like small sprouting seeds (alfalfa and clover being two examples)were always clogging up the water flow and I'd have to take trays apart to remove the impediments. It was a nuisance, so I ended up giving it away.
A few years back, I paid 50c for the above tray sprouting system at a church rummage sale. It had three trays and seemed complete in the box minus the directions. Those were easily found and printed off the Internet. The brand is Victorio Kitchen Products.
At this point, I'd say that I like the sprouts from this tray system better than those grown in jars. There's obviously more surface area for the seeds to sprout, so germination and the resulting yield are higher. They look better too, probably because they have more room to spread out. I've read that some people feel too much water is left in the bottom of the trays after draining, which can lead to molding, but I haven't found this to be a problem.
The seeds do occasionally block the drainage holes in this unit, but not as often as they did in the previous tray model I owned.
Sprout seeds may seem expensive at first; they can be priced somewhere in the $15-$20/lb range. But unless you're in commercial production, you wouldn't buy a whole pound of sprout seeds at a time! My tray of clover sprouts began with a mere 1 1/2 teaspoons of seeds, so the half-pound bag I paid $7.95 for at a local health food store will last me forever.
I don't know if I eat enough sprouts to improve my health, but I like the way they taste, and it's nice to have something so fresh, especially when I'm waiting impatiently for my vegetable garden to get going.


