Showing posts with label Made it. Show all posts

Thursday, October 25, 2018

Made It: Christmas Ornaments From An Unusual Source

Hello! May seem hard to believe, but Christmas is two months from today! So what better time to show off some ornament gifts I just finished making? 

Every year I create ornaments for my younger nieces and nephews, the ones who haven't graduated from high school yet. I like to get these made early and out of the way since I always have other gifts to make. Here's what I stitched up for this year's set:

And a close-up:

Each design was stitched on  14-count Aida fabric, trimmed, backed with coordinating felt and then glued to wooden rings. A friend of mine gave me those rings, which came wrapped with wire hangers. They were the perfect size for the finished stitcheries. I'll admit, though, that these aren't big ornaments - the wooden rings are only about 2" diameter. So, small ornaments, but big on charm. 

What makes the source of these designs unusual is this:

A 1979 counted cross-stitch design book, published by the Japanese company Ondori. (In case you didn't know, the letters "DMC" on the  front cover refer to a well-known embroidery thread company). I bought this book at a thrift store for a quarter. I liked the interesting - and sometimes goofy -  designs, but it was the cheery colors that really caught my eye:


A friend thought these figures looked Dutch. 

These chicks would be cute for Easter.


A pig in pink. 

The page from which my ornament designs came. 

For reasons unknown to me, several of the larger designs in this book depict some sort of circus or carnival setting, such as this one:

Children on an animal-themed ride. 

Other designs along the same theme are children holding balloons, hot air balloons rising up in the sky beyond a roller coaster and a Ferris wheel, clowns riding a circus wagon being pulled by an ostrich, clowns doing an act with a monkey, and other whimsical scenes. 

The purpose of these - or any of the designs in this book - is unknown to me as well, since nearly the entire book is in Japanese. But the design charts were easy to follow and the DMC color numbers were given for each design. Those numbers are universal, so I had no problem doing the stitching.
  
I was curious about this:

Might have included some handy tips about how to pull out an end of the floss without ending up with a tangled mess like I've sometimes done. But it'll remain a mystery to me.

This book is 120 pages long plus four pages of ads for other Ondori craft books. The only real English in the whole volume is two snippets added later: the American importer of the book and the shop in my area that had stocked it. 

Although Japanese language craft books are still a thing in this country, I don't see them around much, so I do consider them an unusual source. But in this case, my thrift store find helped me with some Christmas gift-giving. There's nothing unusual about that!


Wednesday, July 4, 2018

Made It: Happy 4th Of July!

Hello! My dad would have been 96 today (he lived to be nearly 94), so my siblings and I planned a get-together in his honor. Alas, the gathering fell through, so instead today my husband and I visited the one sibling who wouldn't have able to attend: a brother who was hospitalized over a month ago with life-threatening health issues. Fortunately he is much improved now and may be allowed to go home soon. 

I made him a decoration in honor of the holiday:

Materials used:
  • white card stock backing
  • 1880's ledger paper (there are subtle red and blue lines on this paper)
  • Uncle Sam stencil set
  • white card stock decorated with red marker (pants, hat)
  • vintage time card, altered with blue acrylic paint and stars stamped with white acrylic on top of the  blue paint (jacket, hat, stars in upraised arm) 
  • white card stock scraps (beard and hat brim)
  • black art paper scrap (shoes)
  • beige art paper scrap (hands)
  • red art paper scrap (stars)
  • 1974 catalogue (man's face)
  • red ink (July 4) 
  • blue ink (2018) 
This was the first time I'd used the Uncle Sam stencil set, which had been a garage sale purchase years ago. I think another time I'd use more vintage catalogue images- for example, men's shoes instead of shoes cut from art paper scraps. I think this would bring more interest to the piece. 

As it was, the man's face from the catalogue was a late edition. I'd cut a face shape from beige art paper, using the corresponding part of the stencil set, then I drew a face on the shape. But after I was done I wasn't overwhelmed by what I'd drawn. So out came my scissors and the vintage catalogue. 

I forgot to measure the finished work, but I'd guess its dimensions are around 6"x9". My brother seemed to appreciate this simple gift, but to me the real gift was seeing him back on the mend!
 

Tuesday, May 1, 2018

Made It: A Crafting Failure - And A Save

Hello! The local tulip festival begins at the end of this week, so I wanted to create a garment honoring that flower by using this thrifted pattern:

A trio of floral designs for sweatshirt applique. The tulip pattern is on the right. This "It's Bloomin'" pattern (#133) is from the Bloomin' Minds company out of Iowa. Would have cost me $7.50 from their website, but I paid a quarter for it. The original purchaser had selected this pattern from The Pattern Hutch in Pigeon Forge, TN.

This time of year, it took some doing to find a plain sweatshirt at the thrift stores - the few I came across were either zip-up or had designs on the front. But finally I found what I wanted, in a pretty sky-blue color to boot. I thought that would look especially nice for springtime.

The applique is worked by cutting the pattern pieces from fabrics, then affixing the fabric pieces to each other with fusible interfacing. The five panels that result are fused onto the sweatshirt, and lastly, the edges of all fabric pieces are finished off with blanket stitching. 

It took a little time to pick out the fabrics I wanted to use for the petals, leaves and background, but finally I was pleased with my choices. So I grabbed my fusible interfacing and ironed away. 

And that's where my crafting failure was! Not thinking, I grabbed a type of fusible interfacing that was too heavy for this project once all the layers of fabrics were fused together. When it came time for blanket stitching, I could only get my needle in the outer edges of the whole design. And as far as putting the sweatshirt on my body - well, I tried that to see how it would hang. Of course, the stiffness of the appliqued panel resulted in that part of the sweatshirt not draping well at all. Definitely not the look I wanted!

So, a waste of nice color-coordinating fabrics, a pretty sweatshirt color and my time? It would appear so, but then it hit me: I could use the stiffness of that appliqued panel to my advantage and turn it into a Tulip Festival wall hanging! All I had to do was cut out the panel and sew a backing onto it.
  
Decided to make things easy by using the sweatshirt for the backing. I just cut off the panel and the back of the sweatshirt together, then blanket-stitched the edges closed. I left a small part near the top of the short sides unstitched. I slit those parts open, slid a dowel through, adding a matching cord, and voila: my wall hanging was done. 
 
Here's out it turned out:

And a close-up:


Like I'd said, I thought I'd done a nice job in selecting the fabric colors for this project, so I'm glad I was able to turn my crafting failure into a save!


Saturday, April 14, 2018

Made It: Yo Yo Quilt

Hello! In 1998 I bought a machine-sewn, patchwork-style comforter at a department store. I really liked the colors, so when the patches began coming loose at the seams, I sewed on coordinating fabric pieces to cover the gaps. But over time too many seams became loose and patching was no longer feasible. 

I made do with the quilt my late mother had made me decades ago. But it dated from my dorm room days, so was sized for a single bed. It barely covered our double bed, so I began thinking of making a quilt. I'm not into intricate quilting patterns, though, so it would have to be something simple. 

An older craft book from a thrift store gave directions for making a yo yo quilt, and it sounded like something I could handle. I looked up some online info on this type of handiwork and thought the examples I saw were charming. From articles such as this one, I learned that yo yo quilts were popular in the 1930's and 1940's.

I had plenty of scrap fabrics, so I already had a head start on the supplies needed. But I bought a yo yo maker (as seen here) to make the job go faster.  

In the context of quilting, what is a yo yo? It's a fabric circle  with a gathered stitch edge that, when pulled, turns the circle into a smaller puffy round. The rounds are then tacked together to form quilts and pillow tops, and can also be used to trim pillowcases, purses and other items. They can be strung together to make toys, or sewn together to make garlands or Christmas ornaments too. 

I think that yo yo makers are fairly new; before then, the circles were cut out with a template, the raw edges were turned under, and then a gathering stitch was sewn around that turned-under edge. There's no way I would have considered making a yo yo like that when yo yo makers are now available. Not only does this tool eliminate the need for using a template, but it also eliminates the need for turning over the raw edge as a separate step. And the yo yo maker has slots for placing the gathering stitches, which makes that step a no-brainer. So all in all, a big improvement!(The only real disadvantage is that you're limited to the sizes the yo yo makers create.)

This is not to say that crafting the number of yo yo's needed for a double bed quilt was a quick and easy project. It was probably around five years ago that I started making them. I'd work on them in spurts, mostly during the winter months, but also when we went out of town for vacations. Making yo yo's was a very portable project.

I loved working with my fabric scraps (and admittedly, used the project as a excuse to buy appealing remnants at thrift stores and garage sales). But there were times I got sick of making yo yo's, so I'd set aside my efforts for months at a time. Yeah, there was a lot of stopping and starting, and occasionally I wondered why I'd even begun the thing. But since I'd already started, I figured I might as well finish. 

Eventually I deemed that my multitude of yo yo's was enough, so I began tacking them together. This was more tedious than making the yo yo's, but it was fun to randomly match them as I sewed. 

And how many did I sew together to make my quilt? It's 36 yo yo's wide and 40 yo yo's long, so yep, that equals 1,440 yo yo's! Insane, right?

Well, I finally got the quilt done, so here's some pics of how it looks on the bed:

Some close-ups of fabrics I used:

A colorful conglomerate.

I think the quilt looks very nice on our bed! We bought that bed  back in 1988. At that time, the antique store owner told us she thought it dated from the 1920's. So, perhaps at one time the bed had had another yo yo quilt on it. I'd like to think so!

By the way, yo yo quilts don't have backing fabrics as pieced quilts do. The craft book that inspired my quilt did suggest a backing as an option though. In that case, the yo yo's were to be tacked onto the backing while they are being tacked to each other. 

I thought I'd already done enough sewing, so I just placed a white sheet over the blankets, and then laid the quilt over the sheet. The white shows off the many colors of the many yo yo's to their full effect. 

I'm glad I didn't give up on this project at the times I was tempted to do so. But I have to say, I'm glad it's done! Now, what to make with the fabric scraps I have left? I recently came across another quilt pattern that looks simple...


Saturday, March 10, 2018

Made It: DIY Chair Seat Covers

Hello! In 1999 I bought an antique dining table/chair set. The chairs were covered with a blah beige-ish fabric that I never cared for. But since the chair seats are the kind that are easy to recover (only a screwdriver needed to remove the seats and to put them back in), I figured I'd do just that.

Never got around to doing so, but over time I got more tired of looking at those blah chair seats. More recently I began looking at replacement fabrics, but didn't see anything I liked. 

Then last summer I stopped at an interior design firm in our downtown that was participating in the annual sidewalk sales. They were selling fabric sample books for practically nothing. There were so many many pretty choices in one book, I decided to see if those fabrics would work for my seat do-over.

It's a bit of work taking apart a fabric sample book, as they're typically put together by glues, heavy-duty staples and screws. But eventually I pried everything apart. I laundered and ironed the fabric pieces I wanted to use, and they sat around for a few months more. 

But finally I began my project earlier this week. Here's an example of what I started out with:

As you can see, nothing special about the above fabric! 

Now, the one thing about my fabric pieces is that none of them were big enough to cover a chair seat. I'd have to sew more than one fabric together to get the size I needed. It may seem unusual to cover a chair seat with more than one fabric, but I asked the interior design firm employee who sold me the fabric sample book if it'd be okay to do. She said it would be. And since anything seems to go these days, I figured it'd be all right to take a chance. If I didn't like how it turned out, I could try looking for more fabric again. 

I cut four 10" squares of my sample fabrics per chair, then sewed the squares together. For interest, I alternated darker and lighter prints. After prying the beige fabric from the seats, I used one of those pieces as a pattern to cut my sewn squares down to the right size and shape. 

(Yes, I had to use a different set of four fabrics for each chair, but stuck to those that had at least some pink in each print.)

And voila:

A big improvement, I'd say! The fabrics I used are all very nice quality. They should be, as the price per yard is astronomical for this stuff. 

A close-up of some of the fabrics:

I can't say I did the best job ever of recovering the seats, as I don't have much experience with a staple gun. But by the time I was working on the last chair seat I got better at it. 

I also don't know how durable these seat covers will be, since the friction of one's posterior could cause stress on the seams over time. But we really don't use our dining room a lot - mainly for holidays and when we're having people over. The latter includes dinner guests, family parties and house guests, but still not frequent occasions for us. 

Use or no use, I wanted to get rid of that blah, beige-ish fabric anyway! I'm glad I finally did so. 


Saturday, October 7, 2017

Made It: A Fall Scrap Fabric Wreath

Hello! I've shown off scrap fabric wreaths on this blog before, such as the post seen here.  Since I've made a few by now, I figured I was done with this craft. 

But then I bought a large bag of fabric scraps at our town's sidewalk sales during the summer. While sorting out the pieces by color once I got home, I noticed that many of the scraps were already cut in pieces the perfect size for a scrap fabric wreath, and what's more, they happened to be mostly in fall-ish colors. So I decided to make a fall scrap fabric wreath for our front door. 

I also raided my own assortment of autumn-hued fabric scraps, which was fine with me - this project's a great way to use up pieces too small to do much else with. 

I remembered I had a bag of vintage quilt scraps that had been cut in a shape that would work well in the making of this wreath; these bits can be seen in this post. I dug out the bag to find the scraps that fit with my color scheme (mostly grays, browns, blacks, orange, yellow and dark red), zeroing in on the shapes as seen in the second photo in the linked post.  

I bought an 18" wire wreath frame at Michaels, then tied, tied, tied away. It actually goes quicker than you might think, and I liked seeing all the strips come together on the wreath frame as I filled it in. 

Here's how it turned out:

And here's a close-up of some of the fall fabrics I used:

Striped ticking, Halloween prints, vintage plaids, ginghams...this wreath's got a little bit of everything.

Well, everything that makes this a fall scrap fabric wreath!

(If you'd like to make your own scrap fabric wreath - in the colors of your choosing, of course - the directions are within the first link in this post.)


Wednesday, August 23, 2017

Made It: Ye Olde Brick Path

Hello! There's a narrow strip of land - about five feet wide - on the western edge of our property that was a bit of a no man's land. When we first moved in, an assortment of weeds and tree saplings reigned in that space. I got rid of the saplings first, then pulled out the weeds. One particular weed, though, grows via runners, so it was very hard to eradicate. And the thinning out of the other weeds and mini trees caused the spread of lily of the valley. I like the scent and appearance of its flowers, but there was just too much of it growing in this small bit of ground. 

Over the course of our years here, I've gradually added some perennials in this area, but placed them close to the house so I would still have space to walk through. During the growing season, I'd gradually wear down enough of the weeds and lily of the valley to make a path of sorts, though walking on these plants stopped them from growing back.

Then it dawned on me: since I was beating down a path by walking on this strip of land, why not just make a real path? So earlier this summer I dug out a ton of weeds and lily of the valley. It was a bit laborious, but with the excess growth cleared away, that section of the yard looked better already!

Now, what to put down on my path to make it look more official? This would involve figuring out what type of paving stone to buy and how much of it to buy. But before I made a trip to an outdoor landscaping place, it was time to cut the lawn. This task included mowing around a semi-buried, two-brick-wide path someone had added to the park side. And since this path was right next to a large maple tree, it was difficult to mow around. So, time to kill two birds with one stone: remove that old brick path so it'd no longer be a nuisance - and use those bricks to make my new path!

And here's how it turned out:

To show you how narrow this strip of land is, the light green plants to the left are lavender I planted about a foot away from our house, while the feathery-looking greenery to the right is on our neighbors' property. But as you can see, a single file of bricks fit in well here. 

A couple of close-ups on the old bricks I dug up from the parkside and put in place to make the path:

There were a few of this brand, Bessemer Block, Youngstown, Ohio.

But mostly I had this:

Metropolitan Block, Canton, Ohio.

I looked online for some information on these companies. Bessemer Brick Company began in 1901 and was bought by Metropolitan Brick in 1917.  Metropolitan Brick was formed in 1902. 

Finding Metropolitan bricks is quite common; read here
to see where they were found by others (a brief history of the company is first, followed by the comment section where the finds are discussed).

I don't know if or where the bricks I dug up from the parkside had originally been elsewhere. I was glad to have had found just enough to make a nice little path. A couple of neighbors have complimented me on my efforts, which was very kind of them. My path is rather rustic in appearance, but at least that side of our yard no longer looks like a no-man's land!


Wednesday, July 26, 2017

Made It: Seashell Mobile

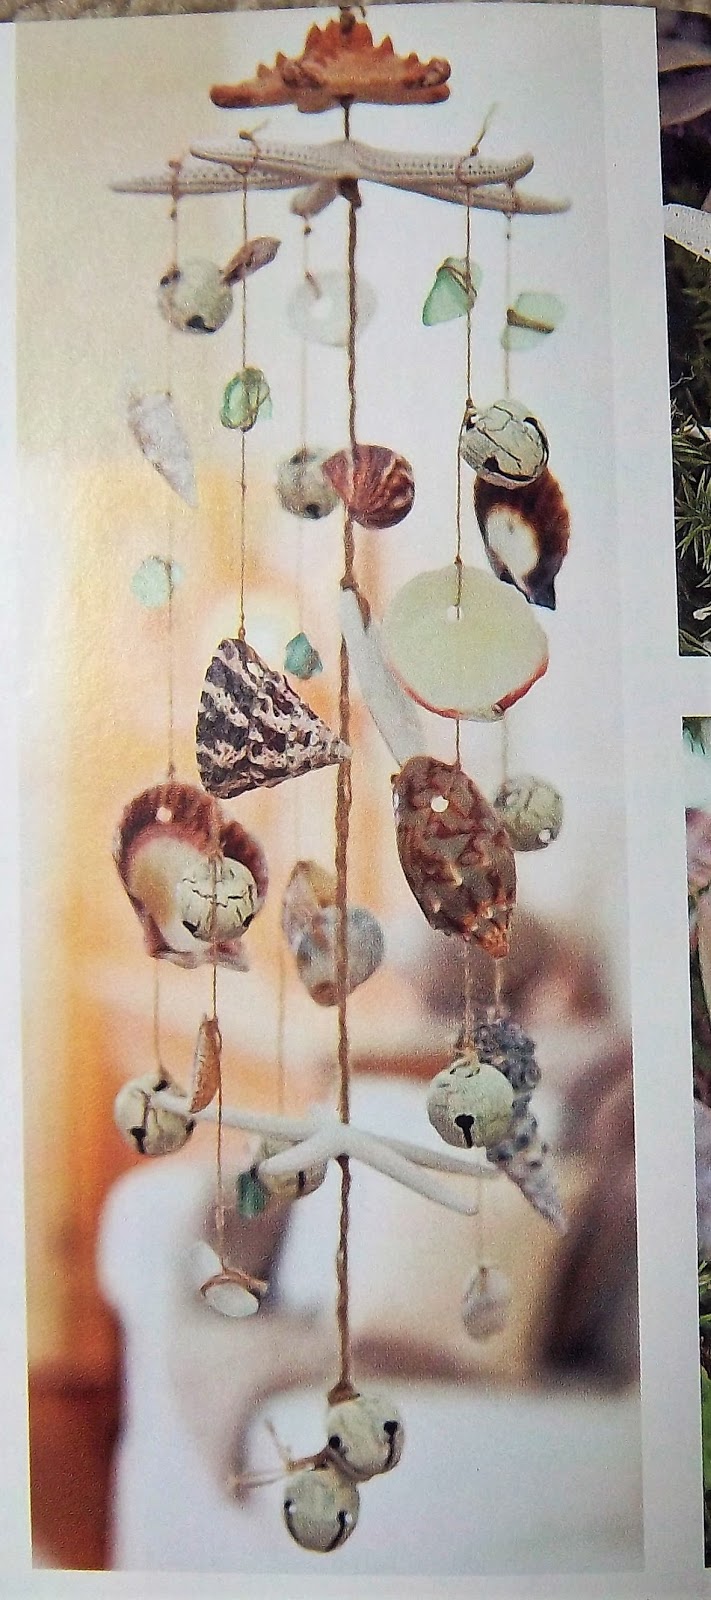
Hello! Spied this project awhile back The Spirit Of Christmas 20th Anniversary Edition (thrift store find):

In the chapter entitled "Beach House Christmas", a seashell-laden wind chime is shown. But the thought of seashell crafts in the dead of winter didn't make sense to me. I thought this item would look better in the summer, when the local beaches where I live can actually be used. 

I had plenty of seashells on hand (another thrift store find), but didn't have the starfish and sea glass that are on the supply list. So instead I went to one of the local beaches to pick up some driftwood, and used beads for the sparkle the sea glass would have given. I also omitted the jingle bells, so I'm calling my finished project a mobile rather than a wind chime. 

Here's how it turned out: 


This mobile didn't photograph very well, no matter where I hung it, so I'm showing off two pics: hanging up on an interior door and laying on the carpeting. It's actually hanging up on the front porch, but it's even harder to get a good shot there. 

Some close-ups:


Overall, this was an easy project, although there were a few tricky parts along the way. For one thing, I learned that some seashells don't take well to having holes drilled in them. Fortunately, some of my thrift store seashells had holes in them already, and I was able to make holes in some of the remaining shells without too much effort. 

The other problem was finding the right-size needle: one that was thin enough to go through my chosen beads, but also with a thick enough eye to accommodate the thin twine I was using for the strings. 

But once the shell-drilling and the needle-threading were accomplished, the project went together fairly quickly. I started by drilling five holes in my driftwood piece: one on each end, one in the center, and one between the center hole and each end hole. 

Next, I strung thick twine through the two end holes, tying the top center of the twine into a hanging loop. Each end was knotted underneath the driftwood. 

Then all that remained was the arrangement of the three strands. Using thin twine, the end of each strand was threaded through the top of the driftwood. I added two beads to each end and then knotted the twine. 

Each strand was then strung with alternating beads and shells. I didn't measure where to place these; I just tied them on. The middle strand is the longest, so it has one extra bead and shell. 

For extra measure, I dabbed each knot with a bit of waterproof glue. Hopefully this will keep the knots from unraveling. 

As far as dimensions, my driftwood piece is 15" long (horizontal length). The mobile measures about 40" long. I didn't plan a particular length, it's just what I ended up with. This is the kind of project that's pretty adaptable; you can make it as big or as small as you'd like.  

And if you want, you can always use your mobile to decorate for a "Beach House Christmas", as the Spirit Of Christmas folks had intended. I'm fine with my beach-look mobile in the summertime!

Thursday, June 29, 2017

Made It: DIY Produce Storage Bags

Hello! I try to eat a good amount of vegetables every day, whether they be store-bought or grown by me. Thus, at any given time I typically have various lettuces, greens, sprouts and other such produce in my refrigerator. I enjoy having a variety of vegetables on hand for lunchtime salads and dinners, but this means I have to make sure my veggies stay fresh before they're eaten up. 

I've tried storing my produce in rolled-up old kitchen towels - fine, but the towels take up a lot of room in the crisper. I've used paper towels, but this seems wasteful.

Then I came across this tip somewhere (don't recall the source):

Cotton "Green" Storage Bags
  •  Make out of unbleached muslin or broadcloth
  • Cut and stitch a rectangle of about 11"w x 14"l
  • Doesn't have to have a drawstring
  • The cotton fabric allows the produce to breathe

Rather vague directions, but that's because it's very simple sewing. Here's a bit more detailed info on how I made mine:
  •  I used unbleached muslin for mine (most recent purchase of this was yesterday; paid $3.70/yd sale price at JoAnn Fabrics.)
  •  You can cut your fabric to any size you prefer. Since I favor a number of veggies with long leaves and/or stems (Romaine and leaf lettuces, kale, collards and other greens), I made bags that measure 10"w x 20"l. 
  • And for smaller produce like my home-grown sprouts, I also made smaller bags that measure 10"w x 7"l. These smaller bags are also good for transferring produce from the larger bags once some of that produce is eaten up (for example, a partially-used bunch of kale). 
  • Sewing directions: to save on sewing a side seam, I placed my patterns (made from newspaper)on the fold of doubled-over muslin. 
  • After cutting out the pattern, I opened up the fabric and sewed a narrow hem on the top edge (fold over 1/4" fabric, fold over 1/4" again, then sew this down)
  • Match edges and sew down long side and bottom edge to make bag. Use 1/4" seam.
  • I pinked the seams to prevent raveling. 
  • Turn bag to right side. 
  • To use, just place your produce in your bag and roll down the top. If the produce is too close to the top of the bag to roll down, I place the bag in a plastic bag from the grocery store produce section and roll down the top of that bag loosely. Using one of those plastic bags in this manner doesn't seem to affect the produce.
  • Machine wash and dry after each usage.
That's it! I've been using my produce bags for years now, and I can report that they work very well. My daughter apparently took notice, for she recently asked me to make her some. Here's how they turned out (I actually made her two of each size):


As I'd said, very simple sewing! But it's nice to have something so simple that works so well. 

PS I've found that the large-size bag works well when I make broth with the post-Thanksgiving turkey carcass. I put the broken-up carcass plus the vegetables and seasonings all together in the bag, tie it up with some kitchen string, and toss the bag into my soup pot along with some water. When the broth is done, I just pull the bag out and place it in a colander over a bowl to catch any broth that had seeped into the bag. This is easier than having to strain the entire pot of broth into the colander. I do reuse the bag (after emptying it out, of course). Since it's greasy from the turkey innards, I hand-wash the bag a bit in the kitchen sink with some dish soap, rinse it, then toss it in with the laundry. I reserve a bag just for this purpose.


Saturday, May 27, 2017

iHanna DIY Postcard Swap 2017 - Results

Hello! In a previous post, I showed off the postcards I'd made as a participant in the iHanna DIY Postcard Swap. Although I've yet to receive the last of the 10 postcards coming to me, the deadline for mailing them out occurred over a month ago. So I'll just show the nine I've gotten thus far.

From Texas, papers sewn onto a card stock base. I was thrilled to get this one because I recognized the artist's blog name mentioned on the back - Daisy Yellow. Tammy, the creative genius behind that blog, runs ICAD (Index Card A Day) every June and July, and I've participated in it a couple of times now. 

(Needless to say, ICAD time is coming up soon, so if you want to take part, go here to learn how you can do so.) 

Collage work from Olympia, Washington. 


Vivid blue and purple watercolors, with Zentangle-style designs at the corners. This postcard was sent from York, England.


.
Another overseas postcard, this time from Norway. The Little Red Riding Hood theme is carried out by the hand-drawn and colored girl and the linocut wolf. The words on the front are Norwegian for "Good day, Red-Riding Hood, Said the Wolf." (translation supplied by the artist). This design was done by a very talented person! 


This was postmarked from Arizona. The artist explained on the back that the phrase is from Henry Wadsworth Longfellow's The Saga of King Olaf.


This was the first postcard I received in the swap, and it came all the way from Vienna, Austria. The artist had painted a beautiful scene of a lighthouse, and she added machine stitching and a butterfly embellishment. 


I loved this postcard, in part because it's similar in style to the collages I often make. I looked it over carefully to see what the artist had included: a foreign stamp, a piece from a sewing pattern, a portion of a book page, and more. I couldn't quite tell what the very thin copper-colored stuff used for the "belt" of the dress image was, so I emailed the Norman, Oklahoma artist (we're supposed to put our email addresses on our postcards for contact info). She emailed back her reply: it was wire taken from the innards of an old cellphone. She added that she loved using this wire and would be sorry when her supply of it was used up. I can relate!

Another Arizona artist heard from! This postcard features carefully-cut, fanciful flowers. I think they were snipped from magazine pages. 

As the artist explained on the back of the postcard: "The postcard is paper weaving from the various flyers I collected around Taiwan". Cool! 

I'd participated in the iHanna DIY Postcard Swap a couple of years ago, and at that time I was a little disappointed that I'd gotten no postcards back from people living in other countries. This time, I've gotten postcards from four foreign lands. I enjoyed that. 

And who knows, maybe my missing 10th card is on a slow boat from another country at the moment, and may show up yet! Until then, I'm happy with the nine I have received.


Saturday, April 22, 2017

Made It: DIY Postcard Swap 2017

Hello! I'm a huge fan of the multi-talented Hanna Andersson and her iHanna blog. A couple of years ago I participated in the springtime version of her DIY Postcard Swap (she also runs another swap around Christmastime). I decided kind of late to take part in this year's spring swap, but got my 10 postcards done earlier today in advance of Monday's mailing-out deadline.

Here's how my postcards turned out, followed by some close-ups:


Two postcards have a more solid-looking background, courtesy of some endpapers from a vintage Nancy Drew book. The backgrounds of the other eight came from vintage Reader's Digest magazines (mid 50's/early 60's; a fun thrift store find!).


Close-up of a vintage V-8 ad; loved the colors. Added some white acrylic paint stenciling, a strip of patchwork from a 1970's greeting card, and modern bits in the form of a stamped word and a phrase cut from a magazine.

I couldn't resist the "we bought a postcard" phrase, which came from a 1930's grammar book. And I assume the recipient of my postcard will enjoy the reminder to "craft daily".

It almost seemed a shame to cover up the layout of this bright Campbell's Soup ad! But cover up I did, with rubber stamping, words, a sunglass image from a hotel coffee cup holder (or whatever those things are called), and part of a job tag from our auto repair shop.

Pretty in pink: a Westinghouse electric blanket ad is loaded with  white acrylic paint stenciling, a vintage image of a man sitting on a chair, words and art paper scraps.

Above, our happy shopper insists on Saran wrap! I thought the produce sticker (just below the Saran wrap in the shopping cart) was appropriate. The added words and art paper bits may not be as appropriate, but they were a fun addition. I think I went a little haywire, though, with the leafy rubber stamping; shouldn't have put it over the woman image. But since I'd already affixed the ad to my postcard blank, I wasn't going to pitch it.

A woman is ready to "explore the world", or maybe at least write about it, with her Sheaffer pen. The snippet of a map (forget what city) near the upper left-hand corner fits the saying.

And "explore the world" I will, at least vicariously, through this DIY Postcard Swap. You see, the swap is international; Andersson herself is from Sweden.

The previous time I did the swap, two of the 10 addresses I was assigned were from other countries. I was hoping that some of the 10 coming to me would also be from other countries, but that didn't happen. Nevertheless, between the 20 outgoing and incoming addresses, I learned a little geography from looking up unfamiliar locales.

Thus, I anxiously awaited the release of the 10 addresses I would use for this year's swap. They were sent this afternoon, so I learned I am to send four cards to California, two to Colorado, one to Arizona two to the UK - and one to Andersson herself! I was really happy to get her address - it'll give me a chance to write a note of thanks for doing the swap, having such a fun blog, and being a creative inspiration to me and countless others over the years.

If you'd like to see what I mean about her fun blog, and to learn more about the DIY Postcard Swap, go here.


Friday, April 7, 2017

Made It: Crepe Paper Daffodils

Hello! In an earlier post, seen here, I showed off a crepe paper snowdrop I'd made. 

Well, now snowdrops are passe; daffodil season has begun! Due to all the rain and chilly temps we've had around here lately, it seemed to take forever for ours to start blooming, but they've finally begun to do so. We don't really have enough daffodils to cut for indoor enjoyment, though, so I made some crepe paper ones last night for this purpose:


My "daffodils" were a bit fiddly to make. I found it tricky to arrange the several petals just right around the trumpet, but did my best. And I think they look almost as nice as the real thing.

Just the same, I am very glad that we finally got some more sun today - and that warmer weather is in the weekend forecast. That should encourage more blooming of the real thing outside!


Wednesday, March 8, 2017

Made It: A Paper Flower

Hello! We've been enjoying spring-like weather lately, although it sounds like winter will be returning soon. So, with the two seasons battling it out (a common March theme in these parts), it seems fitting to pay homage to one of the earliest blooming flower, the snowdrop. 

Not sure why, but we haven't put in any snowdrops on our property, and no previous owners had either. To enjoy the real thing, we  stroll by the front yard of one of the nicest gardens in our neighborhood. But recently I thrifted a book that I thought would at least help me pretend I have this flower myself:

Making Flowers In Paper, Fabric And Ribbon, by Steve and Megumi Biddle. This book was published by a British company in 1991, but both Biddles have a Japanese crafting background. Mr. Biddle studied in Japan with top origami masters, while Mrs. Biddle received a Japan Floral Art Teacher's Certificate. 

With such artistic backgrounds, you'd expect this duo would have created life-like flowers, and the cover above is proof. Those peonies looked pretty realistic to me! So when I took a peek inside the book, I assumed the directions would be quite intricate. But to my surprise, the patterns and instructions for each flower were clear and not all that complicated.

And since I'd been collecting vintage crepe paper (dirt cheap) at rummage sales and thrift stores, I had the "paper" in the book title covered. So I bought it.

Here's the page that shows the pattern pieces for the snowdrop:

I began by copying the patterns onto tracing paper. There are three leaf patterns of varying lengths, but since I decided to practice by making just one flower to start, I used one of the lengths. Overall, this was an easy flower to craft, since I only needed to cut out crepe paper for three leaf pieces, three petal pieces, one of another petal piece, and one calyx. 

Besides the crepe paper, this pattern also called for some typical floral craft supplies: green floral tape, floral wire and a white stamen - plus a green marker (to color the inside of the rectangle-ish petal piece) and glue for affixing the wire to the leaf petals. I had everything but the white stamen (another reason for buying the book - I had the majority of the supplies already on hand. Like the crepe paper, most of them were purchased secondhand).

This kind of craft may seem a bit fiddly, since you're working with rather small pieces, but I found my snowdrop pretty easy to put together. I think I did pretty well for a first effort:

 
Looks close to the real thing, I think! 

A close-up:

Of course, with such a close-up you can readily see that the petals, stem and leaf are made from crepe paper. But our daughter, who came home from college for a visit after my snowdrop had made its debut on our dining room table, didn't realize it was artificial until I told her. So my effort passed the eye test, at least with her. 

This is the only snowdrop I made. However, there's 25 more types of flowers in this book I can assemble, and I look forward to doing so. Daffodils will be nice to create, as will tulips when the local annual festival devoted to that flower comes around. 

We have planted daffodil and tulip bulbs on our property, but don't have enough to cut many for indoor enjoyment. So instead, I can make some and display them around the house for more signs of spring. 

Now, if only spring weather will stay here, rather than allowing winter to return this weekend!