Hello! I was out of town for the Easter weekend, so I didn't get around to posting some photos of what might be the biggest bunny of them all:
Above, a solid chocolate Easter bunny, created by the folks at Purity Candy, near Allenwood, PA. This photo was taken on March 18th.
This bunny may not look like much, but the sign below indicates otherwise:
It's a "75 lb. Decorated Milk Chocolate Rabbit", you see, and was priced at $399.99. Hey, at least they weren't charging 400 bucks for it! Although I didn't measure the rabbit, it was probably about as tall as a young child.
But lest you didn't want to spend quite that much on one chocolate bunny, a smaller version was also available. Didn't get the price on this one, but it was still was an impressive size. Visible behind this display of Easter goodies is the workroom where many other chocolate bunnies were lined up and ready to be packaged.
Like I'd said, the above bunny was impressive. However, I was aiming for the best, so I jokingly told my husband to buy the 75 pounder for me for Easter. Alas, Easter Sunday came and went, with no sign of that monster rabbit.
We couldn't help but wonder if the rabbit ever did get sold, and if not, what its fate would be. Sold or unsold, it was still quite a sight to see, and I salute Purity Candy for making it!
Hello! I'm not sure when my interest in the Amish began, but their settlement in Lancaster County, Pennsylvania is well-known. I probably heard about the Amish first in reference to that area.
Consequently, when we ended up living about an hour east of Lancaster County, I enjoyed many trips there. Pretty countryside, fun shops, roadside stands - and I never tired of seeing Amish horse and buggies traversing the roads in the area.
I mourned moving away from that proximity to Lancaster County when we moved to west-central Indiana, but then learned we were now about an hour east of another Amish settlement, the one near Arthur, Illinois. And so I made more happy visits to get my fix of peaceful countryside, Amish grocery stores, and more encounters with horse and buggy travel.
(I can still recall seeing one Amish buggy pass another on a quiet road in this region - just like you see a car passing a slower one in front of it. And yes, when I passed both buggies, I saw that the faster buggy was driven by a young guy, while the slower buggy driver was an older woman. So the Amish maybe aren't so different than us in that respect! At least, that was the case on that day. But that remains the only time I've ever seen one Amish buggy pass another.)
Then we moved further north, and we're now about two hours from the largest Amish settlement in these parts, Shipshewana, Indiana. I've been there a few times, but haven't made the trip that often. A four-hour round trip, plus driving around on the back roads and in the towns to check out all the shops of interest makes for a long day.
But I can still get my Amish fix, courtesy of Kevin Williams' Amish365 website. Mr. Williams, who's based in Middletown, Ohio, has visited Amish settlements big and small throughout the US and even parts of Canada. Besides that wide range of travel, Mr. Williams also covers a wide range of Amish information: the good (writing about an Amish weddings), bad (reporting on Amish buggy accidents) or in between (interviewing the young teachers at an Amish school).
And then there's the recipes. True, Amish food tends to be heavy at times, but after all, these are folks who do far more physical labor than most of us "English" (how the Amish refer to the non-Amish) do. I suppose they burn up a lot of what they eat.
So instead, I mostly just drool over the many recipes Mr. Williams supplies. For example, today I saw recipes with a Thanksgiving theme: a mock pecan pie, several stuffing variations, scalloped corn, pat-a-pan pie crust, and more. I can vouch for the pie crust recipe, as it's the one I'll be using for my Thanksgiving pumpkin pie. It's very easy and very good! (I first encountered it in the Amish cookbook Cooking From Quilt Country).
Mr. Williams also covers a variety of non-Amish topics, such as his long career as a journalist, activities revolving around his two cute young daughters, and occasional trips down Memory Lane to reminisce about stores, restaurants and other key markers of his childhood that are now gone. (note: he's in his mid-40's, so if you're around his age, or older, as I am, these memories will often be very familiar to you as well).
You can either read Amish365 via this link, or sign up for email notification of new postings. It's a fun way to keep up with the Amish way of life!
Hello! I'd been reading about kombucha tea lately, but didn't know much about it other than the various health claims (purported to be probiotic, anitbacterial, and more). Then a friend told me about purchasing the Sacred Springs brand at our local farmer's market, so I tried some from the vendor there. The guy was super nice and his ginger-flavored kombucha tea was awesome.
But was not awesome was the cost: I think around $4.00/bottle. The brands at grocery stores and health food stores are priced lower, but still not low enough to make buying kombucha tea a regular habit.
So of course I investigated making my own, and came across this clearly-written tutorial.
According to the recipe, I needed to start out with a SCOBY (symbiotic culture of bacteria and yeast), which I could have ordered online. However, my recipe also included a link for making my own SCOBY as well (the link is in the last line of the ingredients list). For this SCOBY-making step, I did need to buy some unflavored kombucha for making the starter tea, to go along with tea bags, sugar and water. For the tea itself, I used ordinary Lipton's since I already had a big box of it on hand, but opted for organic cane sugar(purchased for a reasonable price at Sam's Club).
You need a large, clean glass jar for making kombucha tea, as both the SCOBY-making process and the kombucha tea-fermenting step yield 8-10 cups of liquid. Fortunately I had 2 large jars, purchased years ago at a store-closing sale. (the recipe can be made in two smaller jars, or can be halved if desired).
I think I jumped the SCOBY-making step a bit. The instructions say to let it "grow" to a thickness of about 1/4" thick. This is supposed to take 1-4 weeks. After 8 days, I looked at my SCOBY and thought it was thick enough. But you know how shapes look distorted under water? Well, that's what happened when I took my SCOBY out of the starter tea. It was probably closer to around 1/8" thick. However, I'd already made the tea base that, along with the SCOBY, would be set aside to ferment for 7-10 days to make kombucha tea. So I decided to go ahead with the fermenting step, figuring that the lesser amount of SCOBY would be okay for this first time around.
After seven days of fermenting were up, it was time to flavor/bottle/carbonate my kombucha tea. Flavoring options are included in my recipe, so I decided to go with the easiest one, which was to add fruit juice. I used R.W. Knudsen's organic black cherry juice.
I've read that carbonation works best with the type of bottle that has a stopper that is clamped down with a wire mechanism. I didn't come across an inexpensive source for these bottles, but will keep on looking. In the meantime, I bought some plastic bottles with screw-on lids from American Science and Surplus's website.
The carbonation step takes 1-3 days, then the kombucha tea is refrigerated and ready to drink. The tea will keep for a month in the refrigerator. I decided to refrigerate my first batch after one day was up, since I was anxious to start drinking it. I liked how it turned out! It wasn't really fizzy, but I didn't care about that.
Okay, that's enough chatter about my first foray into DIY kombucha tea. As of today, I'm ready to bottle my 4th batch, so here's how things look:
Above, the fermented tea base, with the SCOBY on top (that lighter-colored blob). The glass jar is kept covered with a cloth napkin, but I took it off so the SCOBY would be more visible in the photo. Next to the jar is one of the bottles I use, and behind these containers is the tea base for the next batch of fermenting tea.
Making kombucha tea is like using a sourdough starter (which I've also done): you have to reserve some of the fermented tea (before you add any flavoring to it) to use in making the next batch of kombucha tea. Thus, you make the fresh batch of tea and let it cool down before you're ready to bottle the fermented batch.
My first two batches of kombucha tea were flavored with that bottle of cherry juice. But then I wanted to try replicating the tangy ginger flavor I'd enjoyed before. Again, I went for an easy way of adding this flavor: I peeled about 3" fresh ginger and placed it and 1/4 cup raw honey into my Vitamix along with 3/4 cup water. I blended this mixture until smooth, then strained into my jar of kombucha tea. It tasted great! I think this will be my go-to flavor.
As with many DIY projects, there are various cautions involved in the making of kombucha tea. Contamination can be an issue if a bad SCOBY is used. The recipe I use has a page on troubleshooting typical SCOBY problems, the worst of which is mold. And of course, all kitchen utensils, bottles, jars, etc. need to be clean when going through all the steps in the process. But that is just common sense.
To keep things straight, I keep a running list of when each step is completed (fermenting, bottling, carbonating). It seemed a little confusing at first, but I'm getting the hang of it.
So far my SCOBY has been behaving just fine, so I will keep making kombucha tea with it. I don't know if I feel any different after drinking it for a few weeks now, but I like how it tastes, and I like the money I'm saving by going the DIY route.
Hello! I eat salads throughout the year, either as a main course lunch or as a side to other meal components. But of course they taste the best during our local growing season. The produce looks as pretty as a picture then:
Above, my side salad includes leaf lettuce, cucumber, cherry tomatoes, red onion, radish and clover sprouts. I grew the tomatoes, cucumbers and the sprouts, while the other veggies came from the Farmer's Market. I'd started the tomatoes from seed; it's the Sweet 100 variety, very prolific. The cucumber came from a plant I bought at the Farmer's Market earlier this spring. The clover sprout seeds are from High Mowing, an organic seed company.
(Those nice slices of radish, cucumber and red onion are courtesy of this purchase, which I still love using as much as I did when I first got it).
And lastly, my favorite salad dressing, visible as the pale yellow, thick topping. The recipe came from an Internet source, but I don't recall where now.
Tahini-Ginger Salad Dressing (adapted from an Internet source)
2 tablespoons tahini
Juice of one lemon (see note below)
2 teaspoons minced fresh ginger (see note below)
2 teaspoons honey (see note below)
1/2 cup olive oil
salt, pepper and cayenne pepper to taste
The directions are merely one line: "mix all together in small bowl". However, I find the dressing mixes best when I blend the tahini, lemon juice and honey together first, then stir in the olive oil and seasonings. Store in refrigerator until needed (I use a glass jar). If using after being stored, stir a little first.
Notes: I don't always have fresh lemons on hand, even though I know they make a better-tasting juice than the bottled stuff. But it's the bottled stuff I typically use. My bottle of Real Lemon says that three tablespoons of their product equals the juice of one medium lemon, so that's what I put in the dressing.
Could you use dried ginger powder instead of fresh ginger? I'm guessing you could, but here's a case where I've always used the fresh product when called for instead of subbing in its more processed version. I use a couple of tips to make handling fresh ginger easier:
1. I cut it into chunks that'll work in my recipes
(smaller chunks for this dressing recipe, larger pieces for stir fry dishes). I cut it as is, no peeling done. I put the pieces in a quart freezer bag, then stash it in the freezer.
2. When I need fresh ginger in a recipe, I just take out a chunk I from that freezer bag. The peel cuts off very easily while frozen. For this recipe and ones that call for minced ginger, I use a grater (my Microplane grater does a great job), while the peeled chunk is still frozen. If the frozen ginger needs to cut into pieces instead, I set it aside for a few minutes to thaw a bit (or if in a hurry, I'll put it in the microwave for a few seconds). It's easier to cut if still a bit hard, rather than if thawed out completely.
I suppose that fresh ginger loses a bit of its flavor if frozen first, then thawed out for use, but it beats the alternative: I'd buy a knob of fresh ginger and keep it in the produce crisper, only to have it go bad before I could use it up.
Honey is messy to measure out, so I always just eyeball the 2 teaspoons needed for this recipe while squeezing or pouring it out of the bottle.
The recipe doesn't give the yield, but I think it makes around a cup. It can be scaled down, but I like this dressing so much I've occasionally doubled it. And why do I like it so much? It's a nice consistency: some dressings are so thin, they fall to the bottom of the salad bowl, while others can be thick and gloppy. This dressing seems to be just right. (note: it's a bit thick just out of the refrigerator, so I take it out to warm up a bit while I'm making my salad). And I don't know if this dressing is particularly healthy, but it tastes like it is. And besides tasting healthy, it tastes good!
.
Hello! I think I eat a pretty good diet - I cook from scratch so I can control the amount of sugar, fat and salt in our meals, and most days I get plenty of veggies.
But there are times I get off track and don't eat as well as I should. This is what happened when we came home from vacation near the end of March. My husband and I ate healthily most of the time then, and did a lot of walking too.
The trouble began with our "souvenirs", regional goodies from some of the places we visited: chocolate-covered pretzels, more pretzels and a barbecue potato chips (all these treats came from small companies in Pennsylvania). And then Easter came along, with some candies from my husband. And so I ate them. That led to finding other chocolates around the house, which I also ate for dessert more evenings in a row than I should have.
Ugh. I started to feel bloated and sluggish, and I didn't like that. So I turned to this:
JJ Smith's 10-Day Green Smoothie Cleanse.
I'd gotten this book, discounted, from Sam's Club a few years back. It looked interesting, but frankly a little scary: for 10 days, one gives up meat, dairy, caffeine, starches, sugar and alcohol. What is allowed: 10 days' worth of green smoothies (recipes and shopping list included), plus a few approved snacks: crunchy vegetables, hard-boiled eggs, small handfuls of raw nuts, small amounts of nut butter with no added sugar or salt. Herbal teas are fine (stevia only for sweetening), and plant-based protein powder (no soy or whey)for the smoothies is optional. Lots of water every day is part of the plan, along with a couple of suggestions for keeping things moving (if you know what I mean).
I wasn't sure how I'd do on such a strict regimen, even for a relatively short time period. Would I have enough self discipline? I wouldn't miss alcohol, but caffeine? I've cut back on the amount of coffee I drink, but I do still have some every day, and the other no-no's during the cleanse are a regular part of my diet as well.
And I was worried about feeling weak from hunger and snapping at my husband. I could just see myself getting irritable as I fixed his dinners (I'm the cook around our place).
But I was curious to see what results I would get. As it says on the cover: "Lose Up to 15 Pounds in 10 Days!" Wow - that sounded like a great weight-loss boost!
Other common benefits are supposed to be clearer skin, more energy, better clarity, better sleep, better digestion and a few more pleasant-sounding results.
So, off I went shopping, ingredient lists in hand (various greens, various fruits, and a detox tea to be drunk every morning). That was 12 days ago, so now I can report on how it went.
I'm not going to lie: the first three days were very tough. I got a headache and the rest of my body felt achy at times too. Overall, I felt blah and out of it. But I still went for my usual fitness walk on those days, although a little more slowly.
I tried to distract myself from food deprivation by keeping busy doing other things. I did some projects that had been on the back burner for a couple of years or so, ran longer errands than usual, and at night, listened to lots of great music on my new headphones (a surplus store purchase). All these distractions helped.
I didn't really feel better until partway through the 5th day. It happened while I was going on my usual fitness walk: suddenly, I realized my joints felt more loose and limber than they had in ages. I definitely felt like I had more spring in my step!
And it wasn't my imagination: the next morning, while doing my usual morning stretch routine (to try to keep those joints loose and limber), I felt more flexible than usual. Considering that I do these stretches first thing in the morning, when my body is at its stiffest, the difference was striking.
And overall, I think that was the biggest benefit of this 10-day cleanse, that sense of feeling lighter and looser. I did sleep better, and I think my skin did look better, but that was hard to tell since my skin looked pretty good before this. I felt energetic enough that I didn't miss coffee at all!
I was disappointed in my weight loss though: 5.5" pounds. Now, I know that's actually a lot for ten days, but it was still hard to read the glowing testimonials (in the book and in online reviews) from people who had lost 10-15 pounds, or more, while on the cleanse. I felt a little cheated, as if I had done something wrong.
But as far as cheating, no, I didn't at all. Some of the dinners I cooked for my husband were entrees I don't like, so I wasn't tempted to sample them. But I didn't even as much as lick the spoon while making a rich dessert for some weekend visitors. And though it was hard to watch my husband eat pizza in front of me at a favorite local brewpub, all I had there was tea.
The smoothie recipes were, for the most part, very delicious, and were quite filling. (I did add the protein powder, which helped, I'm sure.) Smith does encourage snacking as well, to keep hunger pangs at bay and to keep metabolism up.
Did I lose less weight than a lot of people seemed to due to snacking too much? Not sure, as Smith is vague on just how big the snacks are supposed to be. But on other days, I think I waited too long to take a snack in between my smoothie "meals". And I think I didn't always quite drink the daily 64 oz water either. These factors could have slowed my weight loss down.
Then, too, it could be at least some of the testimonials were from people whose diets were worse than mine to start, so perhaps their bodies reacted more to a drastic change. (I'd already been drinking green smoothies off and on before I tried the cleanse).
The first few post-cleanse days aren't a call to pig out, of course: light eating and more green smoothies instead. And so that's what I'm doing. I'm still not sure how much of the no-no foods and drinks I'll partake less of from now on. I'm still fine without coffee, and I don't crave carbs like I had before.
And I don't know if I'll do this again since those first few days were such a drag. I'll continue with the green smoothies, though. The book has over 100 post-cleanse green smoothie recipes, and there's many other recipe sources as well.
Or, I suppose I could do another round, only this time do the modified cleanse version (green smoothies for two meals, and one healthy meal consisting of salad, sauteed vegetables and grilled or baked chicken or fish).
If you'd like to learn more about this book, go here.
Hello! With today being Pi Day (3/14), I saw mention of pizza specials on TV. But I decided to take a different approach - I made pecan pie. Actually, I made two of them, in miniature form, thanks to this recipe:
Li'l Pecan Pies (recipe attributed to Christine Boitos of Livonia, MI. Not sure in what magazine the recipe had appeared; possibly Taste Of Home.)
Pie Crust
1/2 cup flour
1/8 teaspoon salt
3 tablespoons shortening (see note)
4 teaspoons cold water
Filling:
1/3 cup pecan halves
1 egg
1/3 cup corn syrup
1/3 cup packed brown sugar
1/2 teaspoon vanilla (see note)
Whipped cream, optional
In bowl, combine flour and salt; cut in shortening until crumbly. Gradually add water, tossing with a fork until dough forms a ball. Cover and refrigerate dough for at least 30 minutes. Divide dough in half. Roll each half into a 6" circle and transfer to two 4 1/2" tart pans. Fit pastry into pans, trimming if necessary.
Arrange pecans in pie crust shells. In bowl, combine filling ingredients; mix well. Pour over pecans. Place shells on baking sheet. Bake at 375 for 35-40 minutes, or until knife inserted near center comes out clean. Cool on wire rack. Top with whipped cream if desired. Yield: two servings.
Notes: I used butter instead of shortening in the pie crust. The chilling period of at least 30 minutes seemed silly to me for such a small recipe. So instead, I divided the pie crust in half, flattened each half, wrapped them separately in plastic wrap and put them in the freezer. I then proceeded to make the pie filling. By the time I had whipped that up, the pie crust halves had firmed up enough to roll out. Much quicker!
Upon tasting a portion of a baked, cool pie, I felt that the vanilla taste was too strong. I looked at some pecan pie recipes for full-sized pies and saw that they called for 1 teaspoon vanilla. Since my recipe's filling seems to yield 1/4 the amount of filling used for a full-size pecan pie, I think 1/4 teaspoon vanilla would work better.
Instead of 4 1/2" tart pans, which I don't have, I used two of my mini pie pans. They have the same diameter.
Here's how one of my baby pies looks:
And a quarter of it:
Yeah, I know the recipe was written as two servings, but pecan pie is pretty rich, so I'll stick to smaller helpings. If you're familiar with the even smaller pecan pie-like dessert known as Pecan Tassies, the above slice is about the same size as two of those pastries.
And another reason for eating a small slice from a small pie: I'll be the only eating these mini pecan pies. My husband's far more interested in the number Pi than in pie!
Hello! It's not really been "soup weather" most of this week, what with temps that felt more like May in these parts (mid-60's some days!) Nevertheless, I made a nice, easy soup a few days ago to ease my cold symptoms. Today is definitely a "soup weather" day, though (30's and a light coating of snow), so I'll post the recipe I used, with adaptations explained after.
Easy Soup (adapted from Marcia Adams' Cooking From Quilt Country)
1 large onion
4 stalks celery
2-4 tablespoons vegetable oil (Adams specifies the larger amount, but I've found the lesser measurement is plenty)
4-6 cups broth of choice (turkey, chicken, beef or vegetable, see note)
1 15-ounce can navy beans (see note)
1 15-ounce can tomatoes, drained and chopped (see note)
1 10-ounce bag frozen mixed vegetables (see note)
1/4 cup quick-cooking pearled barley (see note)
1 bay leaf
1/4 teaspoon black pepper
1/4 teaspoon grated nutmeg
3/4 teaspoon dried thyme, optional (see note)
1 cup mashed potatoes (see note)
1/2 cup half and half (see note)
2 tablespoons minced fresh parsley (see note)
Chop onion and celery. Heat oil in large kettle; cook onion and celery until the onion is transparent. Add the rest of the ingredients except for the potatoes, half and half and parsley. Cover, bring to a boil over high heat, and then lower heat to simmer for 10-12 minutes, or until barley is tender. Add the potatoes, half and half, and parsley, and simmer 5 minutes longer.
This may look like a lengthy list of ingredients, but they're ones that are common (except maybe the barley), so you may have them on hand already, and prep time is short. And once the soup kettle ingredients have come to a boil, the total cooking time is a mere 15-17 minutes. I'd call that easy for a soup recipe!
Now on to the notes:
I think that 4 cups of broth makes for a very thick soup, so I increase the amount to 6 cups. Try it either way.
Adams calls for 4 cups of turkey broth, since she designed this recipe to be prepared with stock made from the carcass leftover from a Thanksgiving dinner. And I admit, I do make it that way (she supplies the turkey stock recipe on the preceding page of this cookbook). I haven't hosted a turkey dinner in awhile, but buy one when they're on sale in November and stick it in the freezer until I feel like cooking it. Same with the carcass - I freeze it as well, until I feel like making Adams' stock recipe.
Of course, the better the broth, the better the soup, but feel free to substitute other flavors of homemade or commercial broths.
The recipe calls for navy beans, but use any other cooked beans that you may have on hand. I cook large amounts of dried beans in my slow cooker, then package them up for freezer storage. Then I just pull out whatever type I feel like on soup-making day.
I use a can of petite-diced tomatoes to save on the mess of having to chop whole canned tomatoes.
I usually buy a 1-pound bag of soup vegetables to use with this recipe. Since Adams created this recipe "for the busy Thanksgiving weekend...you can add any leftover vegetables from the holiday dinner or any other fresh vegetables you prefer." In other words, feel free to use what you have on hand.
I didn't have quick-cooking pearl barley on hand when I made this a few days ago, so instead I added a half-cup of small-size shell pasta, whose cooking time matched that of the recipe's. I think I could have increased that amount to 3/4 cup or even a full cup of uncooked pasta.
I did use all the specified seasonings listed, including the optional dried thyme, but also added a small amount from a "soup seasoning" mixture I'd gotten in bulk at an Amish grocery store. If you use other seasonings when making this type of broth-based soup, you can add them instead if you wish.
I'm guessing that Adams stuck mashed potatoes in her soup since, again, they were likely a leftover component from her Thanksgiving dinner. (Her recipe for mashed potatoes follows this soup recipe). I had just the right of leftover mashed potatoes in my freezer, but I'm sure you could use leftover boiled potatoes, or cook a potato in advance to add to the soup.
I don't use half and half for this recipe, just milk.
I had fresh parsley in my freezer, harvested and frozen in the fall from my deck planting. You can use dried parsley, but fresh really is nicer.
Adams states that this recipe yields "12 hearty servings", which seems a little low for a soup that begins with only 4 cups of stock. You also may have noticed that there's no meat in the recipe, so perhaps she meant for this soup to be served as a light lunch for house guests over a Thanksgiving weekend. Feel free to add turkey, chicken, beef, etc. to your soup if you prefer. I've sometimes added turkey, but didn't this time since we'd recently come back from a trip and had thus had been eating richer foods than we usually do.
Even when making this with 6 cups of broth, I'm not sure that "12 hearty servings" is realistic when using this as the main dinner course. But it would likely serve 4-6 people that way.
Okay, I think that's enough talk about the recipe, now here's a pic:
And yes, it tasted as good as it looked!
When I make the same recipe twice in three days, you know it has to be good! And such is the case with a homemade caramel corn recipe.
A couple of days ago, we were "booed" by a neighbor: we became recipients of some Halloween goodies, with instructions to "boo" two more neighbors in turn by secretly dropping off some goodies for them.
I immediately thought of a caramel corn recipe I'd printed from the King Arthur Flour website a few years ago. The recipe had gotten rave reviews from commenters, but I couldn't remember if I'd tried it out for myself. But no time like the present, so I made two half recipes via the microwave. Each half recipe yielded about 8 ounces.
Then we got word that a relative may be stopping by this evening. Since this relative has several kids, I decided to make the caramel corn again, only this time using the full-recipe instructions that call for oven baking. And of course, the full recipe equals one pound.
Even with making two half recipes, the microwave version is much quicker than the oven version: between 5-6 minutes per microwave batch, versus a full hour of oven cooking (very little hands-on time, though; just a good stir every 15 minutes).
But I have to admit, the oven caramel corn turned out better. Even though I'm sure you know what caramel corn looks like, here's how it turned out:
If you'd like to make some yourself, go here.
This link is for the oven version; the microwave technique was courtesy of a commenter. To save you from having to wade through all those comments, here's how to make the caramel corn that way:
Microwave Version of Carol's Caramel Corn
7 1/2 cups popped popcorn
1 tablespoon molasses (see note below)
1/2 cup brown sugar
1/4 cup (1/2 stick) salted butter (see note below)
2 tablespoons corn syrup
1/4 teaspoon baking soda
Place popped corn in large microwave-proof bowl (I recommend greasing bowl first for easier clean-up later. And since my microwave is large enough, I used a 9x13 glass dish, figuring it'd be easier to evenly coat the popcorn than in a bowl).
Place molasses, brown sugar, butter and corn syrup in medium microwave-proof bowl (again, I recommend greasing the bowl first). Cook on high one minute, stir, then cook 2 minutes more. Add the 1/4 teaspoon baking soda, mix in, then pour syrup over popped corn. Stir, then cook 2-3 minutes, stirring every 30 seconds. Spread out onto waxed paper to cool.
Notes: a commenter had suggested using half honey, half molasses in the recipe (so in the case of the above half recipe, 1 1/2 teaspoons each). I have dark molasses on hand, so decided to try that suggestion. Worked great; I would not have wanted the stronger molasses taste that the full amount would have created. But if you love dark molasses - or have the light kind on hand - feel free to add that one tablespoon.
I had unsalted butter, so I added a few sprinkles of salt right after pouring the cooked syrup over the popped corn, then mixed the salt in while stirring the syrup evenly onto the corn.
Some commenters said they had added nuts to the mixture. For this half recipe, King Arthur recommended 1/2 cup roasted, salted peanuts, adding them along with the popped corn before making the syrup. I'm sure that other nuts could be used as well; I suspect they suggested peanuts to create a "Cracker Jack" effect.
This stuff is seriously good! I'm half-hoping the relative won't show up tonight - then I can have the caramel corn all for myself!
But then again, even if he does show up and claims this treat, our daughter is coming home next weekend, so I can make another batch and share it with her. That would work!
Hello! It was chilly and overcast when I got up this morning, a far cry from the summer-like weather we'd had recently. It looked like a comfort-food morning to me, so I decided to try a recipe for a single serving of apple crisp. I would make it less sweet than how the recipe was written, and it would serve as my breakfast. It was so quick to prepare and cook that it was done by the time the coffee was finished brewing!
Microwave Apple Crisp For One(adapted from unknown source; possibly a Taste Of Home magazine)
1 medium apple, peeled and sliced
2 tablespoons brown sugar (see notes after recipe)
2 tablespoons quick-cooking oatmeal
1 tablespoon all-purpose flour (see notes after recipe)
1/8 teaspoon cinnamon
1 tablespoon cold butter or margarine (see notes after recipe)
Place prepared apple in small microwave-safe bowl. In another bowl, combine the dry ingredients; cut in butter until crumbly. Sprinkle over apple. Microwave, uncovered, on high for 2 1/2 minutes or until fruit is tender. (see notes after recipe). Yield: 1 serving. Editor's Note: this recipe was tested in a 700-watt microwave. It can also be baked at 375 for 25-30 minutes.
Notes: I used about half the specified amount of brown sugar, and it was plenty sweet. I used whole wheat flour instead of all-purpose, and used butter.
Small bowls are all you need for this recipe! For cooking, I put the apple/topping mixture in a single-serving casserole dish (I greased the dish first). I mixed the topping in a small cereal bowl, using my fingers to cut in the butter.
Our microwave has 1,200 watts, a far cry from the 700 watt oven used to test the recipe. Instead of guessing as to how much less time I should cook my mini apple crisp for, I found this information on the Internet. Thus, I could determine that I should set the cooking time for 1:28.
And that I did, although I found I still needed a bit more cooking time after that. I was starting with a rather hard apple, so that's probably why I needed an extra 20 seconds.
Here's how my apple crisp for one turned out:
I wouldn't eat something like this for breakfast all the time, but it was perfect for today's weather! Slightly sweet even with the reduced amount of brown sugar, but still very good.
Hello! In my last post, I talked about red bell peppers. Well, I'm still seeing red, but this time it's tomatoes.
It's tomato time at our local farmer's market. It's easy to snare some good deals on them this time of year - especially if you go for the baskets or boxes labeled "seconds". These are less-than-perfect specimens, so they're dirt-cheap by comparison to pristine tomatoes.
I bought some "seconds" to try out in a recipe called "Oven-Dried Tomatoes". This recipe was included in Barbara Pleasant's article "Freezing Fruits And Vegetables From Your Garden", Mother Earth News, August/September 2013.
First, the directions, then my notes afterward:
Oven-Dried Tomatoes (adapted from Barbara Pleasant's recipe of the same name)
Preheat your oven to 250. Wash, dry and core ripe tomatoes. Cut paste tomatoes and cherry tomatoes lengthwise in half. Cut slicing tomatoes into quarters. Arrange the tomatoes, cut side up, on baking sheets that have rims to catch any juices. Sprinkle with sea salt; you can also add fresh herbs and a light drizzle of olive oil. Place in oven and cook 1 hour, then reduce heat to its lowest setting. Dry for two more hours, or until the tomatoes flatten and edges pucker.
Freeze your half-dried tomatoes on cookie sheets, then pack them into freezer-safe containers.
Notes: Besides the sea salt and olive oil, I also added a bit of freshly-ground black pepper and sprinklings of Italian seasoning and Aleppo pepper. I used slicing tomatoes.
I followed the oven temperatures and times specified in the recipe - and got tomatoes that barely looked reduced in size. Thus, I had to leave them in the oven longer. We had a lot of rain in August, so I suspect that had something to do with tomatoes that needed more drying time. In other words, I'd started out with very juicy tomatoes.
For subsequent batches, I started at 275, then lowered the heat to 200. It still took awhile for my tomatoes to shrink down, but it was quicker than it would have been if I'd stuck to the original directions.
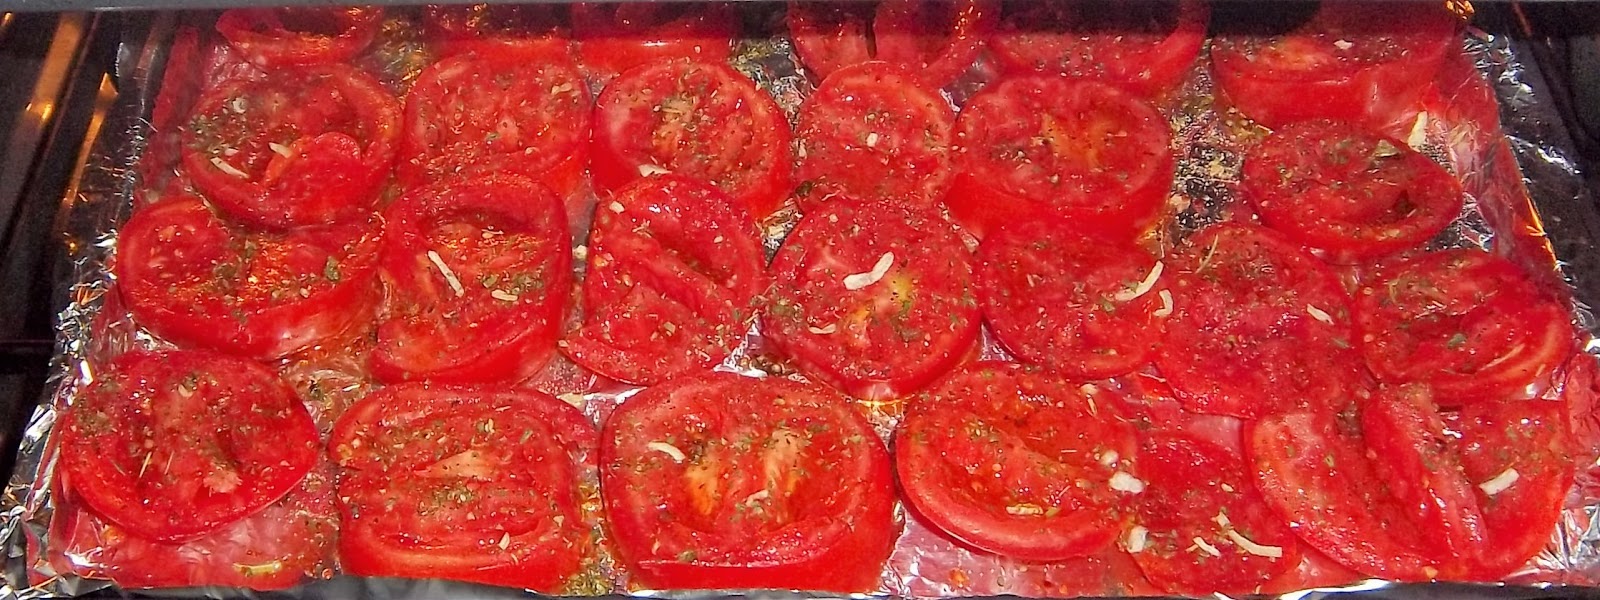
The article had no pictures accompanying the recipe, so I wasn't exactly sure what flattened tomatoes with puckered edges should look like. But I'll show a before and after so you can see how my oven-dried tomatoes turned out:
Above, sliced, seasoned tomatoes are going into the oven.
And above, after oven-drying.
I froze the cooked slices on cookie sheets, then packed them into freezer bags.
Author Pleasant suggested using these for pizza or pasta sauce. I'll try that, but I also thought these would be good on sandwiches and in salads over the winter. After all, as good as local tomatoes are, the decidedly non-local winter tomatoes are as bad. It'll be nice to bypass those mealy, tasteless numbers!
Hello! I like roasted red bell peppers, but I don't like their prices at the grocery stores. So instead I take advantage of the local farmer's market and the current cheapness of fresh red bell peppers there. I buy a big bagful of them and roast my own.
There are a number of directions out there for roasted red bell peppers; over the years I've combined a few instructions to come up with an easy method:
Roasted Red Bell Peppers
1. Preheat broiler and line a broiler pan (I use an old cookie sheet instead).
2. Cut pepper in half vertically and remove the stem, seeds and white pith. Press down on each half with the palm of your hand to flatten it. The flattening creates a more even surface, which results in more skin blackening. The peppers will likely split when you press down on them, so avoid this step if you want perfect halves.
3. Broil until skins are black. This takes eight minutes under my broiler, and I turn the cookie sheet around halfway through for more even blackening.
4. Remove peppers from oven and place in container with lid. Cover with lid, then set aside to cool. Letting the peppers sit in a covered container helps loosen up the skins, and of course they're easier to handle when cooled.
5. The job of peeling the peppers is a bit messy, but if the skins are pretty well-blackened, it goes fairly quickly. I've peeled big bowlfuls of them while watching TV.
6. The peppers exude juices once they're roasted and cooled. So, after the peeling step I like to let them drain in a colander before proceeding further. This probably isn't as critical if you're going to use them right away. But if you decide to roast some to store in the freezer, I think this step helps reduce the peppers' wateriness when thawed.
7. My freezer storage method: I toss the drained, roasted peppers with a little olive oil, then portion them out into 5 ounce amounts. (Why five ounces? To be honest, I don't remember anymore, but it seems to be a size that works well for my small family. You can freeze any package size you want!) Each portion is packed in plastic wrap, then the packages are placed on a cookie sheet and popped into the freezer. Once they're frozen solid, the packages are then stashed in freezer bags and returned to the freezer. They'll keep several months that way.
Here's the bowlful I did earlier today:
Above, three batches of peppers have been roasted.
Peeled and drained:
They look much nicer now, don't they?
And how do I use all these roasted bell peppers? Here's just a few ways:
- in sandwiches
- pizza topping
- mix with some chopped fresh garlic and Italian-style dressing for a salad (always part of my husband's birthday dinner)
- minced, in homemade breads
- sautee onions and garlic in olive oil, then add some chopped peppers and sautee some more. Toss with cooked pasta for a fast entree.
- I don't like the taste of cooked green pepper, which happens to be an ingredients in many recipes. I'll sub in some of my roasted red bell peppers instead. They don't taste the same as cooked green peppers, of course, but they add a nice flavor all their own. They look colorful in a dish too!
I've just listed some basic, no-recipe-required uses, but of course there's lots of recipes that specifically call for roasted red bell peppers. Perhaps you'd shied away from making these recipes because, like me, you didn't want to pay for those little jars at the grocery store.
Well, now you don't have to. Take advantage of those cheap farmer's market prices if red bell peppers are in season where you live and make your own!
Hello! Do you need a big batch of muffins for a bake sale or a brunch? Or maybe you have room in your freezer and want to stash some extra muffins there.
If so, may I suggest Berry Cream Muffins? I baked them last night for a brunch party at a neighbor's this morning. They were easy to make and delicious. What more do you need in a muffin recipe?
Berry Cream Muffins (adapted from clipped recipe attributed to a Linda Gilmore of Hampstead, Maryland, but I'm not sure of the source. It might be from a Taste Of Home publication.)
4 cups all-purpose flour (see notes below)
2 cups sugar
2 teaspoons baking powder
1 teaspoon baking soda
1 teaspoon salt
3 cups fresh or frozen raspberries or blueberries (I used the latter)
4 eggs, lightly beaten
2 cups (16 ounces) sour cream (see notes below)
1 cup vegetable oil
1 teaspoon vanilla
Preheat oven to 400. In a large mixing bowl, combine flour, sugar, baking powder, baking soda and salt; add berries and toss lightly. In another mixing bowl, combine eggs, sour cream, vegetable oil and vanilla; mix well. Stir into dry ingredients just until moistened. Fill greased or paper-lined muffin cups two-thirds full. Bake 20-25 minutes, or until muffins test done. Yield: about 24 standard-size muffins.(see notes below)
Notes: I used half white wheat flour and half all-purpose flour. I used full-fat sour cream, but I'm sure these would be fine with reduced-fat sour cream as well.
I filled my muffin cups two-thirds full (or maybe even a little fuller than that). After I'd filled my two dozen muffin cups, I still had batter left over. I'd read somewhere that it's okay to refrigerate muffin batters, so I tried that. I baked the rest of the muffin batter this morning, and thus I ended up with a total of 31 muffins.
I'd consider that a big batch of berry muffins! And here's how they turned out:
I think these turned out great! They're not as sweet as some muffins are; with all those blueberries, who needs a ton of sugar?
Some of the muffins went to the brunch party, and what was left went into our freezer. Win-win!
Hello! As far as homemade summertime desserts go, it's hard to beat strawberry shortcake and ice cream. And while both are great, my vote for the best homemade summertime dessert goes to:
Raspberry Cobbler!
I'm not sure when my affection for this dessert began. Although my mom would make strawberry shortcake, I don't think she ever made raspberry cobbler. Since raspberries are expensive even in season, she likely thought it'd be a pricey treat to make enough to feed our family of 10.
Nevertheless, when as an adult I saw raspberry cobbler on the dessert menu while dining in Akron, PA, I decided to order it. It was love at first bite! I wished I'd skipped the hamburger I'd just eaten and had gotten two servings of raspberry cobbler instead.
This memorable meal took place back in the early 1990's, but it set me on a search ever since for a raspberry cobbler recipe that could compare to the restaurant one. And thanks to Marcia Adams' Cooking From Quilt Country, I think I've found a great homemade version.
Raspberry Cobbler (adapted from Cooking From Quilt Country)
Raspberry Base:
4-5 cups raspberries (see note below)
1/2 cup white sugar (see note below)
1/2 cup brown sugar (see note below)
2 tablespoons flour (see note below)
1/2 stick butter, cut in small pieces
2 tablespoons lemon juice
1/2 teaspoon nutmeg
Dough:
1 1/2 cups flour (see note below)
3 tablespoons white sugar
1 1/2 teaspoons baking powder
1 teaspoons salt
1/2 cup (1 stick) butter
1/2 cup milk, approximately
1/2 teaspoon vanilla extract
White sugar and nutmeg, for sprinkling on top of dough
Preheat oven to 350. Place raspberries in greased 1 1/2 quart casserole dish with medium-high sides. Add the sugars and flour; toss. Dot with butter; sprinkle with lemon juice and nutmeg. Bake for 15 minutes.
Meanwhile, make the dough. Place the first four ingredients in a medium-sized bowl. Cut in the butter. Combine milk and vanilla, and add to flour mixture. Stir with a fork until a stiff ball forms, then turn out onto a well-floured pastry cloth or board and roll out approximately 1/4" thick. Shape the dough to fit the dish you are using and transfer on top of warm fruit. Slash the middle of the dough, then sprinkle a bit of sugar and nutmeg on top. Return to oven and bake for 30-40 minutes, or until the juices bubble up through the slit and the crust is lightly golden. Serve warm, preferably with cream (see note below). Yield: 6 servings.
Notes: Adams calls for black raspberries, as she thinks they have a more pronounced flavor when baked. They're harder to find than red raspberries, though, so I've always used red when making this. No complaints from me!
The amount of sugars used for the raspberry base makes this dessert quite sweet. Raspberries can be rather tart, but I still like the cut back on the sugars a bit.
My only complaint about this recipe is that the amount of flour specified didn't seem to thicken the raspberry juices enough. I decided to try a double amount of thickener this time, and used cornstarch instead of flour. This change worked well; no more runny filling!
As with most of my baking, I use 1/2 white wheat flour and 1/2 white flour for the dough.
Although Adams suggests serving this dessert with cream, I've never done that. But when I've had vanilla ice cream around, I've sometimes used that instead. However, I find raspberry cobbler just fine on its own.
Perhaps one reason why I like making raspberry cobbler is that my husband doesn't like it, and our daughter can take it or leave it. Thus, there's more for me! But really, I don't need six servings of the stuff all for me, so I cut the recipe in half and bake the cobbler in a small casserole dish. Three servings isn't nearly as piggish - even if I ever decided to eat two servings of it at once and call it a meal.
As in my mom's day, raspberries are still pricey, but this is one recipe that I'll gladly splurge on!
Hello! If you want to save money, see unique items on grocery store shelves, eat healthily, or eat unhealthily, then Amish grocery stores are for you.
I know they're for me, but then again, I used to live an hour east of a couple of Amish settlements - first, near Lancaster County, PA and then near Arthur, IL. I currently live a little over 2 hours from another Amish settlement, Shipshewana, IN, but due to that distance and the fact that gas had gotten quite high for awhile, I haven't been there very often.
I discovered Amish grocery stores during excursions to these settlements. The store near Arthur, IL, Beachy's Bulk Foods, became especially important because we'd moved to a town with little options for buying ingredients with healthy cooking in mind. Beachy's became my go-to place for whole wheat flours, herbs and spices. But as the Amish are known for their baking, I would purchase unhealthy items like cake/cookie sprinkles in just about every shape imaginable, plus darker versions of cocoa and brown sugar than what are typically found in grocery stores.
The "bulk shopping" at Beachy's and other, similar Amish businesses means that the store buys the foods in large amounts and then repackages them for sale. This is what the health food store in my current town does, but there's no comparison in price, as seen here:
Citric acid from the local health food store, $4.85/lb. This store cuts the price per pound a bit for larger amounts, but when I was there that half-pound size was the biggest they offered.
The same product, $2.15/lb at Beachy's.
Alas, I live a good ways north of Arthur, IL now. But when we made a trip to southern IL at the beginning of the summer, I requested a stop at Beachy's. There was very little room in the car (we were taking our daughter and her stuff to her summer job), so I couldn't buy much. This was a big disappointment to me, but I bought what literally could fit in a small box on my lap: the citric acid, some herbs and spices, pink Himalayan salt, some more of that very dark brown sugar, and a few other things. There was so much more I could have bought; with such good prices it was a shame I couldn't do more shopping.
In my next post I'll explain why I bought citric acid.
Note: E & S Sales in Shipshewana is a similar business.


 al
al