Thursday, August 31, 2017

Get Carded: A Simple Card For A Not-So-Simple Event

Hello! Our daughter recently started a PhD program in chemistry. Along with picking a research group to work with and taking classes this semester, she is also a teaching assistant for two freshman-level labs and two corresponding recitation sections. (A professor supplied the course materials, but our daughter will be the instructor). She and her fellow first-year classmates did have TA training, but still, the thought of being in such a position would have kept me awake at night with anxiety. 

If our daughter had such anxiety, she didn't tell us, and texted after the first recitation that she thought it went well. It probably helped some that she had two years of STEM mentoring as an undergrad, a position had involved keeping office hours and running help sessions. So she already has some awareness on how to manage the academic needs of underclassmen. 

Nevertheless, we're very proud of the good start she's off to, and my husband suggested sending her a gift card to one of her favorite online stores. Naturally, I made a greeting card to send along with the gift card:

Materials used:
  • white card stock
  • portion of page taken from vintage chemistry textbook
  • patterned scrap from World Market shopping bag
  • "Congrats" stamped in brown ink on white card stock scrap
  • gold glitter washi tape
I could have made a fancier card, but didn't really feel the need to. Sometimes a simple card just seems right, and this was one such time. 

Our daughter appreciated the card and gift card. We were glad to "reward" her in this small way, even if it was with just a simple greeting card and small gift card.

Wednesday, August 23, 2017

Made It: Ye Olde Brick Path

Hello! There's a narrow strip of land - about five feet wide - on the western edge of our property that was a bit of a no man's land. When we first moved in, an assortment of weeds and tree saplings reigned in that space. I got rid of the saplings first, then pulled out the weeds. One particular weed, though, grows via runners, so it was very hard to eradicate. And the thinning out of the other weeds and mini trees caused the spread of lily of the valley. I like the scent and appearance of its flowers, but there was just too much of it growing in this small bit of ground. 

Over the course of our years here, I've gradually added some perennials in this area, but placed them close to the house so I would still have space to walk through. During the growing season, I'd gradually wear down enough of the weeds and lily of the valley to make a path of sorts, though walking on these plants stopped them from growing back.

Then it dawned on me: since I was beating down a path by walking on this strip of land, why not just make a real path? So earlier this summer I dug out a ton of weeds and lily of the valley. It was a bit laborious, but with the excess growth cleared away, that section of the yard looked better already!

Now, what to put down on my path to make it look more official? This would involve figuring out what type of paving stone to buy and how much of it to buy. But before I made a trip to an outdoor landscaping place, it was time to cut the lawn. This task included mowing around a semi-buried, two-brick-wide path someone had added to the park side. And since this path was right next to a large maple tree, it was difficult to mow around. So, time to kill two birds with one stone: remove that old brick path so it'd no longer be a nuisance - and use those bricks to make my new path!

And here's how it turned out:

To show you how narrow this strip of land is, the light green plants to the left are lavender I planted about a foot away from our house, while the feathery-looking greenery to the right is on our neighbors' property. But as you can see, a single file of bricks fit in well here. 

A couple of close-ups on the old bricks I dug up from the parkside and put in place to make the path:

There were a few of this brand, Bessemer Block, Youngstown, Ohio.

But mostly I had this:

Metropolitan Block, Canton, Ohio.

I looked online for some information on these companies. Bessemer Brick Company began in 1901 and was bought by Metropolitan Brick in 1917.  Metropolitan Brick was formed in 1902. 

Finding Metropolitan bricks is quite common; read here
to see where they were found by others (a brief history of the company is first, followed by the comment section where the finds are discussed).

I don't know if or where the bricks I dug up from the parkside had originally been elsewhere. I was glad to have had found just enough to make a nice little path. A couple of neighbors have complimented me on my efforts, which was very kind of them. My path is rather rustic in appearance, but at least that side of our yard no longer looks like a no-man's land!


Friday, August 18, 2017

Eats: My Favorite Salad Dressing

Hello! I eat salads throughout the year, either as a main course lunch or as a side to other meal components. But of course they taste the best during our local growing season. The produce looks as pretty as a picture then:

Above, my side salad includes leaf lettuce, cucumber, cherry tomatoes, red onion, radish and clover sprouts. I grew the tomatoes, cucumbers and the sprouts, while the other veggies came from the Farmer's Market. I'd started the tomatoes from seed; it's the Sweet 100 variety, very prolific. The cucumber came from a plant I bought at the Farmer's Market earlier this spring. The clover sprout seeds are from High Mowing, an organic seed company.

(Those nice slices of radish, cucumber and red onion are courtesy of this purchase, which I still love using as much as I did when I first got it). 

And lastly, my favorite salad dressing, visible as the pale yellow, thick topping. The recipe came from an Internet source, but I don't recall where now. 

Tahini-Ginger Salad Dressing (adapted from an Internet source)

2 tablespoons tahini 
Juice of one lemon (see note below)
2 teaspoons minced fresh ginger (see note below)
2 teaspoons honey (see note below)
1/2 cup olive oil
salt, pepper and cayenne pepper to taste

The directions are merely one line: "mix all together in small bowl". However, I find the dressing mixes best when I blend the tahini, lemon juice and honey together first, then stir in the olive oil and seasonings. Store in refrigerator until needed (I use a glass jar). If using after being stored, stir a little first.

Notes: I don't always have fresh lemons on hand, even though I know they make a better-tasting juice than the bottled stuff. But it's the bottled stuff I typically use. My bottle of Real Lemon says that three tablespoons of their product equals the juice of one medium lemon, so that's what I put in the dressing. 

Could you use dried ginger powder instead of fresh ginger? I'm guessing you could, but here's a case where I've always used the fresh product when called for instead of subbing in its more processed version. I use a couple of tips to make handling fresh ginger easier: 

1. I cut it into chunks that'll work in my recipes
(smaller chunks for this dressing recipe, larger pieces for stir fry dishes). I cut it as is, no peeling done. I put the pieces in a quart freezer bag, then stash it in the freezer. 

2. When I need fresh ginger in a recipe, I just take out a chunk I  from that freezer bag. The peel cuts off very easily while frozen. For this recipe and ones that call for minced ginger, I use a grater (my Microplane grater does a great job), while the peeled chunk is still frozen. If the frozen ginger needs to cut into pieces instead, I set it aside for a few minutes to thaw a bit (or if in a hurry, I'll put it in the microwave for a few seconds). It's easier to cut if still a bit hard, rather than if thawed out completely. 

I suppose that fresh ginger loses a bit of its flavor if frozen first, then thawed out for use, but it beats the alternative: I'd buy a knob of fresh ginger and keep it in the produce crisper, only to have it go bad before I could use it up. 

Honey is messy to measure out, so I always just eyeball the 2 teaspoons needed for this recipe while squeezing or pouring it out of the bottle.

The recipe doesn't give the yield, but I think it makes around a cup. It can be scaled down, but I like this dressing so much I've occasionally doubled it. And why do I like it so much? It's a nice consistency: some dressings are so thin, they fall to the bottom of the salad bowl, while others can be thick and gloppy. This dressing seems to be just right. (note: it's a bit thick just out of the refrigerator, so I take it out to warm up a bit while I'm making my salad). And I don't know if this dressing is particularly healthy, but it tastes like it is. And besides tasting healthy, it tastes good!

.


Friday, August 11, 2017

Vivid Vacation #2

Hello! My husband and I had visited Pittsburgh's Phipps Conservatory (as discussed in this post) earlier this year, so I wasn't sure if I wanted to visit again so soon. However, our daughter was along for our recent summer vacation, so my husband thought she should see the conservatory for herself. Somewhat reluctantly, I agree, and as it turned out I was very happy we had gone. The special exhibit my husband and I had seen in March was very nice, but now in its place is "Super.Natural" by Seattle-based glass artist Jason Gamrath.

As you'll see from my photos, Gamrath's glass is stupendous, both in scale and in design.

Real orchids are beautiful, but Gamrath's orchids are just as breathtaking in their own right. 

A cluster of pitcher plants, one of many such groupings in the exhibit.

More out-sized flowers.

Giant water lily!

Another rendering of a carnivorous plant, this time the Venus Fly Trap. Thankfully, Gamrath didn't include giant bugs!

Daffodils aren't in season anymore outside, but in Gamrath's world they always will be.

A close-up of those gigantic daffs. 


Boisterous blue flowers. 

A darker shade of blue here.


More orchids. 

And more daffodils.

As you can tell, I thought "Super.Natural" was a great exhibit, and if you're going to be in the Pittsburgh area before November 6th, I suggest checking it out. If you like flowers, glass art, and oversized objects, you'll surely like Gamrath's masterpieces!

If you'd like to know more about this exhibit, go here.


Tuesday, August 8, 2017

Vivid Vacation #1

Hello! We were on vacation last week, a trip that took us to central Kentucky, western Pennsylvania, southern Ohio and Indiana. The photos I took are heavy on vivid art works and gardens, so that's what I'll be showing off here. 

First up, an art quilt show at the Berea (KY) Arts Council. The show was sponsored in part by the Lexington-based Kentucky Heritage Quilt Society. The theme of the show was food. 


One of the quilt show exhibitors was on hand, I suppose to answer questions people may have had about the quilts, so she graciously posed with her masterpiece. It's made from silks she had hand-dyed, and she had added a plethora of beads and quilted detailing. The face in her quilt is a self-portrait. Alas, she didn't win a ribbon (the one shown in the photo is for the quilt displayed next to hers), but I thought she deserved one. She said she typically spends a few hours per night working on her quilts. That's patience, though she referred to it as a passion. 

Being a squirrel lover, I was taken with the lower right-hand corner of her quilt:

There's delicate shading on the squirrel's body, and each acorn cap is adorned with several hand-sewn beads. Beautiful work! Unfortunately, I didn't get the artist's name, but I certainly respected her talent, and the talents behind the other quilts in the show as well.  

Berea seems to be quite into sustainability, so I saw a number of raised bed gardens affiliated with area businesses, like in front of a dentist's office:


and the public library:


A few of the several raised beds sponsored by the library are shown.

The next day we visited the Arboretum/State Botanical Garden of Kentucky, on the campus of the University of Kentucky in Lexington. Free admission, other than the children's garden, so that was a bonus. We enjoyed our visit, and wouldn't have minded paying to view the plantings. 

I should have taken more photos, but I was so busy taking in the plantings that I didn't do so. There were a number of display gardens, plus the arboretum. I was also impressed by the Walk Across Kentucky: 
 
The Walk Across Kentucky
The Walk Across Kentucky was first planted in 1991 after extensive plant collection efforts in the 1980’s, which sought to secure the botanical diversity from across the commonwealth, and cultivate it in a common location for research and conservation efforts.  The collection currently exists as a two-mile paved pathway that meanders through over 80 acres of native plantings representing the 7 physiographic regions of the state.  The collection is constantly expanding, and as of 2015 includes over 520 native species from 99 plant families.   There are 2500 trees and shrubs on the Walk Across Kentucky, showing the great diversity of woody plants found in the state.  More recently, efforts have been made to further develop the interesting ecosystems found across Kentucky, including tallgrass prairies, wetlands, savannahs, and glades. 

(the above info is from the Arboretum/State Botanical Garden of Kentucky website, which can be found here.)

For dinner that evening in Lexington, we visited Smithtown Seafood and West Sixth Brewing. The two businesses are in the same building: if you want something to eat along with your brews, you head over to the Smithtown side of things to order up your meal. When it's ready, it'll be brought over to your table at the brewery side. 

And you sidle up to the bar to order beer:

Wall of souvenir t-shirts:

My husband liked his beers, and we all liked our seafood dinners. I had the Cape Codder (a fish sandwich). But despite our orders and the name of the restaurant, vegetarian, burger and salad options are also available. 

We thought West Sixth Brewery had a fun, funky vibe, and we appreciated the brewery's mission as a home to several community events, like running and cycling clubs, science talks and game nights. 

All in all it was a fun and busy two days in Kentucky. Next post: I'll show off a combination of art works and gardens together.


Saturday, August 5, 2017

Thrifty Acres: Have Arts And Crafts Supplies, Will Travel

Hello! In preparation for our recent vacation, I began to plan what arts and crafts supplies to take along on the trip. Lately I've been using a scrappy journal (as seen here) to record vacation memories, plus I was going to be finishing up the two-month ICAD (index-card-a-day) activity while on the road as well. 

The number of supplies I like to use for both projects adds up, so I wanted a handy way of carting them around. In the past, I've tossed things like scissors, glue stick, ephemera, rubber stamps, markers and the like in plastic bags, but this method didn't organize things very well. I figured there had to be a better way, and one that didn't involve going to a big-box arts and craft store to buy some pricey organizational system. 

And there was a better way, and for $1.25 at a local thrift store:

A Mary Kay cosmetics bag. Closed, it measures 12"w by 11"l; depth is about 3 1/2". 

Doesn't look like much, I know, but opened, it's a different story:


The left side of the bag has two large pockets, one of which has a zipper. I stashed a bag of ephemera in this zippered pocket, and my scrappy journal in the other pocket. On the front of the top-most pocket is an assortment of small mesh pockets and an elastic band that had been sewn down in sections to create looped holders. I suppose those loops were meant to stash makeup brushes, but I placed a pen and a small pair of scissors in some of those loops. I put a glue stick, a small bag of text pieces and a small bag of patterned art paper scraps in a few of the mesh pockets. I could have arranged even more small bags of supplies if I'd felt like it. 

The other side of the cosmetics bag:


More elastic loops on this side, which are holding a roll of double stick tape, two craft scissors (each cuts paper with a patterned edging), a rubber stamp pad, the ICAD index cards, a set of glitter markers and an alphabet rubber stamp set. On the upper right side is a small, clear zippered bag, which I used to corral a roll of washi tape.

I was pleased with this bag while on our vacation. I had enough supplies to add variety to my scrappy journal and my index cards, and it was easy to find what I'd brought. Sure beats that old method of tossing things in plastic bags! 

For good measure, here's a scrappy journal page from one of our vacation days:


A portion of the takeout menu from Thai Essence, located in West Lafayette, Indiana. I featured Pad Kee Mow, the noodle stir-fry dish I'd ordered. It was delicious, although the three-chili symbol meant to show that the dish had some heat seemed a bit of a mistake. It wasn't spicy at all. 

I also included part of the weekly sales flier from Jungle Jim's, a HUGE grocery store in Fairfield, Ohio (near Cincinnati). It's a must-see in that area!

Of course, you might not be interested in doing collage-type work while traveling, but a bag like the one I got could easily be filled with supplies a quilter, a knitter, a painter or other hobbyist use.

(And if you're not an artsy-crafty type, or at least not while on the road, such a bag could be filled with first aid supplies).

Incidentally, we stopped at a big-box arts and crafts store, Michael's, while on vacation (our daughter wanted to look for a particular decorative item). While there, I wandered over to one of the paper crafting aisles to see what crafting organizational systems were available. I didn't see anything that looked exactly like a cosmetics bag, of course, but one particular bag looked like it would hold roughly the same amount of supplies. Its cost? $29.99. 

Of course, this crafts storage bag featured a pretty design on its exterior, while my bag is just a boring solid black. Just the same, I'm happy with my former Mary Kay product, and its much lower price tag!


Wednesday, July 26, 2017

Made It: Seashell Mobile

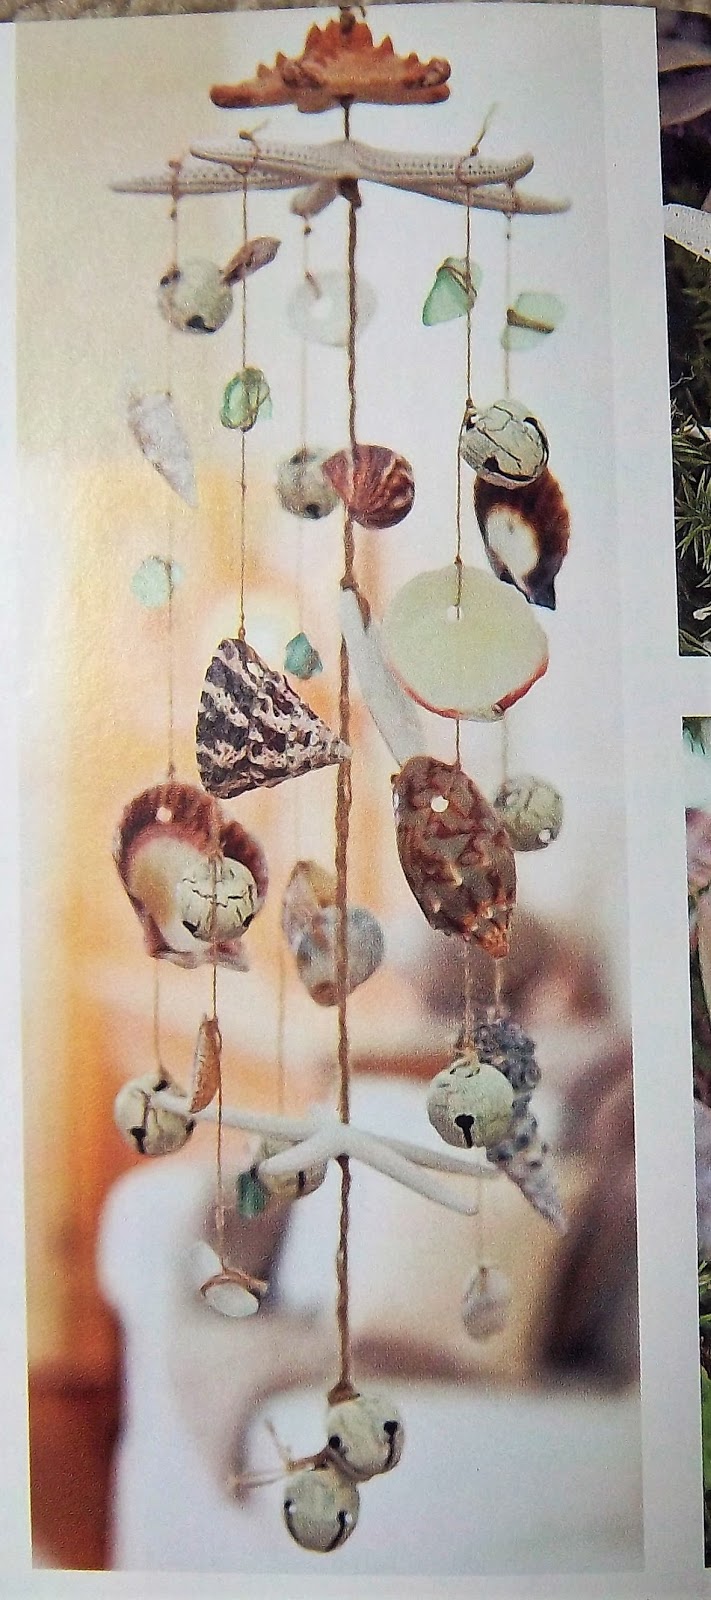
Hello! Spied this project awhile back The Spirit Of Christmas 20th Anniversary Edition (thrift store find):

In the chapter entitled "Beach House Christmas", a seashell-laden wind chime is shown. But the thought of seashell crafts in the dead of winter didn't make sense to me. I thought this item would look better in the summer, when the local beaches where I live can actually be used. 

I had plenty of seashells on hand (another thrift store find), but didn't have the starfish and sea glass that are on the supply list. So instead I went to one of the local beaches to pick up some driftwood, and used beads for the sparkle the sea glass would have given. I also omitted the jingle bells, so I'm calling my finished project a mobile rather than a wind chime. 

Here's how it turned out: 


This mobile didn't photograph very well, no matter where I hung it, so I'm showing off two pics: hanging up on an interior door and laying on the carpeting. It's actually hanging up on the front porch, but it's even harder to get a good shot there. 

Some close-ups:


Overall, this was an easy project, although there were a few tricky parts along the way. For one thing, I learned that some seashells don't take well to having holes drilled in them. Fortunately, some of my thrift store seashells had holes in them already, and I was able to make holes in some of the remaining shells without too much effort. 

The other problem was finding the right-size needle: one that was thin enough to go through my chosen beads, but also with a thick enough eye to accommodate the thin twine I was using for the strings. 

But once the shell-drilling and the needle-threading were accomplished, the project went together fairly quickly. I started by drilling five holes in my driftwood piece: one on each end, one in the center, and one between the center hole and each end hole. 

Next, I strung thick twine through the two end holes, tying the top center of the twine into a hanging loop. Each end was knotted underneath the driftwood. 

Then all that remained was the arrangement of the three strands. Using thin twine, the end of each strand was threaded through the top of the driftwood. I added two beads to each end and then knotted the twine. 

Each strand was then strung with alternating beads and shells. I didn't measure where to place these; I just tied them on. The middle strand is the longest, so it has one extra bead and shell. 

For extra measure, I dabbed each knot with a bit of waterproof glue. Hopefully this will keep the knots from unraveling. 

As far as dimensions, my driftwood piece is 15" long (horizontal length). The mobile measures about 40" long. I didn't plan a particular length, it's just what I ended up with. This is the kind of project that's pretty adaptable; you can make it as big or as small as you'd like.  

And if you want, you can always use your mobile to decorate for a "Beach House Christmas", as the Spirit Of Christmas folks had intended. I'm fine with my beach-look mobile in the summertime!