Hello! Eight months after receiving water damage, our kitchen, dining room and upstairs bathroom have been renovated. Since the walls of the kitchen were redone (wallpaper removed and paint put on in its place), it was a good time to do a bit of redecorating in that room. Changing things around and adding vintage goodies I'd bought this year added to the new look.
Come along for a little tour:
Window over the kitchen sink. The window had previously been framed by a blah lace curtain left behind by the previous owner. I swapped the curtain for two vintage embroidered scarves. They'd been stitched up by either a grandmother or great-aunt of my husband.
Just for fun - at the top corners of the window I hung up handmade doll dresses; I'd purchased them earlier this fall at an estate sale.
A Nabisco Mr. Salty doll, the namesake of a now-defunct (I think) pretzel brand. He was a gift in the early 80's from a relative.
Close-ups of my new "curtains". There are sayings stitched on either side of the designs, but since the words were worked in white, they don't show up very well. "God Bless Our Home" was stitched alongside the house design, while the cute couple with the umbrella are framed with "Whatever The Weather We'll Be Happy Together". I don't know when the scarves were embroidered, but it's safe to say it was decades ago.
Small items on the windowsill. Peppy, Salty and the boy/girl egg cups are made of wood, and both sets came from a church rummage sale in Douglas, WY. The small pottery piece next to Salty holds marbles and bits of broken dishes - all dug up from our backyard; most of it likely vintage. The small glass bottle holds two flowers, the last of the blooms from my yard this year.
Vintage holder for letters/memos/misc., hung by the refrigerator. Purchased for a quarter at an antique store's summer clearance near Calumet, MI. I removed the various coupon offers, gardening info and other papers that I had stashed in the racks so I could show off the rooster designs. This is quite a handy piece.
This holder has three hooks on the bottom, likely for keys. I hung up this vintage tea towel from the hooks instead. It was found in my mother-in-law's things after she had died. That was the first time I'd seen it, so I don't know who had stitched it up (My MIL wasn't into embroidery; crocheting was her thing). The Dutch girl look is fitting for the town in which we live.
One last stop on my kitchen tour for today, and it also has a Dutch theme:
I bought the above plaque at a thrift store. It has a recipe for "Saucijzenbroojes" (I have no idea how that word is pronounced), aka "Pigs in the Blanket". Various recipes of this Dutch food abound, but they all seem to involve sausage and a rich biscuit-like dough. I made them once, using a recipe given to me by an older lady I used to know. The "pigs" took some time to make, and were a bit on the heavy side, but were still pretty good. Around here, they can be purchased, frozen, at grocery stores, and I know of at least one local church that makes them to sell at fundraisers.
And that's it for part one of my vintage kitchen tour - part two to come with the next blog post. Hope you enjoyed what you saw today!
With cold temps and several inches of snow on the ground here, it seems more like winter than fall. Nevertheless, it really is still fall - heck, it's only mid-November. And with local apples still available at the local farmer's market, I continue to enjoy them in a variety of ways.
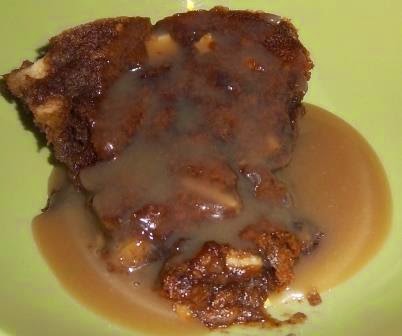
Decided to try making Apple Cake With Hot Caramel Sauce, a recipe from Marcia Adams' Cooking From Quilt Country. I find her recipes delightful in a homey, old-fashioned way, but I was disappointed when I put the apple cake batter into the baking pan. It didn't look like much.
But looks can be deceiving, as I found out when I cut a slice and poured some of the hot caramel sauce over it:
Well, maybe my photo doesn't look like much either, but take my word for it - the cake is moist, rather sweet and well-spiced. In fact, perhaps a bit too sweet and spiced (too much nutmeg, IMO), but these issues can easily be remedied by cutting down on certain ingredients. The caramel sauce is quite sweet too - a little goes a long way - but it's very good.
Another bonus is that this recipe is easily prepared - and Adams states: "The cake gets better as it ages, keeps for a week in the refrigerator, and also freezes well."
Perhaps you're supposed to bring a dessert to Thanksgiving dinner - but either someone else is making the pumpkin pie, or else you said you'd bring a sweet for those who don't like pumpkin pie (perish the thought, but I know those people exist!)
Well, this apple cake would be a good dessert to bring along! It's fast and easy to make and is relatively economical as well. It can be made in advance and frozen, so no last-minute baking is necessary. Adams says the caramel sauce can be made in advance but doesn't say how much in advance. I'd think that the day before would be fine. But since the sauce is quick and easy to prepare, you could whip it up right before serving the cake if it's not too chaotic during Thanksgiving dinner.
If you'd like to try this recipe, here it is, along with my notes:
Apple Cake With Hot Caramel Sauce (adapted from Marcia Adams' Cooking From Quilt Country)
1/2 cup pecans, chopped finely
2 1/2 cups chopped apples (2 large cooking apples)
1/2 cup (1 stick) butter, softened
1 cup white sugar (see notes)
1 egg
1 teaspoon baking soda
1/4 teaspoon salt
1 teaspoon ground cinnamon
1 scant teaspoon grated nutmeg (see notes)
1 cup all-purpose flour
Caramel Sauce
1/2 cup (1 stick) butter
1 cup brown sugar
1/2 teaspoon salt
1 teaspoon vanilla
1/2 cup evaporated milk
Optional garnishes (see notes):
Whipped cream
Fresh apple slices
Preheat oven to 350. In a large mixing bowl, cream the butter. Add the sugar and beat until fluffy. Add egg and beat until blended, then mix in the baking soda, salt, cinnamon and nutmeg. Add the flour and stir just until blended. Stir in the apples and pecans. Pour into a greased 9" round cake pan and bake for 30 minutes or until the tops springs back when lightly touched in the center with your finger.
Prepare sauce: In a saucepan, melt the butter, brown sugar, and salt. Bring to a boil, stirring with a whisk, then remove from heat and whisk in vanilla and milk.
Notes: Adams specifies a 9" round cake pan, but I feel a 9x9 baking pan would be fine as well.
I found the use of sugar and nutmeg in the cake recipe a bit much. I used a bit less sugar as it was but still found it too sweet. That cup of white sugar could probably be reduced to 3/4 or even 2/3 cup.
I thought the nutmeg taste was too strong; Adams does say "1 scant teaspoon". Maybe my "scant" wasn't scant enough. I think I'd cut this down to 1/2 teaspoon next time.
Adams advises serving the cake warm or at least at room temperature. The cake can be reheated in the microwave. She says to serve the caramel sauce hot; if made ahead, she says to reheat it over hot water. I warmed it up in the microwave and that was fine.
Adams' serving instructions are as follows: To serve, ladle 2 to 3 tablespoons hot caramel sauce onto 8 serving plates. Cut cake into 8 wedges and place on top of sauce. Garnish with a dollop of whipped cream and 2 thinly sliced apple wedges, peel left on.
I didn't bother with the whipped cream/sliced apple presentation, but it might be nice to consider if serving this on Thanksgiving Day - or any other time you want a nice taste of fall.
Hello! Could not spend much time at a church rummage sale yesterday, but still managed to come home with a few odds and ends - and more importantly, a couple of vintage Christmas items!
First up:
A Santa figure that stands about 15" high. At the rummage sale, it was labeled as being from the 1950's. The price was a bit higher than I would have preferred, but was still reasonable, and the Santa was in very good shape - just a slight weathered look to his face and a faint yellowing of his beard. But his boots, belt and suit looked brand new.
I liked his face:
I think he'll fit in well with the vintage and non-vintage Santas I already have!
Looked on eBay for more info and learned he's likely from the Harold Gale company, a firm that made Santas for store display, retail purchase and giveaways with various products. This article gives a good summary of the company. I'd never heard of Harold Gale before, so like the old saying goes, "you learn something new every day".
On a much smaller scale is my second purchase of vintage Christmas decor:
The Holy Family in miniature - Joseph is 1 5/8" high and Mary stands 1 3/8" tall. Baby Jesus, who is 3/4" long, lays in a manger that's 1" high and 5/8" long. They're wooden and appear to be hand-painted. I love the small scale.
Saw one example of this set on eBay, which showed halos that looked to be made of wire on the figures. There are a couple of small holes on the backs of my figures, undoubtedly where their halos had once been. I could easily add new ones, but I think my set is fine as is.
This tiny family will be displayed along with my collection of Nativity sets from all over the world. Alas, I don't know what country my latest find hails from, but it's likely from outside the US as well.
The rummage sale also had a number of handmade vintage ornaments, all priced very inexpensively. However, since I now have more ornaments than what I have room for on our tree, I passed them up.
But vintage Santas and Nativity sets - I can still make room for those!
Hello! While I don't always start out with a predetermined theme when crafting my greeting cards,
sometimes I'll find an image that so obviously fits a particular person, I just have to use it when their birthday rolls around.
Such was the case earlier this year when I came across an ad for a knitting product in a vintage craft magazine. Part of the ad perfectly described a friend, so I waited several months until her birthday finally arrived and made her a card that included a scaled-down copy of the ad.
Here's how the card turned out:
Materials used:
- white card stock
- scrapbook paper scrap
- scrap from vintage cookbook cover
- scrap of 1880's ledger paper, altered with red and white acrylic paints
- photocopy of ad from vintage crafting magazine ad
- vintage buttons
- "happy birthday" stamped in black StazOn ink
And why was the ad so perfect for my friend? Not only is she extremely creative and talented, she's a knitting whiz as well. In fact, when I took her out to dinner last night to celebrate her birthday, she was wearing one of her knitted creations.
Not visible above are the definitions for "creative": "pertaining to creation; inventive; productive" - and for "talented": "a special, superior ability in art, learning, etc." These definitions fit my friend too.
(In case you were wondering, for "knitter", the definition is given as "one who knits".)
Like I said, I felt it was the perfect card to make for her! Of course, she has many fine qualities besides her artsy/crafty talents, but I couldn't resist using that ad to highlight that side of her.
Hello! While cruising the Christmas aisle of a local thrift store last week, I spied this:
A package of Noma Easy-Trim Tree Clips: "No More Trouble Trimming Trees" we are informed. The clips were meant to hold strings of lights to Christmas tree branches. Sounds like a good idea, but I was interested in the vintage graphics of the packaging - another goodie to display next month!
I was also interested in the low price of 50c - an especially good bargain when one considers that this particular thrift store has a glass display case plus a shelving unit devoted to vintage goods. Not sure why this Noma package wasn't put in that section of the store, but I'm not complaining - if the staff had done so, it would have been marked higher.
I did complain, however (and politely, I hasten to add) to the counter clerk about that masking tape price tag on the front of the package. This is a pet peeve of mine, as such tags can be difficult to remove without marring the original packaging. I explained to the clerk that I was buying the item for display, so it would have been better if the price tag had been affixed to the back.
She immediately agreed and said the folks doing the pricing had been told this in the past, but they didn't always seem to remember such admonishments. I joked that I ought to make a big sign reminding them to please put the price tags in inconspicuous spots.
Although I hadn't asked her to do so, the clerk began trying to peel the price tag off with her fingernail - bad move, as the cardboard underneath began to peel off with the masking tape. So she stopped that action, I paid for the Noma Easy-Trim Tree Clips and went home.
Decided to look online to see if there was a recommended tip for removing masking tape from cardboard. On eHow.com, I learned that a bit of WD-40 or rubbing alcohol could be dabbed on a cotton swab (ie Q-tip)and then applied to the underside of the masking tape - after a small section of the tape had been carefully lifted up. Since that clerk had already peeled up some of the tape, I started at that end of the price tag. I used rubbing alcohol since I figured it'd be less messy to deal with.
Worked like a charm, as seen below:
No more masking tape price tag, although of course I was left with the bare section of cardboard, courtesy of that clerk trying to be helpful. At least the rest of the cardboard stayed intact, and it'll still be a fun display piece.
Looked on eBay to see if I could learn how old my purchase is- no firm date, but in general sellers seemed to think these had been manufactured in the 1940's or 1950's. That seemed right to me.
By reading a little further on how to best remove masking tape from cardboard, I learned that some people recommend using a blow dryer to loosen the adhesive. Could try this the next time I come across a poorly-placed price tag on a thrift store purchase - though I hope the message about this practice gets through to those folks doing the pricing!
Hello! I enjoy the taste of apple butter, but I don't enjoy the stirring that traditional recipes for this condiment call for. Therefore, I was pleased to discover a recipe for Crockpot Apple Butter in Marcia Adams' Cooking From Quilt Country.
Not only does the recipe require less stirring than what Great-Grandma had to do, but it's ultra easy if you start out with commercial applesauce - yes, rather than cut-up apples, applesauce is the base.
Here's the recipe, followed by my notes:
Crockpot Apple Butter (adapted from Cooking Fromm Quilt Country)
7 cups applesauce, preferably homemade, but a good-quality commercial kind (unsweetened) can be substituted
2 cups apple cider (see my notes below)
1 1/2 cups honey (I used a bit less)
1 teaspoon ground cinnamon
1/2 teaspoon ground cloves
1/2 teaspoons ground allspice
In a crockpot, mix all the ingredients. Cover and cook on low heat for 14-15 hours, or until the mixture is a deep brown. Pack while hot into 4 pint jars. Process in a hot-water bath for 10 minutes, counting the time after the jars have been immersed and the water comes again to a rolling boil.
My notes: I had some homemade applesauce in my basement freezer from last year - was going to use it in baking but had never gotten around to that. Upon thawing, the applesauce tasted fine, so I used it in this recipe. Obviously I'd had the work of making applesauce last year, but having it on hand made this fall made the recipe fast to put together.
I had apple juice on hand instead of cider, so that's what I used.
I don't can, so I'll freeze my apple butter instead. Therefore, I can't vouch for the canning directions.
About the cooking: one thing about crockpots, there's very little evaporation with the recipes made in them. Apple butter is meant to be thick enough to spread, so to hasten the thickening I placed the lid slightly ajar on top of the crockpot. But I didn't do this right away - I started the recipe last night, lid on, let it cook overnight, then adjusted the lid to allow for evaporation when I got up this morning. I suppose I could have left the lid open a bit all night, but I wanted to be able to monitor the evaporation rate.
The beginning of the process:
Homemade applesauce with added honey, spices and juice in the crockpot.
The finished result:
I would say this is the "deep brown" that Adams' recipe mentions! The yield is 4 cups of yummy apple butter.
Adams also remarks "...it tastes just like the old-fashioned kind, baked down in a copper kettle over an open fire." And it actually does! I once attended an apple butter festival in Waterville, PA - it's an annual fundraiser for the local volunteer fire department. I watched as huge kettles of apples were cooked down and stirred over open fires. My crockpot-cooked version is a dead ringer for theirs - but without all that stirring!
Hello! Well, it's the fall of the year, and Christmas will be here before we know it! So I thought it was a good time to dig through a recent thrift store find, the fall-winter 1967-68 issue of McCall's Needlework & Crafts.
There are pages and pages of knitted garments to make, but I turned my attention to the one featured on the magazine cover:
The copy says: "ski or after-ski dress of true Scandinavian flavor...For a breathtaking finish, add borders of rich radiant embroidery."
Actually, they weren't really exaggerating when they hyped that embroidery, as the close-up shows:
I love the lively colors, and the embroidery looks like it'd be fun to do, but here's the thing: first you have to knit the sweater dress - then embroider sections for the cuffs, bottom border, front neck opening and collar on black wool - then those strips are sewn onto green felt - then the felt pieces are sewn onto the sweater dress - then there are finishing instructions for each sewn-on section. Whew, sounds like lot of work! Wonder if anyone actually made the darn thing?
Turning to Christmastime decor, let's see if you recognize what the following wall hanging is supposed to represent:
If you said "the Three Wise Men", then you are correct. I could barely tell what the figures were supposed to be! For some reason, Christmas craft books and magazines of the 1960's seemed to be quite fond of abstract representations of the Three Wise Men. Not sure why. Still, the execution of this project isn't bad - pieces of brightly-colored felt are appliqued onto a felt backing with various embroidery stitches.
Speaking of decor, McCall's Needlework & Crafts covers interior decorating as well. Other vintage issues of this magazines have shown some real humdingers - or, at least that's how they look to me over 40 years later.
See if you agree with me:
The caption for the above bedroom says: "An applique picture of a modern bloomer girl in a polk-dot snowstorm sets Mod mood for teen-age girl's room. Cat rug and footstool in fabric, felt, fur cloth carry out polka-dot theme. Antique quilt in soft pink and green gentles effect. "Pop" flower lampshade and fur-cloth mouse pillow complete our lively decor."
Well, they can toss around "Mod mood", "lively decor" and "pop" all they want. What do I say about this decor? "nothing matches", "pink and green along with blue and white polka dots?", "why did they use a side table with an elephant shape for its base when the other animlas shown are a cat and a mouse?" And more, none of it flattering. There's just too much going on here!
But hold on a sec, for I have another room to show off:
"For an elegant bathroom, be sophisticated in your color, be inspired in your furnishing! Enliven a wall with the unexpected accent of a needlepoint sampler; add coziness with a knotted rung and seat cover; create dazzle with a beaded shower curtain!"
Beaded shower curtain? That's a new one on me! But yes indeed: "...ultimate in luxury! Glowing plastic beads are strung on lengths of sturdy fishing line. Beads are mostly black, alternating with vividly colored accents for a dramatic effect against the white plastic liner and black tub."
Never would have thought that plastic beads and fishing line were the "ultimate in luxury", but I never would have thought of beaded shower curtains either. God only knows how long it would have taken to thread all those beads on all those lengths of fishing line!
As for that "unexpected accent of a needlepoint sampler", it has the motto "virtue is its own reward" stitched on it. Well, maybe it's better than those cutesy, fake old-timey "Baths 5c" signs, but seeing this motto in a bathroom would be pretty unexpected to me!
Okay, I think it's time to get away from those less-than-stellar decors and show off something less complex:
Yippee, it's "styrofoam meat-tray samplers...ideal for a little girl to make." There must have been something wrong with me when this magazine came out - I was a little girl then myself, and never once made a styrofoam meat-tray sampler. In my own defense, I never saw this magazine back then, so I didn't know such a craft existed. Probably just as well! The meat trays may have made for inexpensive stitching surfaces, but the thought of hanging minimally-disguised styrofoam on the walls just seems cheap to me.
But that's half the fun of looking through old magazines such as this one - I enjoy seeing what still looks good today versus something that's better left behind!