Hello! Normally I consider red bell peppers too expensive to buy, but not so this time of year. Thanks to our local farmer's market, I can and do purchase them by the bagful. Although I eat a few here and there raw in salads, most are roasted and then packaged for the freezer. These will find their way onto pizzas, sandwiches and various other recipes.
But then a couple of years ago I found another use for red bell peppers when I came across a recipe for soffritto in a Bon Appetit magazine. As the copy explained: "A mix of chopped aromatics, like the Italian blend soffritto, is the base for countless recipes because it lends character to simple dishes. That's why we always have soffritto on hand. Freeze the extra...and you'll have the foundation for soups and sauces ready to go - no chopping required".
Well, if it was good enough for Bon Appetit, then soffritto was likely good enough for me too. The recipe looked fairly simple, with only five ingredients involved (plus salt and pepper): onion, red bell pepper, olive oil, garlic and tomato paste. The recipe instructions called for chopping the onion and bell pepper in a food processor, so prep time was fairly quick as well. And total cooking time was barely over 30 minutes.
All in all, it seemed like an easy way to add flavor to wintertime soups and other dishes, so I made up a batch that fall to store in the freezer. I'm happy to report the recipe was as advertised by Bon Appetit - the soffritto did, indeed, lend character to my bean soups. I'd also toss some into casseroles and even into the bread machine to add flavor to sandwich bun dough.
And now, with red bell peppers making their appearance once again at our farmer's market, it was time to make another batch:
Above, chopped onion and chopped red bell pepper are simmering in olive oil.
A close-up of the finished product - thicker now, and with the addition of garlic and a bit of tomato paste.
I flash-froze the mixture in a thin layer on a foil-lined baking sheet. When it had hardened, I broke the soffritto into chunks and put it into a quart freezer bag. It'll be easy to grab some as needed when I want to season a pot of soup or whatever.
I like soffritto enough that I ended up making two more batches. If you'd like to make some yourself, you can find the recipe HERE. I should add that the soffritto recipe is included in another recipe, hence the name of a different dish, "White Bean Ragout With Toast" in the title. (I've not tried the ragout recipe, so I have no comment on it).
I should also mention that the recipe says leftover soffritto can be frozen for up to three months. I admit to keeping mine in the freezer longer than that, which seemed fine.
If you decide to try this recipe, I hope you enjoy it as much as I do!
Hello! Well, it's Labor Day, which means that summer is winding down. But thanks to yesterday's thrift store purchase of the 1956 Better Homes&Gardens Barbeque Book, summertime reading pleasure is mine year round.
This is a packed 162 pages! From a multitude of recipes, menus for many occasions, and a wide variety of grilling equipment (none of it gas, by the way), there was something for everyone here.
And today, nearly 60 years later, I can also enjoy the retro illustrations, lavish food styling in the photographs, and marvel at the various grilling get-ups that don't seem to be in existence anymore. (Many of the recipes still sound good too!)
The Chapter 1 illustration is fun:
We'd now consider it a bit sexist, perhaps, that Daughter is carrying a food dish while Son is carrying the bag of charcoal briquets. Also signs of the era: Mother and Daughter aren't wearing pants, Mother has heels on, Son is wearing cowboy boots, a toy gun and a holster, and Father is smoking a pipe. But no matter - they're all obviously forward to their cookout.
Their barbeque grill looks similar to charcoal grills sold today, but in subsequent pages of the book, I encountered a dizzying variety of cookout equipment. The photos that follow show just a few of these.
"...smoke-barrel barbeque. Windlass lowers ribs attached to cover. There's a special metal box to fill with damp hickory sawdust or chips." There also appears to be a generously-sized shelf around the circumference of the grill - large enough to hold a casserole dish, a basket of rolls, condiments and more.
Also generously-sized is this spit roaster, which held three small whole chickens and also had a shelf for tableware and long split loaves of bread.
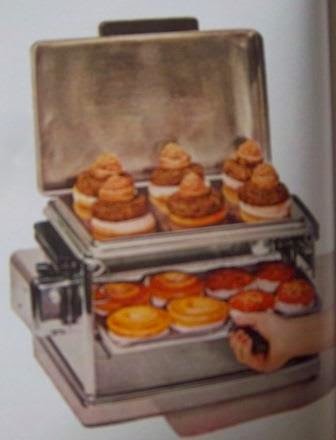
"Grill above - broiler below. Stuffed mushroom caps top the hamburgers. Broil them first; keep toasty warm on the grill. Coming out now: buns topped with pineapple rings, cheese rounds and mayonnaise, left; little English muffin pizzas at the right."
Not to be undone, the opposite page shows:
"Easy-to-wheel barbeque cart. Burgers broil between walls of coals in this little barbeque cart. Rolls are tucked in warming oven, left. Or toast them in the wire rack after burgers are done to their sizzling best. New potatoes brown in butter; corn and coffee stay hot on the grill."
"Little barbeque cart"? It's cooking six burgers, keeping buns, corn and coffee warm, plus cooking potatoes. And there's room for condiments, bread basket, and cutting board to boot. Perhaps it was, indeed, small in size, but it sure was big on efficiency!
"The young chef in the picture above is grilling franks on one portable grill, toasting buns on another. Build charcoal fire inside special insert, put rack on top, and you're ready to broil franks in just ten minutes. You can carry foods to picnics in these handy buckets. The lids double as trays here."
Love that plaid - very cool! I've seen a similar plaid design used for thermoses and picnic baskets, but this was the first time I've seen it for portable grills. It'd be fun to bring this look back!
Sure, all these barbeque grills are nifty, but what about the recipes? Well, they're pretty nifty too - in fact, most of them would still be welcome at a cookout today (maybe other than the two sandwich recipes I saw that used canned deviled ham - does anyone still eat that stuff?)
As always with vintage cookbooks, I like to see what occasions folks back then thought were worthy of celebrating - or at least what cookbook writers thought were worthy. I can report that the BH&G Barbeque Book has menu plans for "Garden Supper", "Hawaiian Special" (perhaps a real novelty because Hawaii hadn't joined the Union yet), "Family Fresh-air Special", "Eat Cool to Keep Cool", "Wrangler's Cookout", "When You Ask Folks Over", and more.
That's just for dinner. There's also "Triple-H Special", "Pizza Favorite" and more under the heading of "hearty sandwich meal". The pizza recipe, by the way, bears only a scant resemblance to pizzas eaten today.
What was the "Triple-H Special", you may ask? Well, here's your answer:
Shown above, Western Sandwiches, Poncho's Limas (a hearty bean dish), Crisp Relish Sticks, Fruit Basket, Hot Coffee, Milk (butter and mayonnaise aren't named, but they're in the spread too). "Hearty, delicious food with all the tang of an evening campfire and the informality of relaxed Southwest Living", the cookbook writers declare.
I personally don't find Western Sandwiches "delicious", but I can't find fault with the food styling!
And for the first meal of the day, "Rise-and-shine outdoor breakfasts", featuring "Dude Ranch Brunch", "He-man Breakfast Splurge", "Sunday Brunch" and "Chef's Griddle-cake Breakfast".
Oh, and that reference to a "He-man" meal? Currently there is much discussion on how "super-sized" meals have led to an obesity epidemic in this country. I'm sure that people were, indeed, slimmer in 1956, but nevertheless there were some super-sized recipes in my cookbook, such as:
Paul Bunyanburgers (named for a mythical lumberjack who lived very large), made with two pounds of ground beef - and meant to serve only three people! The shaping technique was interesting: each meat portion is shaped into a nine-inch patty, filled with goodies like cheese, chopped onion, pickle relish, etc, then the patty is folded over in half. The end result looks something like a meaty turnover, as seen above.
I'm sure they are very good, but I'm old enough to remember when McDonald's rolled out the Quarter Pounder hamburger in the early 1970's. That was considered huge at the time, at least at McDonald's. For those who were already familiar with Paul Bunyanburgers, a Quarter Pounder would have seemed minute!
There are no skimping on submarine sandwiches either:
"Start with a hefty cut of French bread; add plenty of ballast from tray. A Sub can go to jawbreaker heights - some addicts pile up 30 ingredients!"
30 ingredients? The tray above looks packed with "ballast", sure, but a careful counting of ingredients showed only 20. Oh well, can't win 'em all!
The "He-man Breakfast Splurge" featured juices, frizzled ham, Golden Hominy Scramble (eggs, bacon and hominy cooked together), Speedy Donuts (refrigerated biscuits shaped into doughnuts and deep-fried) and coffee.
Sounds hearty enough, but there's a recipe in the pancake section called "Palmer House Griddle Cakes" (named after the hotel in Chicago, I suspect) - the pancakes are supposed to be 12-15 inches in diameter! "But if your griddle is small, you'll have to settle for smaller cakes" we are told.
Smaller griddle? How about smaller plates? A Palmer House Griddle Cake would hang over the edges of my largest plates!
The dessert section of the cookbook is quite slim, but eat up the following dessert and say goodbye to slimness:
A scrumptious "Rainbow-sundae Buffet", complete with "scoops upon scoops of ice cream in three flavors. Banana halves, strawberries between. Toppers: cherry sauce, walnut halves, sliced peaches, crushed pineapple - also Chocolate-velvet and Snow Sauces. It's your choice." (Snow Sauce is a marshmallow sauce)
And it's now my choice to end this blog post. Summer is ending too, but it's nice to know it's always summertime with the 1956 Better Homes&Gardens Barbeque Book.
Hello! While perusing a local flea market earlier this summer, I came across a colorful vintage quilt patch. I was taken with it, in part because one of the fabrics used was identical to a piece of fabric I'd bought decades ago at another flea market. That was a sign to me that I should buy the quilt patch, so that I did.
I asked the seller if she knew how old it was, and she guessed from either the 1960's or 1970's. That seemed like a reasonable estimate to me. I've seen a number of craft magazines from the 1970's that featured patchwork projects, perhaps due to the focus on US history during the Bicentennial.
I wasn't sure what to do with the patch at first when I returned home, but then spied this:
My late mother had made the pillow cover, a tapestry panel sewn onto burgundy corduroy. She gave this to me when we lived in Indiana. Not only did we have a more formal house there, but we also were located near a county known for its covered bridges.
I have since changed states and decor. Our current house is simpler in style and I've gotten into the flea market look. So why not use the quilt patch I'd just bought to change the look of the pillow? It happened to be the perfect size for the makeover.
My mom's pillow cover had been created envelope-style, which made it very easy to remove. I decided to make mine the same way, and used this tutorial for measuring instructions.
Although the sewing of the pillow cover was very easy, there were a few steps necessary before I could do that. First came the choosing of the fabric. I eventually settled on a piece of sturdy white cloth that had come from a thrift store. While ironing it smooth, I noticed that there was a barely-visible blue label printed on it. That likely meant one thing - that fabric had once been part of a flour sack. I've read stories in Reminisce magazine of women doing their best to bleach those printed labels out of flour sacks so that the sacks could then be used to sew undergarments. No idea how old my flour sack piece is, but I got a kick out of having this bit of history for my project.
Next came the attaching of the quilt patch to the pillow front section; this was by far the most time-consuming part. After using Stitch Witchery to keep the patch in place, I added embellishments in the form of hand embroidery and a vintage button.
The actual sewing of the pillow cover was a breeze, and then it was time to complete the makeover by stuffing the pillow into it.
Ta da! I think this turned out really well! The quilt patch pattern is called Dresden Plate. I used a blanket stitch all around the edge of the patch and added a line of chain stitching between each fabric section. (a single strand of red pearl cotton was used for both stitches). Since the patch is about 16"x16", the embroidery took awhile, but I rather enjoyed it. I don't use a lot of hand embroidery, but when I do I like the old-fashioned feel of that craft.
(By the way, that blue floral piece at the bottom right side of the patch is the duplicate of the fabric piece I'd purchased a long time ago.)
And should I tire of this pillow cover, or change houses/decorating style/colors again, I now know how easy and fun it is to make another one!
Between the harsh winter and now the cool summer, flower gardening has been a bit challenging this year. Some of my perennials didn't survive the winters, others came up but never bloomed, and those that made it to the flowering stage bloomed later than usual.
Fortunately, a recent spell of warm weather and some decent rains have helped matters, and today I happily picked some flowers to make bouquets for the house. I could have cut even more, but we have small rooms, so a few flowers go a long way.
Here's the lineup of what I brought in:
My grouping may not look like much, but it made me happy! I picked zinnias, blanket flowers (Gaillardia 'Tokajer"), Sweet Coneflower (Rudbeckia 'Henry Eilers'), perennial sunflowers and some unknown daisy-type flowers. Two of the vases came from thrift stores, one came from a craft show, two were gifts, and one had been my grandmother's.
A couple of close-ups:
I love this little vase, which was a thrift store find a few years ago. All three perennials in it bloomed a good three-four weeks later than they have previous years, but hey, better late than never!
I bought the above vase at a local craft show several years ago, in part because I liked the flower frog the potter had affixed to the center. Add a bit of water, a few stones, stick your flowers into the frog, and voila - an artful arrangement with very little effort.
Too bad gardening hasn't been effortless this year, but as I'd said, better late than never, and I am thankful for the flowers that have hung in there!
Hello! My mint patch is small in size but is prolific enough to provide me with leaves for various recipes.
My husband likes putting flavored syrups in his coffee, so some of the mint goes toward that usage. In the past I'd used a mint syrup recipe that was a bit laborious to make. First the fresh mint had to be cooked in water, then slowly strained. The resulting liquid was measured so that a certain proportion of sugar could be cooked with it. The end result was pleasant to the taste, but a nuisance to prepare.
Earlier this summer our local paper printed a recipe called "Mint Simple Syrup", credited to Brandpoint. It sounded so much easier than the recipe I'd been using that I could call this new version "Simple Mint Syrup".
Since my mint was in need of a trim, I decided to try the recipe today. The amount of mint called for is listed somewhat vaguely as "1 large bunch". Wasn't sure how much mint that really was, so I snipped what I thought was a decent amount. I might have actually cut a little more than what I needed since I was making a half recipe. But I'd rather have too much than too little.
Above, washed mint ready to use. A short while later, I had this:
The above bottle represents half of what the scaled-down recipe yielded, so I got a nice amount of mint simple syrup for very little effort.
How little effort? Well, here's the recipe:
Mint Simple Syrup (from Brandpoint)
2 cups sugar
6 cups water
1 large bunch mint, roughly chopped
Combine the sugar and water in a medium-sized saucepan. Stir to moisten the sugar. Add in the mint leaves.
Bring to a boil and boil for 10 minutes. Turn off the heat and let the syrup sit until it is cool. Strain the syrup to remove the mint.
Store in the refrigerator until ready to use.
Notes: as mentioned above, I made a half recipe. Somehow I didn't notice the "roughly chopped" notation for the mint, so after washing my mint very thoroughly, I tossed it into the saucepan, stems and all. (in my defense, my recipe copy, clipped from the newspaper, has "roughly chopped" on a separate line.)
Chopped mint leaves release more flavor than whole mint leaves would, but my simple syrup was still nicely minty - and of course even simpler since I had bypassed that time-consuming step.
"perfect with lemonade or mojitos" the folks at Brandpoint proclaimed. I'm sure that's true, but I think Mint Simple Syrup would also be great added to iced tea - or a chocolate milk shake!
Several years ago I purchased something called a "prosperity hen garland" at a local thrift store. The hens were made from pieces of colorful fabrics typical of northern India, where such garlands are made. It likely had originally come from a fair trade store.
I didn't think that hanging the garland up would automatically bring us prosperity. I purchased it because I liked the lively variety of fabrics used and it was a very reasonable price as well. Once home, I hung it where it would enliven our front porch.
Over time those cheery fabrics have faded, to the point that the garland now looked like this:
Believe me, they look much more muted than they had when I first hung them up. Now, there was no Front Porch Police around, telling me that I had to remove them or face a penalty, but I didn't like how washed out they looked. So I decided to make another garland.
I already had several decorative items on the porch with a good deal of blue on them (other handmade fabric hangings and pots) so decided to make a bevy of blue birds for my new garland. I showed off the fabrics I was going to use a few posts back.
Finished the garland this morning and here's how it looks:
A couple of close-ups so you can see the variety of fabrics I used:
I recycled the bell that had hung from the bottom of the prosperity hen garland and tied it to the bottom of my blue bird garland. I strung the birds (16 in all) onto gold cord, using a variety of blue glass beads in between each bird. (there are also beads between each prosperity hen, but since those beads are flatter, they aren't visible).
Each bird is about 3 1/2" high and 4" long. The total length of the garland is about 40". I enlarged a pattern from a vintage magazine to make the birds. I added gold bead eyes after stitching them up.
I have to admit, this project took awhile. First, I went through my blue fabrics (I have a lot) to pick out a variety to use. The fabrics were sourced from thrift stores, estate sales, garage sales, and people decluttering their fabric stash. That was the fun part.
More tedious were the tasks that followed: the cutting, sewing, turning and stuffing of those 16 smallish birds. I paced myself, doing a little each day for several days until the project was completed.
I'm happy with the way it turned out, though, and I know it'll be several more years until these fabrics fade on me as well. Until then, I'll enjoy my bevy of blue birds!
Hello! My husband and I bought our first house, which was in Stevens Point, WI, back in 1988. We were fortunate in that a local historian had already compiled a book about older houses in the area, with our house included. Thus, we already knew the date of the house - 1871 - and the names of the families who had lived in it.
Subsequent moves resulted in us becoming owners of three more older houses. Never did learn when houses #2 and #3 had been built and who had lived in them. Guess we'd been spoiled by the work done by that historian in Wisconsin.
Our current house is in a local historic district, complete with its own neighborhood association. Several years ago, the association began a house plaque program, giving homeowners a chance to order signage that shows off the date their homes were constructed.
Finally got around to ordering our own plaque. First, of course, I had to find out when our house had been built. We had thought it was around 1906, but I wanted to be sure. Had to visit three institutions around town that keep local historical records before I got my answer. It was in the archives of the local museum that I learned that our house actually dates to 1895.
At the same time, I learned the name of the first owner, and found three listings in the phone book with the same surname. I'll contact these folks to see if they are any relation. I'm hoping that if they are, they may have some older photos of the house that we could make copies of. The oldest photo of our house the museum archives has dated from the mid 1970's.
Still, it was nice to learn the date of our house's "birth", especially since it's older than what we had thought. Now we have this nice plaque, which arrived about a week ago:
One thing about an older home - it's not unusual to find now-vintage belongings left behind by previous owners. Sometimes it's items clearly deemed too cumbersome to move, like old porcelain sinks, old ladders, and old furniture.
Sometimes there's smaller things that didn't make the move - nothing valuable, but still fun when discovered in a basement or garage. For instance, this:
Vintage wooden crate - not sure of it age, but given that it has a four-digit phone number, it may date from around the 1920's-1930's. Ironically, although the crate came from Manitowoc, WI, this crate was found in the basement of our current house. I use it to store reading material and craft supplies.
Found near the crate was the above, a serving spoon labeled "Tudor Plate Oneida Community Made" on the back.
Close up of the pattern:
From doing a bit of online research, I learned that this pattern is called "Queen Bess" and dates from 1924. I'd say that the spoon is in very good shape considering it's 90 years old and had been languishing in the basement for who knows how long. It cleaned up nicely and now lives in our kitchen. I do use it from time to time for its intended purpose of dishing out food.
Not exactly left behind, but instead covered up:
Our kitchen had sustained some water damage in March, and this wallpaper was discovered when the restoration crew removed the soggy wallpaper that had been placed over it. Although the newer wallpaper design is nice enough, I like this older pattern better. I saved a scrap of it that had come off the wall, and hope there's more to be saved when the remodeling crew comes next month to repair the damaged kitchen.
And so it goes with an older house - history lurks at every corner!