Friday, July 27, 2012

Lake County, IN - A "Trashion Show"

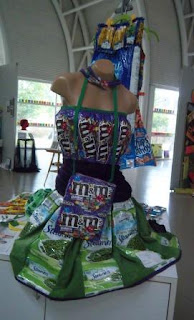
Hello! On our way to a party in northwestern Indiana last Saturday, we stopped to use the restroom facilities at the Indiana Welcome Center in Hammond, IN. To my surprise and delight, there was a  "trashion" show the day we stopped in, housed in the welcome center's exhibit space. Yes, that was actually the name of the show, which you can read about here.

I really enjoy seeing upcycling in action, so I could have spent a good amount of time looking at the exhibit, but there was that matter of the party to attend. So, I had to content myself with a few quick photos:

Dresses made from book pages.

Dress made from bark.

 
Dress made from food packaging.

A vintage tablecloth was used for the skirt section of this dress. Great idea!

The squares of this quilt were made from old t-shirts.

Since I had so little time to look through the exhibit, I didn't get a chance to study this dresser closely, but it's plain to see that it has been invigorated by a paint job and a healthy sprinkle of buttons! I would have loved to have see a "before" photo - I'm sure the dresser was very drab before the artist transformed it into a one-of-a-kind piece. 

There were more works on display, but alas, I just didn't have the time to look everything over. But I was grateful to see what I had - it happened to be the very last day of the exhibit. 

Hats off to all the artists, and thanks as well to the Indiana Welcome Center for hosting the exhibit. 
 

Tuesday, July 24, 2012

Douglas, MI - Miniature Circus And More

Hello! Read in our paper recently that a museum in the nearby village of Douglas was hosting a layout of a miniature circus, so I went there last week to check it out. 

Think of your typical model railroad layout; this was similar in scale and layout size. Indeed, the woman on hand at the display told me that the circus layout had been created by her father and was a replica of the Al G. Barnes circus of the 1930's. She added that her father had been an avid member of a miniature circus hobbyist group. I'd long been aware of such groups for model railroads, but had had no idea that there were people into scale model circuses.  Well, they say you learn something new every day, and that I did.

As with a model train layout, certain "vehicles" moved around the perimeter of various stationary objects. In this case, a parade of circus wagons and animals moved around a collection of circus tents plus more wagons, animals and people. I'll show a few photos of what I mean:

High-wire acts under the Big Top. 

 Elephants on parade, passing by one of the circus tents.

Circus wagon.

Circus tents - they were made of muslin, I was told.

Circus customers streaming into the sideshow tent.


I had taken many more pictures, since I love this sort of thing, but figured the village of Douglas deserved some photos on this blog as well:


Above, the museum that hosted the miniature circus display. The building was originally a schoolhouse.


This library is across the street from the museum. There was a 1/2 off sale of used books advertised, so you'd better believe I headed over there! For $1.50, I got a craft book full of cute projects and a relaxation music CD.

Sculpture in front of an art gallery.

Once a house, now houses businesses.


Window boxes along the outside of a restaurant.
 

Colorful animal sculptures outside another art gallery. Downtown Douglas is quite small but is big on charm! 


Alas, the circus display has been taken down, but I will have to return to Douglas soon to take more pictures - as I'd said, it's a very charming place.


Saturday, July 14, 2012

Red, White And Blue Decor

Hello! The 4th of July has come and gone, but I still have my red, white and blue decor up. I like the summery feel of these colors, so I decorate with red, white and blue from June through August. I have a mix of secondhand finds and a few things I've made. 

I found this Silvestri piece for two bucks at a thrift store; I believe it originally would have sold for around twenty dollars. 

These crocheted potholders were priced at a ridiculously low 25c apiece at a thrift store and were in perfect condition. Not only did they make me smile, but the colors are perfect for my summer decor!

I altered a vintage bingo card.


I found a set of red, white and blue quilt squares at an out-of-the-way flea market in Indiana several years ago. I cut them up to make the hanging ornaments you see above.


I do seasonal decorations for my reproduction feather tree, so here is the summer look. 


I found the small vintage dolls at a garage sale in Indiana several years ago; paid a quarter apiece.


I paid $3.00 for this French sailor doll at a thrift store last year. He had a handwritten price tag considerably more than that, which led me to believe that he had been made for a craft show. Very well made! 


I paid a quarter each for the embroidered dishcloth and for the 1960's kit that yielded the little doll that I made; it's standing next to the French sailor doll. 


Vintage bridge tally card, 10c at a rummage sale, and embroidered teal guest towel, $2.00 at an antique store in Calumet, MI. (it didn't have the water stain on it when I purchased it).


Vintage wooden plaque, 50c at a garage sale.


A craft project I made a couple of summers ago, using wooden blocks, a variety of papers (some vintage, some not), lace trims, vintage pipe cleaners, hearts cut out from fabric scraps and small paper flags.


A page from A. E. Staley's Childrens' Party Book, dated 1935. Purchased for 50c at a garage sale in Montoursville, PA a few years ago. 

A windsock I'd crafted several years ago, using directions from a womens' magazine. I happened to have everything on hand at the time to make the windsock, including the fabric flag panel. 


I found this Uncle Sam wall-hanger decoration for $3.00 at a thrift store last year. 


And finally, the latest addition to my red, white and blue decor - I made this ornament earlier in the day, adapted from the 1974 Family Circle Christmas Helps magazine, which I purchased for a quarter at a thrift store last year. The two red, white and blue fabric sections were from my mom's fabric stash; in fact, I think the plaid fabric dates from the 1970's too. Not sure, but my mom might have used it to make herself a pantsuit.

I sewed vintage snaps on for eyes and glued a piece from an old earring on top. (The original directions had button eyes and embroidery floss loops for hair.) 


Although it's sad that my mother is no longer around, I'd like to think that she's happy that I'm using her fabrics.


Wednesday, July 11, 2012

Made It - From Plain Jane To Patchwork

Hello! Last fall I scored a boxful of fabric pieces for quilting, described HERESince then, I've used some of the pieces here and there, mostly for a few yo-yo's. But after seeing new quilting fabrics used to make decorative edgings for pillowcases, I decided to try a simplified version using my fabric find. 

Found a pair of white pillowcases at a thrift store for 50c/pair; I was told they had been donated by a local hotel. They were very plain Jane, as you can see:

But with a little patchwork, plain Jane became pretty cute:


I used greens and pinks to match my comforter. Needless to say, this was very easy to do, and I had the fun of going through those fabric pieces again to pick out the ones I wanted to use. 
  
I could dress this up further by adding rickrack trim, buttons, etc (these pillowcases are meant to be decorative; the pillowcases that came with our sheet sets are the ones used for sleeping on.)I'll see if I feel like doing anything more, but for now I'm pleased with how this project turned out!

Saturday, July 7, 2012

Get Carded - Birthday "Fun"

Hello! Our daughter turned 17 today, so of course that meant another card was made this week:

This goofy-looking card is the kind I'd probably always make, except that not everyone may like this style. Not sure if our daughter does, actually, but she's used to me foisting these kinds of cards on her. 

As I told her, everything used to craft the card is older than her except for the white card stock base, the "happy birthday" rubber stamp and the black StazOn ink. 

The vintage elements include:

Image of a woman cut out of the magazine dated from 1952. The woman is so excited because Dreft dishwashing liquid had gotten her dishes so clean (she was holding a shiny-looking pot in the ad).   

The large and small "fun" words were cut from a 1959 phonics flashcard. 

The smaller sayings with the word "fun" in them were all cut from the same 1973 catalog.

The number 17 was cut from a vintage bingo card; year unknown but the illustration on the box makes me think it's from the 1950's. 

I had a lot of fun making this card! It took a bit of time to hunt for just the right image of a person having fun, but what I found fit the bill very nicely. 

If you make your own greeting cards, I hope you have fun doing so as well!

Thursday, July 5, 2012

Get Carded - Birthday Cards

Hello! My family is so large, we get together and celebrate a bunch of birthdays by the seasons; hence yesterday there was recognition of the late spring/summer birthdays. A few of my handmade greeting cards follow:

A niece turns two early next month. Her greeting card is made of white card stock, art paper pieces, a vintage children's playing card and a rubber-stamped "happy birthday" greeting in azure StazOn ink. This young miss has recently joined the family via international adoption, so this was the first card I've made for her. Meeting her was a very exciting event!

My oldest niece is more than 20 years older than this new niece, so of course her birthday card is more sophisticated in appearance:

White card stock, off-white art paper, gift shape of hand-decorated paper (made by a friend, and the gift shape was cut from a scrapbook template purchased at a thrift store), "wish" and "Happy Birthday" stamped onto card stock scraps with black StazOn ink, red marker outline, ribbon piece. 

One family member actually had his birthday yesterday - my dad turned 90 then. Here's his card:

White card stock, stars cut from hand-decorated papers (given to me by a friend, and the star shapes were cut from scrapbook templates purchased at a thrift store),  "star" cut from a vintage phonics flashcard, and "90" photocopied from a vintage multiplication flashcard (I prefer to use the originals, but the numbers were too big in scale to be used on the card). 

Green predominated because that's my dad's favorite color, but this card would also be great in red, white and blue. I love the funky star shapes! This card was the easiest to put together of the three, and I think it turned out the best.
 

Tuesday, July 3, 2012

Thrifty Acres - Thrift Where You Can!

Hello! I admit it, I'll thrift wherever I can, even when I'm traveling. Just think of it as a more interesting form of the souvenir shop! 

Made a whirlwind trip this past Friday and Saturday to pick up our daughter from a summer science camp in west-central Indiana(where she and her partners won "Best Teamwork" for their research project efforts, I'm proud to say). I had my eyes peeled the whole time for thrifting opportunities, but my husband and daughter tended to be uncooperative of such endeavors. And admittedly, we didn't have a lot of time either. 

 We spent Friday night in the Indianapolis area, very close to a Salvation Army thrift store and a Goodwill outlet store. I've never been to the latter type of store, so it would have been fun to check it out, but I didn't get up in time Saturday morning to do so.

We drove north toward home, stopping for lunch at a Burger King in Rochester, IN. And what was adjacent to the BK? A Goodwill thrift store - not only that, but the big sign outside advertised that it was a 50% off day. I've heard of Goodwills having such sales, but the ones in our area don't. They just recently added 50% off tag color day for Mondays, but that's it for their sales. 

Well, I wasn't going to let this opportunity pass by. Fortunately our daughter eats slower than I do, so I had a few minutes to head over to the Goodwill. 

I'm glad I did, for I found this kit:

I could tell by the packaging - for one thing, it hailed from the UK - that this was from a small company, not some mass-produced number. With the half-off sale, it was a grand total of 80c plus tax. The kit had never been opened, and the five pieces of wool blend would have certainly cost more than 80c alone if bought at a fabric or craft store. 

I checked on the company, Paper And Strings, and found it listed on Etsy. As it's in the UK, the prices for the kits and shipping were given in pounds, with USD equivalents included. I learned that the kit sells for around $16.11 USD, with shipping coming out to $6.75 USD. Thus, I paid 80c for something that would have cost me almost $23.00 on Etsy.

I can tell that these will be fun and easy to make, and I can use them as gifts or little decorative pieces around the house. And with the enclosed pattern, I can always more if I want with my own materials. 


So you see, it's worth it to be on the hunt for thrifting opportunities whenever one goes!


Monday, July 2, 2012

Made It: Late Father's Day Gifts

Hello! Our daughter was away at camp during Father's Day, so after her return home this past weekend I gave my husband some gifts I had made for the occasion. 

I'll start with the card:

I always try to make a wacky card for him. The cow theme began with the "holy cow" phrase from a Harry Caray restaurant matchbook. Harry Caray, now deceased, was the beloved Chicago Cubs TV broadcaster for several years and "Holy Cow" was a popular saying of his. Once I had that saying in mind, the cow theme fell into place with the additions of the Flex-O Mastitis Detector card and the reproduction vintage cow images. A piece of art paper, a vintage button and some stamped words completed the card. Inside I wrote that I hoped that Father's Day was a "moo-ving" experience. Corny, I know. 

 A friend had made "notebook paper" fabric and gave me a "sheet", which I happily accepted. I'd seen such fabrics being used to embroider short messages but as my husband teaches chemical engineering, I went a different route:

I copied an equation from an old exam of his; have no idea what it's about. As you can see, the project is self-framing with an emobroidery hoop I'd found at a thrift store. 

A thrift store trip inspired the last gift; I saw an old softball on a shelf and for 50c it was mine. My husband had gotten me a garden piece for Mother's Day - a hummingbird figure on a stake to add a decorative element to one's plantings. So, I reasoned, why not do the same with a softball? 

I looked on the Internet for some ideas but to my surprise, I didn't see much in the way of repurposed softballs, and nothing involving garden usage. Thus, you may be seeing an original concept here (or at least one that's not too common). 

My husband has what I consider to be a rather unfortunate affliction - he's a diehard Chicago Cubs fan. Hence, anything Cubs-related is a sure bet with him. Among some memorabilia that had belonged to his late dad was a 1944 Chicago Cubs game program - perfect! His dad had been in the Navy then, serving during WWII, but perhaps an older relative had attended the game and sent the program to him as a reminder of home. 

I made copies of the program's pages, reducing them to fit, then cut out images and sayings to decoupage onto the softball. I added a few buttons and beads to embellish the ball a bit and coated it with sealant to make it waterproof. I'd made a hole in what became the bottom of the softball, and a garden stake fit in perfectly. 

Here's the softball garden stake in its new home:

Followed by some close-up images:


I think it looks pretty cool but then again, I'm used to seeing all manner of repurposed items displayed on blogs and in magazines like Flea Market Gardens. I'm not sure what my husband thought of this item; he said it was "strange" because he wasn't expecting to see a softball transformed into a garden piece like that. 

Oh well, expect the unexpected with me!